Chic Strawberry French Tips for a Fresh Look
Imagine this: you’ve finally carved out some time for yourself after a whirlwind week of endless responsibilities. You settle in with your favorite playlist playing softly in the background and get ready for a little self-care. Maybe you grab your favorite cup of tea or a glass of chilled rosé. You pull out your nail polish and get excited for a fresh look. Now, instead of the usual neutral tones that tend to dominate, you’re reaching for a vibrant and delicate design — chic strawberry French tips. Sounds dreamy, right?
Here’s the truth: nail art can be both an expression of your personality and a form of self-care. It’s your moment to play, have a little fun, and add a pop of color to your routine without losing that classic French manicure vibe. Whether you’re someone who loves to visit the salon or you’re more of a DIY enthusiast, I’m here to guide you through the world of chic strawberry French tips.
What Are Strawberry French Tips?
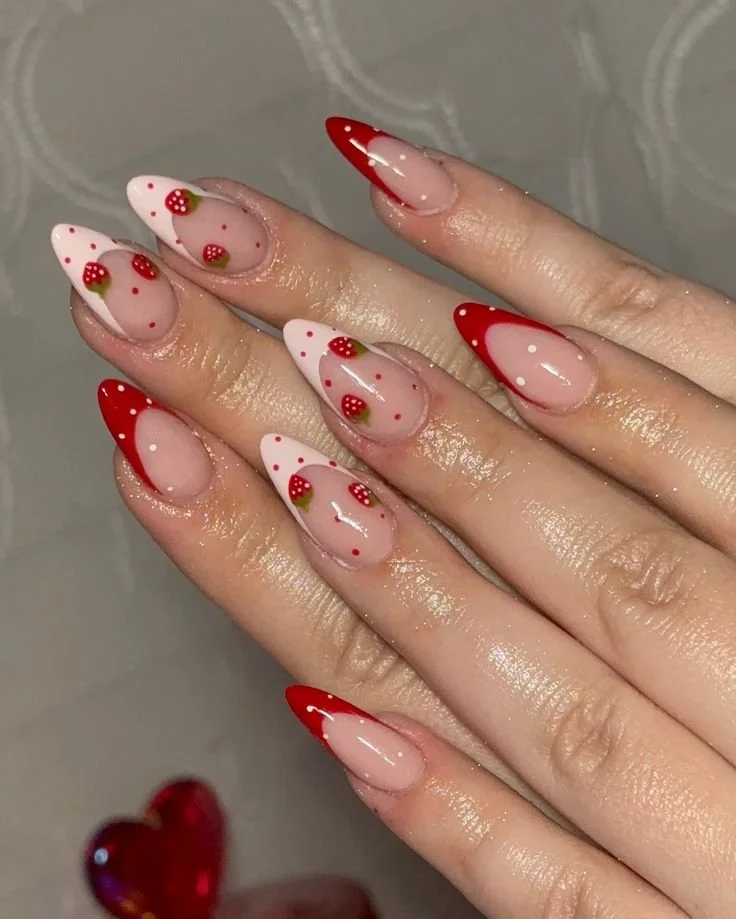
So, you might be wondering what exactly strawberry French tips are. Picture the classic French manicure — white tips over a natural pink base — but with a fruity twist. Instead of the traditional white, your tips are painted in luscious shades of strawberry pink or even bold red hues. This fun twist is perfect for spring and summer, but honestly, it can brighten up any season.
You’re not alone if you’re ready to ditch the plain and embrace something more vibrant. Nail art has exploded in popularity; chic strawberry French tips are a way to effortlessly step up your nail game. They’re playful yet classy, making them perfect for any occasion, from casual outings to more formal events.
Tools You’ll Need
Before you dive in, let’s gather our supplies. Here’s a quick rundown of what you’ll need to achieve those gorgeous strawberry tips:
- Base coat: Protects your nails from staining and helps polish adhere better.
- Nail polish: The star of the show! Choose a soft pink or nude for the base, with shades of strawberry pink or bright red for the tips.
- Nail art brush or tape: For precision and clean lines, you can use a fine nail art brush or striping tape.
- Top coat: Seals your design and adds that beautiful glossy finish.
- Nail file and buffer: To shape your nails and ensure they’re smooth.
Gather these, and you’re ready to embark on a nail journey.
Step-by-Step Guide to Achieving Chic Strawberry French Tips
Let’s break this down into a simple, step-by-step process so you can easily follow along. Don’t worry if you hit a snag; we’ve all been there, and practice makes perfect!
Step 1: Prep Your Nails
First things first, prep your nails. Here’s how:
- Remove any old polish: Using a gentle nail polish remover, clean off any existing remnants.
- Shape your nails: Use a nail file to shape them to your liking — square, almond, or round, it’s your choice.
- Buff your nails: A quick buff smooths out any ridges and gives your nails that polished look.
- Apply base coat: This is crucial. It protects your nails and allows your beautiful polish to adhere better.
Step 2: Apply the Base Color
Now, onto the fun part!
- Choose a soft pink or nude polish and apply a thin layer to your entire nail.
- Allow it a few minutes to dry. You want it to be just right when you add the tips. If you’re in a hurry, a quick-dry top coat can help.
Step 3: Creating the Strawberry Tips
Here’s where your creativity comes into play.
- If you’re using striping tape, place it at an angle where you want your tips to start. For freehand, you just dive in with the brush.
- Take your chosen strawberry pink or red polish and lightly brush it onto the tips. Aim for a diagonal line for a modern twist.
- For a clean look, use the nail art brush to refine the edges. A steady hand goes a long way here!
- If needed, add a second coat for a rich, vibrant color.
Step 4: Seal the Deal
- Once everything is dry, apply a top coat to seal your design. This step not only adds shine but will help your manicure last longer.
- Optional: If you want to take your strawberry theme a step further, consider adding tiny gold or white dots as “seeds” on your tips. It’s a cute detail that makes a big difference.
Step 5: Clean Up
You might have some polish on your skin or around your nails — no worries!
- Dip a small brush in nail polish remover and carefully clean around your nails for a polished finish.
- Don’t forget to moisturize your hands afterwards. It ties everything together nicely!
Quick Beauty Tips for Perfect Nails
- Choose the right colors: Look for rich, creamy formulations that apply smoothly. High-quality polishes often boast better color payoff and longevity.
- Maintain your nails: Regular trimming and moisturizing keep your nails healthy and can prevent breakage.
Common Mistakes to Avoid
We’ve all made mistakes when tackling nail art. Here are some common pitfalls and how to sidestep them:
- Skipping the base coat: It’s tempting to just dive right in, but always use a base coat to protect your nails.
- Not letting layers dry: Rush the process, and you’ll end up with smudged nails. Patience pays off!
- Overloading the brush: Less is more when it comes to application.
Bonus Self-Care Ideas
Incorporating nail art into your routine is a little act of self-love, but why stop there? Here are some bonus ideas to enhance your self-care routine:
- Mindfulness while painting: Turn off the distractions and focus solely on your nail art process. It can be surprisingly therapeutic!
- Try a relaxing foot soak: While your nails dry, indulge in a warm foot soak with calming essential oils.
- Create a cozy atmosphere: Light some candles, put on your favorite show, or even treat yourself to a glass of something bubbly to make it special.
FAQs About Strawberry French Tips
Can I do this at home, or should I go to a salon?
You can definitely achieve chic strawberry French tips at home. It’s a fun practice, and with some patience, you’ll master it!
How long do strawberry French tips last?
With a good base and top coat, expect your manicure to last about a week or two, depending on your activities.
What’s the best way to remove the polish?
Use a gentle nail polish remover to avoid damaging your nails. Soak a cotton ball in remover and press onto your nail for a few seconds before wiping it off.
Conclusion
Now that you’ve had a chance to explore chic strawberry French tips, it’s clear how these vibrant designs can lift your spirits and enhance your look. Nail art doesn’t just express creativity; it also reflects the beauty of taking a moment for yourself in this busy world.
So, the next time you find yourself with some free time, remember that treating yourself can be as simple as a fresh coat of polish — and a dash of strawberry flair. Whether you go bold or sweet, you’ll feel empowered as you show off your new look. Let’s be honest, nothing completes an outfit quite like freshly painted nails, right?
So, why not give those chic strawberry French tips a chance? You might just fall in love with your nails all over again.