Imagine this: you’re getting ready for a special event, and everything from your outfit to your shoes is lined up perfectly. But as you sit down to do your nails, you realize you need something elegant yet minimalist that won’t take forever to achieve. Sound familiar? It’s the age-old struggle of wanting to look fabulous without the hassle, especially when you have a busy schedule.
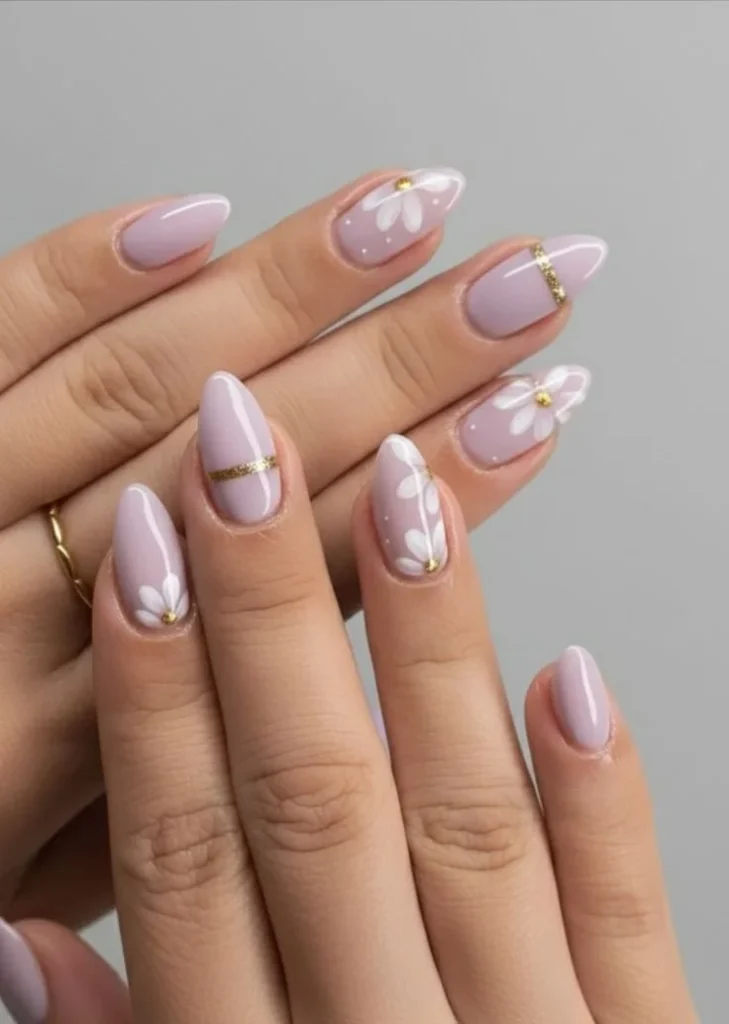
Enter the soft lavender nail art with delicate white floral patterns and subtle gold accents. This design isn’t just pretty—it’s a perfect balance of elegance and simplicity that makes it suitable for weddings, festive occasions, or even a casual day out. Let me guide you through the beauty of this design, how to achieve it, and why it could be your next go-to manicure.
The Allure of Lavender Nail Art
Lavender isn’t just a color; it’s an experience. The soft hue has a calming effect and exudes a sense of tranquility. When paired with elegant white floral designs, it transforms into something dreamy and romantic. You might be wondering if this design is right for you—trust me, it adds a touch of sophistication to every outfit.
Floral patterns have a timeless charm, right? Whether you opt for an intricate design or a minimalist touch, they always seem to elevate the look. With lavender as the base, the delicate whites contrast beautifully, while the subtle gold accents offer that little hint of glam without being overpowering.
DIY Lavender Nail Art at Home
Creating this soft lavender nail art doesn’t have to be complicated. Here’s a step-by-step guide to help you achieve this look right in the comfort of your home.
What You’ll Need
- Soft lavender nail polish
- White nail polish or nail art pen
- Gold nail art striper or gold nail polish
- Top coat
- Base coat
- Nail file and buffer
- Nail clippers
- Optional: floral nail stencils for easier application
Step-by-Step Application
Prep Your Nails: Start with clean nails. Trim and file them to your desired shape. Don’t forget to buff the surface gently; this helps the polish adhere better.
Apply Base Coat: A base coat serves as a protective layer for your nails and enhances polish longevity. Wait for it to dry completely.
Paint Lavender Base: Apply two coats of soft lavender nail polish for an even finish. Make sure each coat dries before applying the next.
Create Floral Patterns: Using white polish or a nail art pen, draw delicate floral patterns on a few accent nails. If you’re feeling adventurous, try small flowers or swirls. If you find it difficult to draw freehand, floral nail stencils can be a lifesaver.
Add Gold Accents: This step makes all the difference. Using a gold nail art striper or gold polish, create subtle accents around the flowers or along the tips of your nails. This adds a layer of depth and elegance.
Seal It In: After everything has dried, apply a top coat. This protects your design and gives it a lovely shine.
Clean Up: You can dip a small brush in nail polish remover to clean up any mistakes around your cuticles.
Enjoy Your Beautiful Nails: Now, take a moment and admire your work. You’ve just created a stunning manicure!
Common Mistakes to Avoid
Even seasoned nail artists can make mistakes. Let’s cover a few common pitfalls to help you achieve flawless lavender nail art.
Skipping the Base Coat: This is a must for enhancing polish durability. If you skip it, your color may chip faster and look dull.
Not Waiting for Each Coat to Dry: It’s tempting to rush through the process, but patience is crucial. Waiting helps prevent smudges and ensures a smooth finish.
Overloading on Nail Polish: It’s easy to apply too much polish on the brush. A thin application is better—this prevents clumping and allows for even drying.
Neglecting Nail Health: If your nails frequently chip, it might be time to reassess your nail care routine. Try incorporating more hydration and nutrients.
Quick Beauty Tips
Hydrate Your Hands: Use a nourishing hand cream or cuticle oil to keep your hands and nails in tip-top shape.
Choose Quality Products: Invest in a good polish and tools. It might cost more upfront, but the results will speak for themselves.
Be Creative: Experiment with different floral designs. Not every nail needs to match—mix and match for a fun look!
Keep It Simple: If you’re short on time, embrace minimalism. A couple of flowers on accent nails with a lavender base can still wow.
Ideal Occasions for Your Lavender Nail Art
Here’s the truth: this lavender floral design isn’t just for fancy events. It’s versatile enough to suit various occasions, including:
Weddings: Whether you’re a guest or the bride, this manicure adds a softness that complements any outfit.
Festive Gatherings: Think holidays or family reunions—this design adds a sense of celebration without being overly flashy.
Everyday Wear: Feeling fancy on a casual Tuesday? This minimalist look is perfect for adding a touch of joy to your daily routine.
Conclusion
There’s something incredibly empowering about taking the time for self-care. Engaging in nail art—like the elegant lavender manicure we’ve explored—can be a simple yet impactful way to boost your confidence and look your best. Remember, you deserve to prioritize these little moments of beauty and creativity in your life.
For more inspiration, take a look at Dreamy Lavender Spring Nails: My Unexpected Mani & Design Inspo! or check out the lovely options available at Lavender Floral Press-on Nails – Handmade Spring Chrome. If you’re in a hurry, consider adding imPRESS Design Press On Nails – Pastel Bloom to your beauty toolkit for quick, stylish nails without the fuss.
So, are you ready to paint the town lavender? I can’t wait to see your stunning creations!