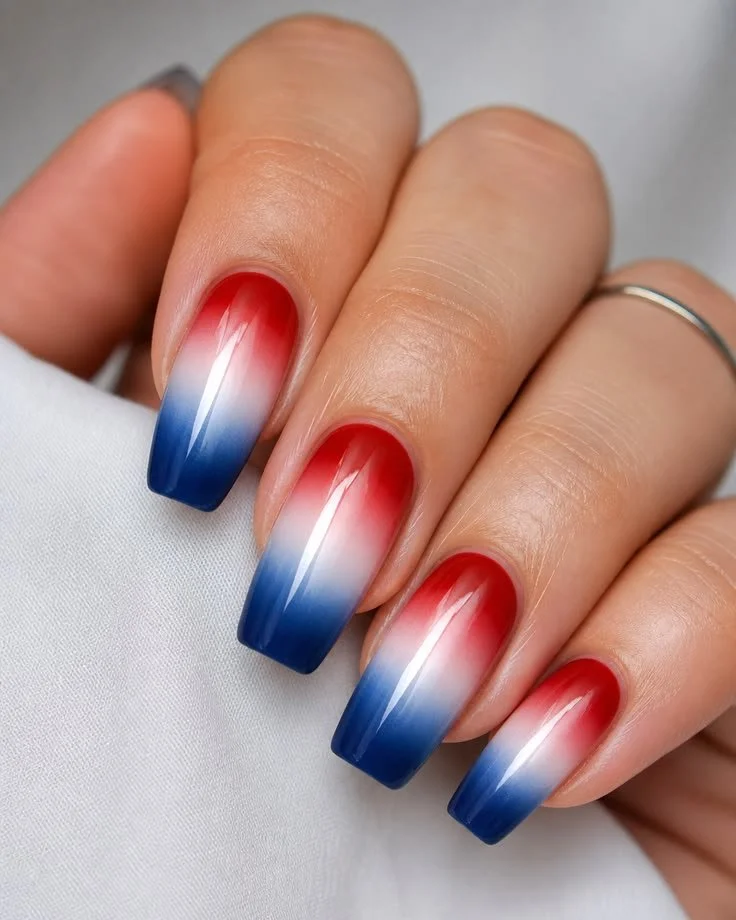

Imagine it’s the Fourth of July, and the air is filled with sounds of laughter, sizzling BBQ, and the joyous clink of ice-cold drinks. You step outside, and as the sun sparkles overhead, your fingers shimmer with a stunning set of ombre gradient nails, transitioning seamlessly from vibrant red to pristine white and ending in deep navy blue. It’s like wearing the spirit of patriotism right on your fingertips! You may also find Best Fitness Apps For Women 2026 Free And Paid Compared useful.
Creating a look like this requires a bit of skill but with the right techniques and tools, you can absolutely master this eye-catching design. So, let’s dive into the techniques, tools, and tips you’ll need to achieve smooth patriotic ombre nails that will leave a lasting impression.
Gathering Your Tools
To get started, you’ll need a few essential supplies. Here’s a quick checklist:
- Nail polish: Red, white, and navy blue polishes are crucial. Opt for high-quality brands for vibrant colors and good coverage.
- Base coat: A good base will protect your nails and help the polish adhere better.
- Top coat: This will seal the design and give your nails a glossy finish.
- Makeup sponges: They’re perfect for creating the ombre effect.
- Nail tape: If you want to create clean lines or prevent your skin from getting polish on it, nail tape will be your best friend.
- Cotton swabs and remover: These will help clean up any mistakes.
By having these tools on hand, you’re already on the right track to beautiful nails! But you might still be wondering about the exact steps to take, right? Let’s break it down into manageable pieces.
Step-by-Step Guide to Ombre Nails
Step 1: Prep Your Nails
First things first: prep your nails. This means cleaning them thoroughly, pushing back your cuticles, and buffing the surface slightly. A well-prepped nail makes a huge difference in how the polish adheres and lasts. Plus, applying a base coat protects your natural nails from staining, especially with darker colors.
Step 2: Apply Base Coat
Once your nails are clean and dry, apply a base coat. This not only protects your nails but also provides a smooth surface for your colors. While this dries, you might consider planning your design. Think about how you want the ombre to flow.
Step 3: Choose Your Colors Wisely
Now, about those colors: the fun part! When you’re selecting your red, white, and navy blue polishes, consider their finishes too. Matte finishes can be beautiful but often require more work to achieve smoothness. A glossy finish is generally easier for beginners and lends itself well to the ombre technique.
Step 4: Create the Ombre Effect
Here’s where that makeup sponge comes into play. With your chosen colors, dab a bit of red, white, and navy blue on the sponge, making sure they slightly overlap. Then, gently dab the sponge on each nail, starting at the tip (red) and gradually moving down (to white and navy). This might take a couple of tries, but don’t worry!
If you’re not getting the desired effect, you can always add more layers. Just remember to let each coat dry before applying another. This is where patience is key; we’ve all been there, waiting for polish to dry, right?
Step 5: Clean Up & Seal
Once you’ve achieved the gradient effect, it’s time to clean up. Use a cotton swab dipped in nail polish remover to tidy up around your nails. This makes all the difference in making your nails look polished and professional.
Finally, seal your design with a good top coat. Not only does this enhance the shine and durability of your nails, but it also smooths out any imperfections in your ombre. Plus, who doesn’t love that glossy look?
Tips for Flawless Ombre Nails
Practice makes perfect: It might take a few tries to get a seamless blend. Don’t get discouraged; keep practicing!
Use tape for precision: If you’re not confident with your sponge technique, using tape along your cuticles can help get clean lines.
Experiment with different color combinations: While red, white, and blue scream patriotism, there are endless color possibilities. What about a soft pink to a vibrant purple? The options are limitless!
Mix your own shades: If you’re having trouble finding the perfect colors, consider mixing shades to create your unique palette.
Don’t forget the nail care: Keep your cuticles moisturized and your nails healthy. After all, healthy nails are beautiful nails.
If you’re looking for more beauty tips, especially around topic areas like skincare or fitness, there are resources that delve into different routines. For instance, you can explore the best budgeting apps that can help you invest in quality beauty products.
Common Mistakes to Avoid
Even the best nail artists sometimes make common mistakes. Here are a few to watch out for:
- Rushing the process: Nail polish takes time to dry, and if you skip this step, you might ruin your design.
- Using the wrong sponge: A dense makeup sponge might not work as well as a softer one. Experiment to find what works best for you.
- Not cleaning up correctly: A messy manicure can ruin the whole look, so make sure to clean around your nails properly.
If you find that managing your time for beauty routines feels overwhelming, consider looking into tips on reducing screen time to help carve out moments for self-care.
Maintaining Your Patriotic Look
To keep your ombre nails looking freshly done, you can:
- Redefine your look with nail art: Add some stars or stripes for a festive touch!
- Regular touch-ups: Apply a top coat every few days to maintain shine and durability.
- Embrace the chips: If your nails do chip, don’t fret! Embrace the imperfections or simply touch them up.
Sometimes we get so caught up in achieving that perfect look that we forget to enjoy the process. So, have fun with your nails and don’t stress if they don’t come out perfectly the first time.
Conclusion
With your beautiful ombre nails ready for Fourth of July festivities or any patriotic event, you’ll be turning heads and sparking conversations. To gather more inspiration for your next nail art, check out these creative ideas: 34 Fourth of July nails that are perfect for summer BBQs. If you’re looking to purchase supplies, you might want to check out options on Etsy for ombre nail kits tailored specifically for your needs. For even more tips on easy patriotic manicure styles, visit this Lemon8 post on French manicures that celebrate the spirit of the holiday. Happy painting!