
Dreamy Sky Blue and Milky White Almond Nails: A Step-by-Step DIY Guide
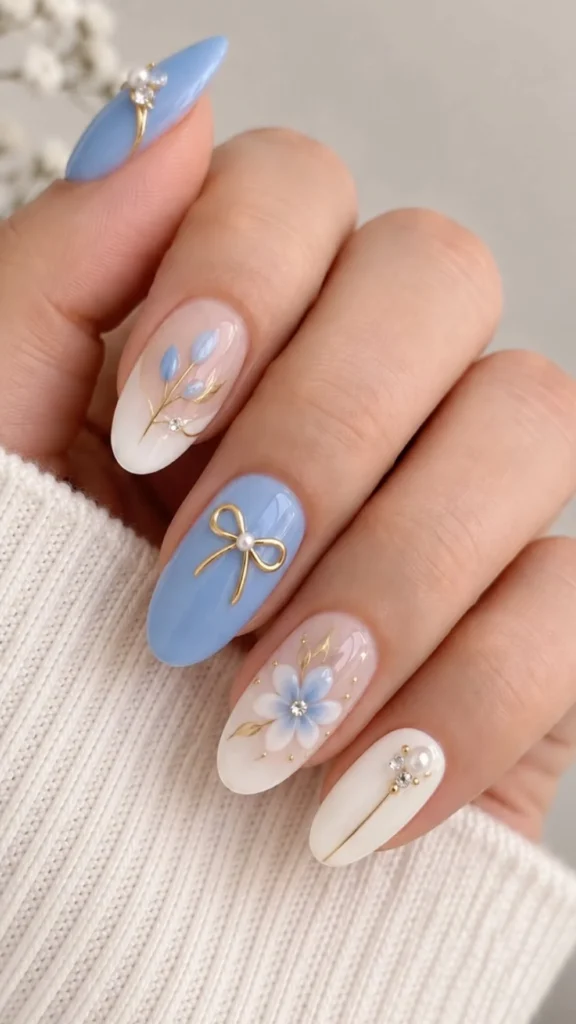
Are you ready to elevate your manicure game with a chic and dreamy design? In this guide, I’ll walk you through creating stunning almond nails featuring a soft sky blue and milky white palette adorned with delicate flowers, dainty gold bows, pearl accents, and subtle gold details. This elegant manicure is perfect not only for spring but also for weddings and other feminine occasions. Let’s dive right in!
Why You Will Love This Nail Design
- Elegant Aesthetic: The combination of colors and delicate designs creates a soft and elegant look perfect for any occasion.
- Easy to DIY: With the right tools and instructions, you can achieve salon-quality nails at home.
- Customizable: Feel free to switch up colors or add additional embellishments for a unique touch.
Ingredients
While this isn’t a cooking recipe, the “ingredients” in this context will be the materials needed for your nail art.
- Base Coat: A clear base coat to protect your nails.
- Sky Blue Nail Polish: Choose a pastel or soft sky blue shade.
- Milky White Nail Polish: A soft white polish that gives an elegant touch.
- Nail Art Brush: For painting flowers and details.
- Nail Gems or Pearls: To add accents.
- Gold Foil or Gold Nail Striper: For the dainty bow and subtle details.
- Top Coat: To seal the design.
Equipment
Make sure you have the following tools handy:
- Nail File: For shaping your nails into an almond shape.
- Cuticle Pusher: For tidying up cuticles.
- Nail Clippers: To trim your nails to the desired length.
- Dotting Tools: For creating flower details.
- Nail Art Palette: Useful for mixing colors on.
Step-by-Step Instructions
Preparation
Shape Your Nails: Use the nail file to shape your nails into an almond shape. Start by filing the edges of your nails toward the center. Be gentle to avoid breakage.
Push Back Cuticles: Carefully push back your cuticles using the cuticle pusher. This step ensures a clean nail bed for polish application.
Painting the Base
Apply Base Coat: Start with a clear base coat to protect your nails. Allow it to dry completely.
Apply Sky Blue Polish: Paint the majority of your nails with the sky blue polish. Allow to dry for about 5-10 minutes.
Add Milky White: On a couple of accent nails, paint a milky white base. This contrast will serve as a perfect backdrop for the floral design. Let it dry.
Creating Floral Designs
Prepare Your Nail Art Brush: Dip your nail art brush into the milky white polish.
Paint Flowers: On the milky white nails, use the brush to create delicate flower designs. Start with five-petal flowers by making a small dot for the center and painting petals around it. Aim for 2-3 flowers per nail.
Add Accents: Use the dotting tool to add dots around your flowers or create mini flower buds.
Details and Finishing Touches
Incorporate Gold Accents: With the gold striper or gold foil, create tiny bows near the base of some flowers or on accent nails. This adds a lovely, dainty touch.
Add Pearl Accents: Once the designs are dry, carefully place pearl accents on the center of flowers or on other areas of your nails for added dimension.
Seal with Top Coat: Once everything is dry, apply the top coat to seal the design and add shine. Make sure to cover all edges to prevent chipping.
Tips for Success
- Drying Time: Be patient! Allow each layer to dry fully—rushing can smudge your beautiful design.
- Practice: If you’re new to nail art, practice the flower design on a piece of paper first.
- Use Quality Products: Invest in quality nail polishes and tools for the best results.
Common Mistakes to Avoid
- Too Much Polish: Avoid overloading your brush with polish; this can lead to drips and uneven application.
- Skipping Base and Top Coats: Never skip these steps as they protect your nails and enhance the longevity of your design.
Variations and Customization Ideas
- Change Colors: Try pastel pinks, lavenders, or even metallic shades for a different look.
- Different Shapes: Experiment with different shapes like stiletto or square.
- Add Glitter: Introduce glitter polish either as an accent nail or in the floral designs for extra sparkle.
Storage and Shelf Life
While nail polish can be stored indefinitely, it’s best to keep it in a cool, dry place away from direct sunlight. Shake well before use to maintain even consistency.
Safety Tips
- Always do a patch test on your skin if you’re using any new nail products to check for allergies.
- Make sure to work in a well-ventilated area, especially if using nail polish removers or other strong odors.
Frequently Asked Questions
1. How do I make my nail polish last longer?
Ensure you apply a base coat and finish with a top coat. Avoid soaking your nails in water for too long.
2. What if my nail polish is too thick?
You can add a few drops of polish thinner to restore the optimal consistency.
3. Can I use regular paint for flowers?
It’s not recommended. Nail polishes are specifically formulated to adhere to nails and provide the right finish.
4. How can I remove nail art safely?
Use a good quality nail polish remover that contains acetone. Soak a cotton ball and gently press it against the nail for a few seconds before wiping away.
5. Can I do this design on short nails?
Absolutely! The design can be modified for shorter nails; just scale down the flower and detail sizes.
Conclusion
Creating dreamy sky blue and milky white almond nails adorned with delicate flowers, bows, and pearl accents is a rewarding DIY project. With a little patience and creativity, you can achieve an elegant look that’s perfect for spring or any special event. Remember to enjoy the process, and don’t hesitate to customize the design to suit your style. Happy nail art making!