
Experience the Refreshing Benefits of Banana Soap with Cold Process Method
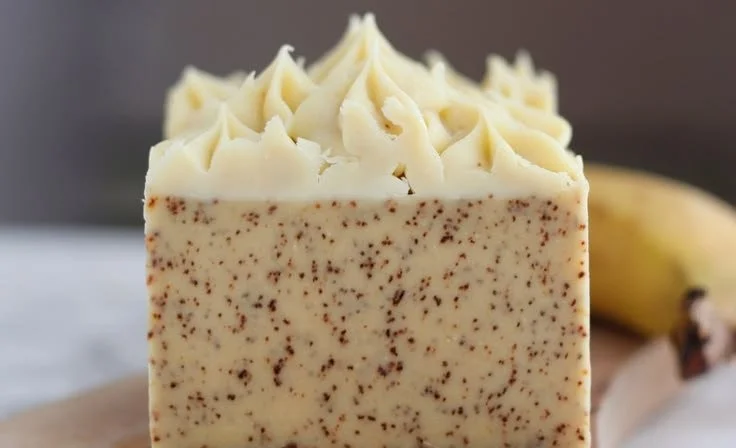
Imagine this: you’re ending a long day, treating yourself to a much-needed self-care ritual. You’re surrounded by the soothing aroma of essential oils, and the gentle lather of a luxurious soap that you’ve crafted with your own two hands. Sounds lovely, right? Now, picture the rich, creamy texture of banana soap made with heavy cream bursting with hydrating goodness. If you’ve ever wanted to dive into soap making, let’s explore how using the cold process method to create banana soap can elevate your beauty routine while indulging your senses.
You might be wondering: why banana soap? Besides its unique scent, bananas are packed with essential vitamins and minerals that deeply nourish your skin. They’re not just a delicious snack; when used in skin care, they can provide moisture, exfoliation, and help with acne, thanks to their natural astringent properties. So, let’s take a step back, roll up our sleeves, and embark on this exciting journey together.
A Simple Recipe for Banana Soap
To create creamy banana soap using the cold process method, we’ll need some specific ingredients and a bit of patience. Trust me, the result will be worth it. Here’s what you’ll need:
Ingredients
- 1 pound of olive oil (moisturizing and nourishing)
- 0.5 pounds of coconut oil (for bubbly lather)
- 0.5 pounds of palm oil (adds hardness)
- 1 pound of banana puree (use fresh bananas for maximum benefits)
- 0.5 pound of heavy cream (for richness and hydration)
- 3 ounces of lye (sodium hydroxide, be cautious handling this)
- 12 ounces of distilled water (to dissolve the lye)
- Essential oils (choose your favorites, like lavender for relaxation or lemon for freshness)
- Optional: natural colorants (like turmeric or spirulina for added visual appeal)
Equipment Needed
Before we dive into the process, let’s gather the necessary tools:
- A heat-resistant container
- A kitchen scale
- A thermometer
- An immersion blender (or stick blender)
- A soap mold (silicone molds work great)
- Safety goggles and gloves (safety first, always)
The Cold Process Method Step by Step
I know it can seem a bit daunting at first, but DIY soap making is truly a rewarding experience. Let’s walk through each step together.
Step 1: Prepare Your Work Area
Soap making can be messy, so start by organizing your workspace. Lay down newspaper or an old tablecloth—you’ll thank yourself later! Make sure to have all your ingredients and tools at hand.
Step 2: Safety First
Put on your gloves and goggles. Lye can be harmful, so it’s critical to prioritize safety while handling it. You might feel a little anxious, but with the right precautions, you’ll be just fine.
Step 3: Create the Lye Solution
Carefully measure out 12 ounces of distilled water into a heat-resistant container. Slowly add 3 ounces of lye to the water, stirring continuously. Remember, always add lye to water, never the other way around! This generates heat, so let it cool down until it reaches around 95°F to 105°F (35°C to 40°C).
Step 4: Measure the Oils
In another container, weigh out your olive oil, coconut oil, and palm oil. Combine them and gently heat them on the stove or in the microwave until fully melted. Once melted, let it cool to the same temperature range as your lye mixture.
Step 5: Combine Oils and Lye
When both your lye solution and oils have cooled, it’s time to mix them. Carefully pour the lye solution into the oils. Using your immersion blender, blend the mixture until it reaches "trace." This is when the consistency thickens and resembles pudding—a vital point in soap making!
Step 6: Add Banana Puree and Heavy Cream
Now comes the fun part! Gently fold in the fresh banana puree and heavy cream into your soap mixture. This is where the hydrating properties come to life.
Step 7: Add Essential Oils
Here’s the chance to customize your soap. Add your selected essential oils, stirring them in thoroughly for a refreshing scent that’ll turn your bath experience into a sensory delight.
Step 8: Pour into Molds
Once everything is well-blended, pour your soap mixture into the molds. You can tap them lightly to settle and remove any air bubbles.
Step 9: Insulate and Cure
Cover the molds with a towel to insulate them; this helps the saponification process. Leave them for 24 to 48 hours. After that, carefully remove the soap from the molds and cut them into bars.
Step 10: Cure the Soap
Let your soap bars cure in a cool, dry place for 4 to 6 weeks. This is a crucial step, allowing the lye to fully saponify and the bars to harden properly. You might be wondering why the wait is necessary—it’s all about achieving that perfect, luxurious texture.
The Benefits of Using Banana Soap in Your Skincare Routine
At this point, you’re probably wondering what makes banana soap so special. Here are some incredible benefits that can make this homemade soap a staple in your beauty routine:
- Natural Moisturizer: The combination of banana, heavy cream, and olive oil provides exceptional hydration. Say goodbye to dry skin.
- Exfoliation: The natural enzymes found in bananas can help gently exfoliate, improving skin texture.
- Youthful Glow: Bananas are packed with vitamins A, B, and E, promoting radiant, healthy-looking skin.
- Soothing Sensation: The creamy, rich lather feels luxurious and calming on the skin, perfect for those pampering sessions.
- Customizable Aroma: You can create your own unique scents with essential oils, making each bathing experience special.
Common Mistakes to Avoid
Even seasoned soap makers can face challenges. Here are some common pitfalls and how to avoid them:
- Skipping Safety Gear: Always wear gloves and goggles around lye. It’s your first line of defense.
- Incorrect Measurements: Precision is key when it comes to lye. Use a kitchen scale for the best results.
- Temperature Fluctuations: Ensure your lye and oils are at similar temperatures. Too hot or too cold can affect trace.
- Not Waiting Long Enough to Cure: Patience is a virtue. Always allow your soap to cure for at least four weeks.
Quick Beauty Tips for Using Your Banana Soap
- Pair It with a Scrub: For an extra pampering session, pair your banana soap with a gentle body scrub for smooth skin.
- Use as Part of Your Shaving Routine: The creamy lather can provide a smooth base for shaving.
- Store Properly: Keep your soap in a dry area, away from direct sunlight to prolong its lifespan.
Bonus Self-Care Ideas
Sometimes, self-care goes beyond just using amazing products. Here are some simple ideas to elevate your well-being:
- Create a Relaxing Bath Ritual: Light some candles, play soothing music, and enjoy a long soak using your banana soap.
- Incorporate Mindfulness: While washing up, take a moment to focus on the scents and textures, practicing mindfulness and relaxation.
- Hydrate: Follow your shower or bath with a nourishing body lotion or oil to lock in that moisture.
- Connect with Nature: Take a moment outside, whether it’s a short walk or simply enjoying your morning coffee, to reset and recharge.
Conclusion
Now, you’re all set to embrace the vibrant, nourishing benefits of banana soap made using the cold process method. You’ve not only created a beautiful, handcrafted product but also indulged in the comforting ritual of self-care. So next time you’re feeling overwhelmed or just in need of a little love, take this opportunity to rejuvenate both your skin and spirit. After all, you deserve it!
The road to self-care is not just about the products you use; it’s about embracing each day with love and intention. Feel free to experiment with your soap-making journey, share your experiences, and always remember: you are beautiful, and your skin deserves the best. Happy soap making!