
Discover the Joy of Making Cherry Blossom Soap at Home
Picture this: it’s a sunny spring afternoon, and you’re enjoying some well-deserved me-time. You’ve set aside a few hours for self-care, flipping through your favorite beauty blog, and suddenly, you stumble upon a beautiful cherry blossom soap recipe. You feel a spark of excitement—wouldn’t it be delightful to create something luxurious and fragrant with your own hands? You imagine the soft, fluffy texture of whipped soap infused with that stunning cherry blossom scent, and before you know it, you’re inspired to make it yourself.
Here’s the truth: DIY beauty products not only allow you to pamper yourself but can also make thoughtful, delightful gifts. And with spring right around the corner, there’s no better time to whip up this enchanting cherry blossom soap. Let’s dive into how you can create this gorgeous skincare staple that’s both moisturizing and fragrant!
Why Cherry Blossom Soap?
Cherry blossoms symbolize renewal and the beauty of nature—perfectly aligning with the fresh start that spring brings. Incorporating cherry blossom-infused oil and essential oils into your skincare routine offers a luxurious feel while keeping your skin soft and hydrated. This whipped soap serves as a gentle cleanser, making it an ideal addition for both your personal use and as a lovely gift for friends and family.
What You’ll Need
Making cherry blossom soap at home is easier than you might think. Here’s what you’ll need to get started:
Ingredients:
- 1 cup whipped soap base (available online or at craft stores)
- 3 tablespoons cherry blossom-infused oil
- 1 teaspoon cherry blossom fragrance oil (or your favorite essential oil)
- A few drops of pink soap colorant (optional)
- 1 tablespoon glycerin (for added moisture)
Equipment:
- Electric mixer
- Mixing bowl
- Measuring cups and spoons
- Airtight containers or mason jars for storage
- Optional: soap molds for different shapes
When gathering your ingredients, don’t hesitate to personalize your recipe with your favorite scents or colors. You’re the artist here!
Step-by-Step Guide to Making Cherry Blossom Soap
Now that you’ve got your ingredients ready, let’s walk through the process of creating your own cherry blossom soap. Trust me, it’s going to be a fun and fulfilling experience!
Step 1: Prep Your Workspace
Before you start mixing, make sure your workspace is tidy and organized. Gather all your ingredients and tools, and put on an apron if you want to feel extra fancy. A clean area not only helps you focus but also keeps your DIY project hassle-free.
Step 2: Combine Your Ingredients
In a large mixing bowl, scoop the whipped soap base and add the cherry blossom-infused oil and glycerin. If you’re using soap colorant, add a few drops at this stage.
Step 3: Mix It Up!
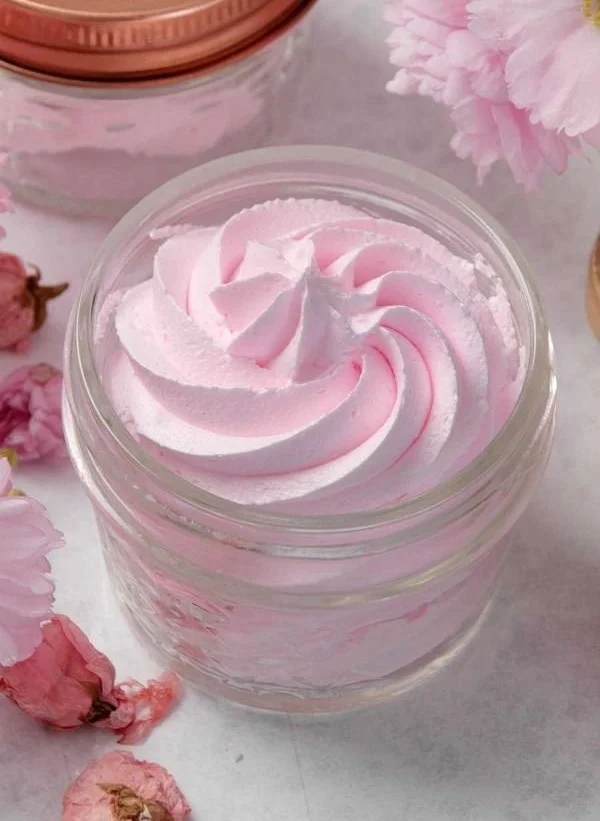
Using your electric mixer, blend the ingredients on medium speed. You want to whip it until everything is well combined, and the mix is fluffy and light. This step is crucial for achieving that luxurious whipped texture you’re after.
Step 4: Add Fragrance
Once your mixture is fluffy, it’s time to add the cherry blossom fragrance oil. This is where that heavenly scent comes from! Blend the mixture for another 30 seconds to incorporate the fragrance fully.
Step 5: Spoon into Containers
Now, for the fun part! Spoon your whipped cherry blossom soap into your chosen containers. You can use individual jars, bowls, or even fun molds—as long as they’re airtight. Make sure to pack the soap lightly for an aesthetically pleasing look!
Step 6: Let It Settle
Seal the containers tightly and let the soap sit for a few hours at room temperature. This allows the texture to firm up nicely, so you get that perfect whip.
Step 7: Enjoy Your Creation!
After waiting patiently (or not-so-patiently) for a few hours, your homemade cherry blossom soap is ready to use! Lather it on your skin, enjoy the enchanting scent, and feel how moisturizing it is. Trust me—your skin will thank you!
Quick Beauty Tips
- Exfoliate first: For an extra pampering session, exfoliate your skin before using the cherry blossom soap for even softening effects.
- Layer scents: Pair your soap with a matching lotion for prolonged fragrance and moisture.
- Keep it cool: Store your soap in a cool, dry place to maintain its texture and scent for longer.
Common Mistakes to Avoid
While making your own soap is a fun venture, here are some common pitfalls to steer clear of:
- Overmixing: It’s tempting to keep blending, but avoid overmixing as it can lose texture.
- Skipping the seal: If you don’t seal your containers tightly, the soap can dry out, losing its wonderful fluffiness.
- Wrong measurements: Accurate measurements are key to achieving the perfect consistency. Use measuring cups to ensure you get it just right.
FAQs About Cherry Blossom Soap
Can I use this soap as a body wash?
Absolutely! This whipped cherry blossom soap works wonderfully as a body wash, providing a gentle cleanse you’ll adore. Just scoop a bit onto your loofah or washcloth for a bubbly experience.
How long will the soap last?
If stored correctly, your cherry blossom soap should last for several months. Just make sure it’s in a cool, dry spot!
What if I can’t find cherry blossom oil?
No worries! You can use other floral-infused oils like jasmine or rose, or even essential oils for a different scent. Get creative!
Bonus Self-Care Ideas
Feeling inspired? Here are a few more self-care practices you can incorporate alongside your cherry blossom soap:
- Create a spa day: Treat yourself to a full bath setup. Light some candles, play soft music, and indulge in a long bath.
- DIY face masks: Pair your soap with a homemade face mask using simple kitchen ingredients.
- Nature walk: Take a stroll outside to enjoy the beautiful spring blooms and recharge your spirit.
The Best Routine for Busy Women
Let’s face it: life can get hectic, but that doesn’t mean you shouldn’t make time for self-care. Here’s a quick routine for busy women looking to pamper themselves:
- Morning: Start your day with a splash of cherry blossom soap in the shower to invigorate your senses.
- Midday break: Take a few moments to breathe and maybe use a scented hand cream to keep your spirits up.
- Evening: Wind down with a relaxing bath, incorporating your cherry blossom soap for a smooth, fragrant touch.
Conclusion
In a world where we often prioritize our responsibilities over self-care, creating your own cherry blossom soap serves as a delightful reminder that pampering yourself is essential. By blending natural ingredients into this fluffy masterpiece, you not only treat your skin to a loving experience but also ignite your creativity and passion for DIY beauty.
I hope you feel inspired to give it a try! After all, there’s something incredibly rewarding about handmade beauty products that store-bought ones just can’t replicate. So, grab those ingredients, and let the cherry blossoms symbolize your own blooming journey into self-care. Happy crafting!