
Embrace Whimsy with Ladybug Nail Art Designs This Spring
Imagine this: spring has finally arrived, and sunshine kisses your skin while daisies bloom all around. You’re rocking a light floral dress, a fresh pedicure, and your nails, well, they need a little something special. Sound familiar? We’re all about those sweet self-care moments that uplift our spirits.
This season, let’s talk about something that can turn your ordinary mani into a delightful expression of your personality: adorable ladybug nail art. Whether you prefer gel nails, press-ons, or nail decals, these designs are perfect for bringing a splash of whimsy to your fingertips. Not only are these little bugs charming and cheerful, but they’re also surprisingly easy to create, even for those of us with a busy schedule.
So, pull up a comfy seat, grab your favorite nail supplies, and let’s explore the world of ladybug nail art together. Here’s a guide on how to achieve these cute designs, with practical tips and inspiration for every nail-loving queen out there.
Why Ladybug Nail Art?
What is it about ladybugs that makes them so endearing? Perhaps it’s their vibrant red shells dotted with shiny black spots or their association with good luck. Ladybugs remind us of warm spring days, carefree afternoons, and the joy of nature. By incorporating these tiny creatures into your nail art, you can celebrate the essence of spring while adding a unique touch to your look.
The Basics of Nail Art
Before diving into specific designs, let’s quickly cover the essentials. No matter what method you choose—gel, press-ons, or decals—having the right tools can make all the difference. Here’s a quick rundown:
- Base Coat: This protects your natural nails and helps your color adhere better.
- Top Coat: A glossy finish that seals your design and adds durability.
- Nail Tools: Dotting tools, nail brushes, or even bobby pins can help you create intricate designs.
- Colors: Classic ladybug colors include red, black, and a touch of white. Don’t shy away from experimenting with different shades!
Once you have your tools ready to go, you’re all set for a fun nail art session.
Ladybug Nail Art Designs to Try
Get ready to transform your nails into a canvas of creativity! Here’s a list of delightful ladybug designs you can easily achieve:
Simple Ladybug Dots
If you’re new to nail art, this is the perfect starting point. All you need is a solid red base color.
- Apply your Base Coat.
- Paint your nails with a red nail polish.
- Using a dotting tool, create black dots for spots on your ladybug.
- For the head, add a larger black dot near your cuticle and a tiny white dot for the eye.
This design is as cute as it is easy. Plus, you can do it in just a few minutes!
Ladybug on a Leaf
For a more whimsical look, how about a ladybug perched on a leaf?
- Start with a light green base for a soft, natural feel.
- Create the ladybug using red and black polish as previously explained.
- Add a simple leaf design using a green polish next to your ladybug.
This look is perfect for showing off your love for spring and nature. Imagine flaunting this adorable design during a picnic—it’ll definitely earn you complements!
Polka Dot Ladybugs
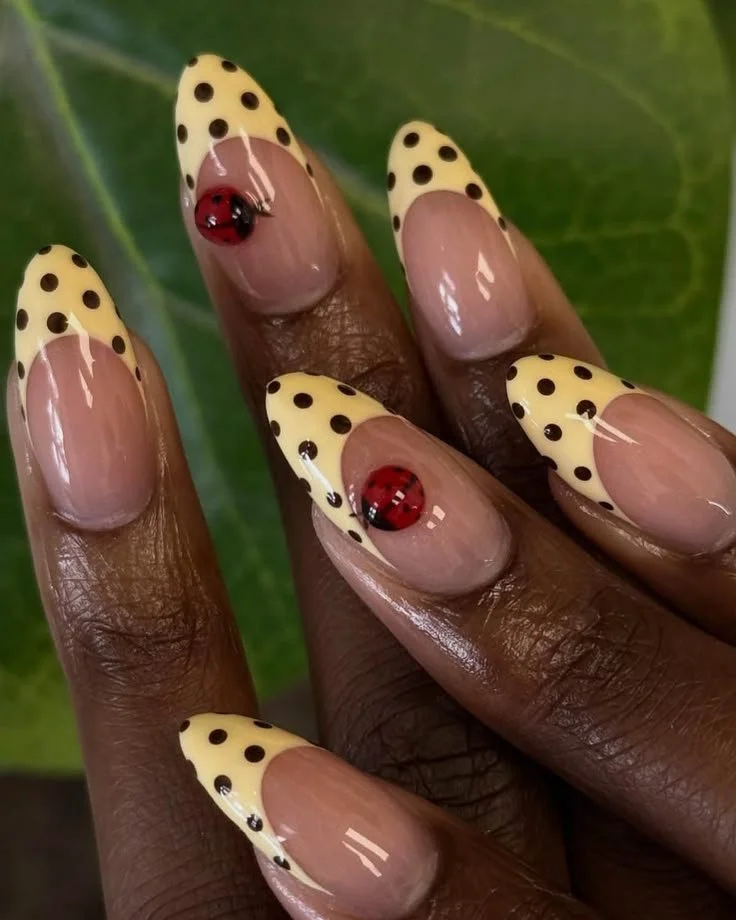
If you love polka dots (who doesn’t?), combine the patterns with ladybugs!
- Choose a neutral base color like white or soft beige.
- Add polka dots using the dotting tool with bright colors, like red and black.
- Add your ladybug accents as described earlier.
The fun blend of patterns keeps your nails playful and vibrant.
Ladybug Gradient
Looking for something a little different? Try a gradient background with ladybugs!
- Create a gradient using a makeup sponge to dab two colors, like pink and white.
- Once dry, follow the ladybug design instructions to place ladybugs on a couple of nails for a pop of charm.
This design not only brings whimsy but also a striking visual appeal.
Cute Ladybug Family
Why stop at one when you can have a whole family of ladybugs?
- Paint a solid base color—a pastel color would work beautifully here.
- Create various sizes of ladybugs using different dotting tools.
- Finish off with a few flowers or leaves around them for a complete look.
This is perfect for anyone who enjoys a bit of storytelling in their nail art!
Ladybug French Tips
Want something a bit more subtle? Opt for a ladybug-inspired twist on the classic French manicure.
- Start with a nude base color.
- Use red polish for the tips, then add tiny black dots as the ladybug spots.
- Finish with a simple ladybug on one or two accent nails.
This elegant take still pays homage to the charming ladybug without overwhelming your look, making it perfect for work or special occasions.
Flourishing Ladybug Garden
For those of us who love a little complexity, go for a whole garden theme!
- Start with a light blue base to represent the sky.
- Add your ladybugs, as outlined earlier.
- Use a fine brush or nail art pen to draw tiny flowers and grass around them.
This design is sure to turn heads and has the added bonus of being a conversation starter.
Using Press-Ons for Quick Designs
If you’re short on time or just don’t have the patience for DIY nail art, press-on nails are the way to go! Many brands offer beautiful ladybug designs that are easy to apply.
- Choose the style you love. Popular brands have intricate designs ready for you.
- Prep your nails properly with a base coat for better adhesion.
- Follow the instructions for applying press-ons, and you’re good to go!
The best part? You get the look of a nail salon at a fraction of the cost and in record time.
Nail Art Decals for an Effortless Look
Decals are a fantastic alternative if you can’t create intricate designs yourself. Here’s how:
- Start with a solid base color.
- Choose cute ladybug nail decals and place them on your nails.
- Seal everything with a topcoat for longevity.
This method saves time and gives you picture-perfect nails in no time!
Quick Beauty Tips for Perfect Ladybug Nails
- Don’t skip the base coat. It’s essential for durability and protecting your natural nails.
- Practice dotting before you start for the best results. Nail art takes a little practice!
- Use a top coat to enhance shine and ensure your design lasts longer.
- Experiment with colors. You might discover a unique twist that feels totally you!
Common Mistakes to Avoid
Even the pros make slips now and then. Here are a few common pitfalls to dodge:
- Skipping the base coat can lead to staining and chipping.
- Letting layers dry fully is essential; rushing can lead to smudging.
- Overloading your brush can create uneven designs. Less is often more!
FAQs About Ladybug Nail Art
Can I do ladybug nail art on short nails?
Absolutely! Ladybug designs work well on all nail lengths. Consider smaller spots for shorter nails.
What if I don’t have nail brushes?
You can use household items like toothpicks or even bobby pins to create dots and lines.
Do I need special products for press-ons?
Not necessarily. Many press-on nails come with adhesive tabs or require nail glue for longevity.
Bonus Self-Care Ideas
While you’re treating yourself to a nail makeover, consider adding a few more self-care rituals to your routine:
- Treat yourself to a relaxing bubble bath.
- Experiment with a new skincare routine.
- Enjoy a DIY facial mask with natural ingredients.
Self-care is all about nurturing your mind and body, and little moments like these can make a huge difference.
Conclusion
At the end of the day, your nails should be a reflection of your personality, and incorporating ladybug art is a playful way to celebrate spring. Whether you choose to go all out with designs or keep it simple with accents, there’s no wrong way to express yourself through your nails. We’ve all been there—those days where we need a little joy, and nail art can deliver just that.
So, grab your supplies and let your creativity run wild. You deserve to have fun with your beauty! Happy nail painting, and may your spring be as vibrant and cheerful as your ladybug nails!