
Creating a Peppermint Swirl Candle with Kids for a Cozy Christmas Gift
Imagine this: it’s a chilly December afternoon, and the smell of pine and cinnamon fills your home. Soft holiday music plays in the background, and there’s a flurry of laughter and tiny voices filling the air. As you gather around the kitchen table, you and your kids are ready for a fun craft that will not only keep them entertained but also bring a handmade holiday touch to your home. Sound familiar? If you’re looking for something special to do with your little ones this holiday season, making peppermint swirl candles might just be the perfect project.
This craft is not only a great way to bond but also a wonderful opportunity to teach your children about creativity and the joy of giving. Trust me, once you get started, you’ll find that making these delightful candles is both simple and rewarding. So, let’s dive into the magic of crafting these amazing, aromatic gifts!
The Joy of Handmade Gifts
Gift-giving is at the heart of the holiday spirit. But here’s the truth: it can be stressful trying to find the perfect gift for everyone on your list. That’s where handmade gifts come into play. They come from the heart and show thoughtfulness in a way that store-bought items just can’t replicate. Plus, there’s something extra special about knowing your little ones’ handiwork will brighten someone else’s day.
Benefits of Crafting with Kids
Crafting has noteworthy benefits beyond just fun. It allows kids to explore their creativity, develop fine motor skills, and boost self-esteem. Seeing their creations can be empowering, and when they gift these candles, they’ll experience the joy of giving firsthand. It’s a win-win situation!
Let’s Gather Our Supplies
Before we get started, let’s chat about what you’ll need. These aren’t hard-to-find items at all. Here’s a handy list to keep things organized:
Essential Materials
- Soy wax or paraffin wax: Soy wax is a great option as it’s biodegradable and burns cleaner.
- Candle wicks: Look for non-toxic options; the length depends on your container size.
- Double boiler: If you don’t have one, a metal bowl on top of a pot works beautifully.
- Essential oils: Peppermint oil will be our star, but feel free to mix in other scents if you like.
For the Swirl Effect
- Dye: Red candle dye or natural coloring (beetroot powder is a fun choice).
- Measuring cup: For precise wax melting and oil mixing.
- Spoon and stirrers: For mixing up your wax and scents.
- Containers: Mason jars, tea cups, or any heat-safe vessel will work perfectly.
Safety First
It’s crucial to keep safety in mind when working with hot wax. Ensure that your kids understand the importance of not touching the hot surfaces and that they should always have adult supervision. You might want to set up a designated area where crafting can happen safely (think kitchen counters or a table that can easily be cleaned).
Step-by-Step Guide to Making Peppermint Swirl Candles
Now that we’ve gathered our materials, let’s walk through the steps to create our magical peppermint swirl candles together.
Step 1: Set the Stage
Before we dive into melting our wax, set up your workspace. Lay down some newspaper or an old tablecloth to catch any spills. This craft can get a bit messy, so it’s best to prepare—especially if you’ve got younger kids involved.
Step 2: Melting the Wax
- Open your double boiler: Fill the bottom pot with water and bring it to a gentle boil. Place the wax in the top part. You want it to melt slowly.
- Let the kids help: While the wax is melting, they can help by prepping containers and choosing essential oils or colors for their swirl.
Step 3: Adding the Ingredients
- Once your wax is melted, carefully pour a small amount into a measuring cup – about 1 cup should do.
- Add your peppermint oil (about 15-20 drops for a strong scent) and a few drops of red color for the "swirl."
- Stir gently to combine everything, making sure not to splash (who wants peppermint wax all over themselves, right?).
Step 4: Pouring the First Layer
- Pour the wax into your containers, filling them about halfway, allowing it to cool slightly.
- Insert the wick into the center of the candle, to anchor it while it hardens.
Step 5: Creating the Swirl Effect
While your first layer sets (about 30 minutes), melt a second batch of wax. This time, you’ll want to keep it clear or add a slight different shade.
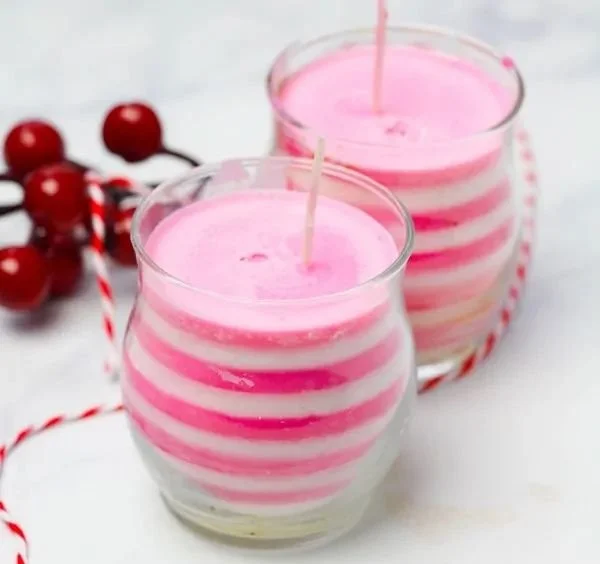
Pour this melted wax over the first layer gently. For a whimsical swirl effect, you can pour it slowly in a circular motion, or use a stick to gently swirl the two layers together.
Step 6: Final Touches
- Let your candles cool completely. This might take around 1-2 hours.
- Trim the wick once solidified, and voilà! You’ve created beautiful peppermint swirl candles.
Quick Beauty Tips for Candle Crafting
- Fragrance profile: If you’re feeling adventurous, mix peppermint with vanilla or cinnamon for an added cozy touch.
- Decorate the containers: Kids can personalize theirs with stickers or paint. It’s a fun way to make each candle unique!
- Use leftover materials: Things like crayon shavings or old candle pieces can be melted down to create new scents and colors.
Common Mistakes to Avoid
When you gather around the table, it’s easy to get lost in the excitement. Here are some common pitfalls to keep in mind:
- Overheating the wax: Always melt on low to avoid scorching. Wax should be heated slowly to prevent it from going rancid.
- Skipping the wick primer: If the wick doesn’t get anchored properly, your candle won’t burn evenly, which can be frustrating.
- Using too much fragrance: More isn’t always better. Keep it around 10% of your total wax amount for the best scent throw.
FAQs About Candle Making with Kids
Can kids really help with candle making?
Absolutely! Just be sure they’re supervised, especially during the melting and pouring steps.
What if my candle cracks?
It can happen, especially if it cools too quickly. Don’t worry; just enjoy the character it adds!
Can I make scented candles without dyes?
Definitely! If you prefer a more natural look, skip the dyes and let the wax shine.
Bonus Self-Care Ideas
Crafting is a beautiful way to bond, but you also deserve some self-care. Why not pamper yourself while the candles cool? Consider these delightful ideas:
- A quiet bubble bath with some calming essential oils.
- Enjoying a good book, perhaps one that’s been on your list forever.
- Mixing up a facial mask using pantry ingredients for some extra glow.
Wrapping It Up
Making peppermint swirl candles with your kids is more than just a fun activity; it’s an opportunity to make memories, learn new skills, and spread holiday cheer. Plus, when you gift these thoughtful creations, you’re not just giving a candle; you’re sharing a part of yourselves.
As you sip our warm drinks and snuggle up during those cozy evenings, your home will be filled with the sweet, uplifting scent of Christmas. So grab those supplies, gather your little helpers, and get ready to create something that smells as good as it looks. And remember, no matter what this holiday season looks like, you’re doing a fantastic job just by being you. Happy crafting!