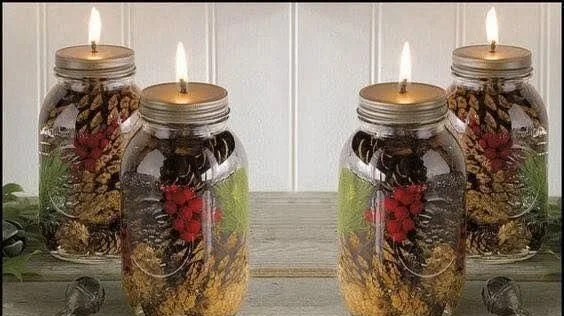

Creating a Mason Jar Oil Lamp for a Fragrant Home Display
Imagine this: you’ve had a long day, and as you step through your door, the soft glow of a candle flickers gently in the corner of your living room. The subtle aroma of your favorite essential oil fills the air, transforming the space into a cozy haven. Sounds dreamy, right? What if I told you it’s incredibly easy to create this ambiance with a DIY mason jar oil lamp? It’s not just a simple craft; it’s a wonderful way to bring light, fragrance, and beauty into your home, and trust me, it feels great to know you made it yourself.
Why Choose an Oil Lamp?
You might be wondering why an oil lamp is a great choice. Here’s the truth: they are not just practical but incredibly versatile. Oil lamps can serve decorative purposes while simultaneously providing soft lighting. Plus, when you create one with olive oil and essential oils, you’re opting for a natural, eco-friendly option that doesn’t emit toxins like many commercial candles.
Getting Started: What You’ll Need
Before you dive in, let’s gather our materials. Here’s a straightforward list of what you’ll need to create your own mason jar oil lamp:
- A mason jar (size of your choice)
- A wick (cotton or hemp wicks work beautifully)
- Olive oil (approximately 1 cup)
- Essential oils (your favorite scents)
- A small container (like a shot glass) for measuring
- A sturdy lighter or matches
- Decorative items (optional, think flowers, stones, or shells)
- A lid or cover for your mason jar (to extinguish when finished)
Step-by-Step Guide to Making Your Oil Lamp
Now that we have everything ready, let’s get into the fun part – crafting your oil lamp! Don’t worry; this process is super easy.
Step 1: Prepare the Mason Jar
Start by cleaning the mason jar thoroughly. Any residue or dust can affect your oil lamp’s performance. Once it’s clean, dry it well.
Step 2: Measure the Olive Oil
Using your small container, measure about one cup of olive oil and pour it into the mason jar. Olive oil is an excellent choice because it burns clean and provides a lovely glow.
Step 3: Add Essential Oils
This is where you can get creative. Add about 10-20 drops of your favorite essential oil or a blend that speaks to you. Want to feel calm? Lavender is excellent. Looking for a refreshing vibe? Citrus oils like lemon or orange are invigorating and perfect for uplifting your space.
Step 4: Insert the Wick
Take your wick and cut it to the desired length, allowing some to extend above the oil surface. Place one end of the wick into the oil and the other end outside the jar. If your wick isn’t standing well, consider placing a small stone or little decorative item around the wick to hold it in place.
Step 5: Decorate the Jar (Optional)
If you’re feeling crafty, now’s the time to decorate! You could wrap twine around the top or add some dried flowers or stones inside the jar for extra character. Whatever suits your style will enhance the beauty of your lamp.
Step 6: Safety First
Before lighting up, make sure everything’s secure. If you’re using decorative items, ensure they won’t catch fire.
Step 7: Light It Up!
Grab your lighter or matches and carefully light the wick. Let it burn for a few minutes to create that dazzling glow, and enjoy how it transforms your space.
A Few Quick Tips to Keep in Mind
- Adjust the Wick Length: If you find the flame too high, trim the wick a bit. Too low and you won’t get enough light.
- Essential Oil Blends: Experiment with different combinations! For example, a mix of eucalyptus and mint can create a refreshing effect, while vanilla and sandalwood can bring warmth and comfort.
- Monitor Oil Levels: Keep an eye on your oil levels! If it gets too low, the wick will start to smolder instead of burn cleanly.
Common Mistakes to Avoid
Even though this project is beginner-friendly, here are a few faux pas to steer clear of:
- Using the Wrong Jar: Avoid glass jars that are too thin or not specifically designed for heat, as they could break.
- Overcrowding with Decor: While adding decorative items can enhance your lamp, make sure they don’t interfere with the wick or flame.
- Not Allowing the Oil to Soak: Let the wick soak in the oil for about 30 minutes before lighting. This prevents it from burning too quickly.
FAQs About Mason Jar Oil Lamps
Can I use other types of oil?
Absolutely! While olive oil is fantastic, you could also try coconut oil or other natural oils. Just remember that the fragrance and burning properties may vary.
How do I extinguish the lamp safely?
You can simply blow it out, like you would a candle, or cover it with the lid, which will deprive it of oxygen. Never use water, as this could splatter the oil.
How long will it last?
This depends on the size of your jar and wick length, but a full jar of oil can last several hours to days of use.
Bonus Self-Care Ideas
Once you’ve made your oil lamp, consider turning this into a self-care ritual! Perhaps light your lamp and enjoy a quiet evening with a good book or while taking a long, relaxing bath. Create an atmosphere where you can truly unwind.
Conclusion: Your Home, Your Sanctuary
Creating a mason jar oil lamp is more than just a fun DIY project; it’s a moment of self-care that brings warmth and beauty into your space. Picture this: after a long day, you come home to that soft light and delightful scent – doesn’t that sound healing? By using natural materials, you’re not only beautifying your environment but also caring for your health and well-being.
So gather your materials, unleash your creativity, and enjoy the wonder that comes from crafting something unique for your home. You’re not just making an oil lamp; you’re cultivating a beautifully fragrant sanctuary that reflects you! Happy crafting!