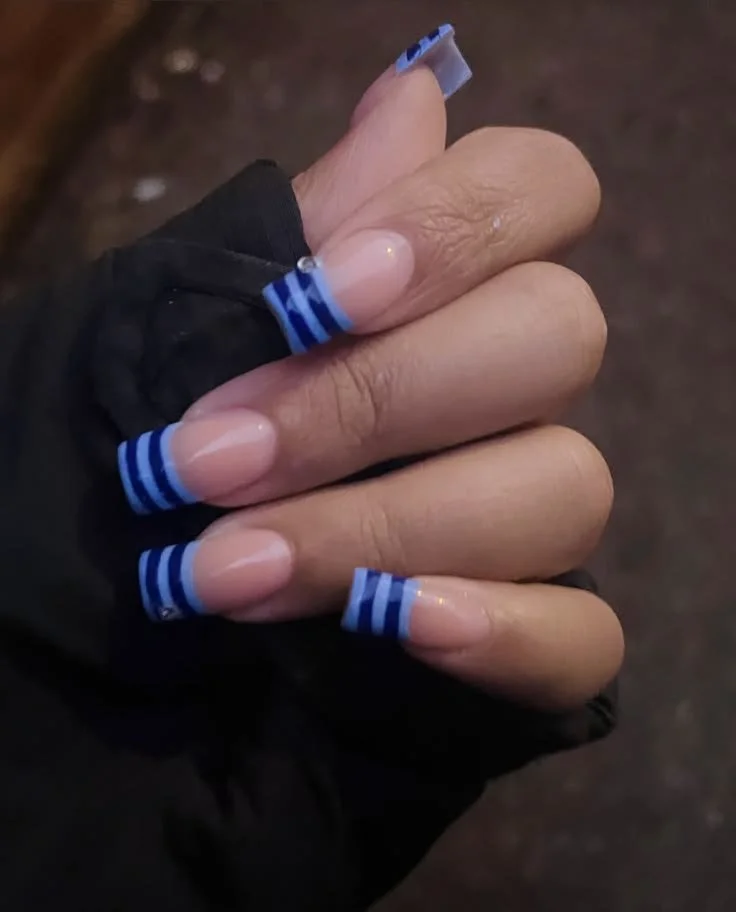

Let’s Talk About Short Square Striped Nails for Summer Vibes
Picture this: you’re getting ready for a casual outing with friends, the sun is shining, and you’re in the mood to embrace summer with all your heart. You slip on your favorite sundress, pop on some cute sandals, and then… you glance at your nails. Sound familiar? Sometimes, they need that extra something to really pull your look together.
If you’re like me, you know that nails can be the ultimate accessory. You don’t need to have them long and dramatic to make a statement. Short square striped nails are not just trendy; they’re a refreshing, fun way to express your creativity and tie everything together. Let’s dive into how you can recreate these fabulous nails, infusing them with bright blue accents for an eye-catching and lively vibe. Plus, be sure to check out all 25 designs to find your next mani inspiration! 💅✨
Why Choose Short Square Striped Nails?
First off, why short square nails? For one, they’re incredibly versatile. Whether you’re heading to a barbecue, a beach day, or just a coffee shop catch-up, short square nails are practical while still looking polished. And let’s be honest, they can handle a bit of rough and tumble better than those long stiletto designs.
You might be wondering how stripes can add flair to your manicure. The answer lies in the playful nature of stripes themselves. They can elevate your look without being too overwhelming. Plus, combining various colors adds a fun pop that screams summer!
Your Step-by-Step Guide to Recreating Short Square Striped Nails
Feeling inspired? Let’s break down the simple steps to achieve this colorful and chic look.
Gather Your Supplies
Here’s what you’ll need to get started:
- Base coat
- Bright blue nail polish
- White or pastel-colored nail polish (for stripes)
- Top coat
- Striper brush (or nail tape)
- Nail file
- Cuticle oil
Step One: Prepare Your Nails
Before diving into color, you’ll want to prep your nails properly. Start by trimming and filing them into a short square shape. You want them to be uniform so that the stripes look neat and tidy.
- File: Smooth out any jagged edges.
- Clean: Remove any old polish and wash your hands.
- Moisturize: Apply cuticle oil to keep your cuticles healthy.
Step Two: Apply the Base Coat
This is crucial! A base coat protects your nails from stains and ensures your polish adheres better. Apply a thin layer and let it dry fully.
Step Three: Get Colorful with Bright Blue
Now comes the fun part: apply your bright blue polish! This will be the main color for your nails.
- Tip: Start at the base of your nail and work your way to the tip. Two coats might be necessary for full color saturation, so let each coat dry before applying the next.
Step Four: Create the Stripes
Once your blue base is dry, it’s time for the stripes. Using your striper brush or nail tape, create stripes on each nail.
- You can opt for vertical stripes for a sophisticated look, horizontal for a playful vibe, or even diagonal for something edgy.
- Play with different widths of stripes for added personality!
Step Five: Top Coat Time
To make your design last, finish with a top coat. Not only does it seal everything in, but it also adds shine, giving your nails that salon-finished look.
Final Touches
After everything is dried, apply a little more cuticle oil around the edges to keep your nails looking fresh. Who says you can’t show off those beautiful digits?
Quick Beauty Tips for Stunning Nails
- Hydrate: Always keep your nails and cuticles hydrated. This can prevent breakage and peeling.
- Nail Health: Use a nail strengthener if you notice your nails are brittle.
- Limit Soaking: Try to limit soaking your nails in water, which can weaken them over time.
Common Mistakes to Avoid
We’ve all had our nail fails, right? Here are a few common pitfalls that might hinder your nail art game:
- Skipping the base coat: It’s easy to overlook, but this step can save your nails!
- Rushing the drying process: Patience is key! Don’t jump into activities before your top coat is fully dry.
- Overloading on polish: A thin layer saves you from bubbles and smudges.
Frequently Asked Questions
How can I make my nail art last longer?
Keeping your nails dry and using gloves when washing dishes or cleaning can extend your nail art’s life. Plus, reapplying top coat every few days helps!
Can I do this design on longer nails?
Absolutely! This design works beautifully on any length as long as you’re comfortable with the nail shape. Feel free to adapt!
What if I don’t have a striper brush?
Nail tape works wonders for creating clean stripes too! You can also DIY a striping brush by using an old polish brush—just trim it to your preferred width!
Bonus Self-Care Ideas While You Nail It
Finding time for yourself as a busy woman can be challenging, but self-care is important. Consider these ideas while you pamper yourself:
- Mini Pamper Session: Pair your nail activity with a DIY face mask. Your skin deserves the love too!
- Mindfulness: While waiting for polish to dry, practice some deep breathing or meditate for a few minutes. It’s a great way to reconnect with yourself.
- Listen to Your Faves: Pop on a podcast or your go-to playlist while you paint. Making this a part of your routine creates a joyful atmosphere.
Conclusion
Creating short square striped nails isn’t just about having pretty hands; it’s about embracing a bit of fun in your life, especially during the vibrant summer months. You deserve to feel confident and put-together, whether you’re at the beach or enjoying a morning cup of coffee with friends.
So, what if you took that little extra time to beautify your nails? Not only will you rock a stylish mani, but you’ll also boost your confidence in the process. Dive into those bright blue accents, get creative, and don’t forget to check out the 25 designs for even more inspiration. Here’s to a summer filled with fun nails and even more laughter! Happy painting!