
Discovering the Magic of Lye: A Guide to Making Lye from Ashes for Soap-Making
Imagine this scenario: you’re in your kitchen, the enticing aroma of essential oils swirling through the air, feeling that little thrill of excitement as you prepare to create something wonderful. You’re not just making any soap; you’re gearing up to craft a luxurious bar that’s packed with ingredients you can trust—organic, all-natural, and utterly decadent. But then, reality hits you. You remember that you need lye for the saponification process.
You’re not alone in this—many of us have felt that moment of panic. So, here’s the truth: you can make lye from ashes using a lye-leaching barrel! Yes, you heard that correctly. Not only does this technique allow you to harness the power of nature, but it also adds a unique, personal touch to your soap-making journey. So, grab a comfy seat (maybe a cup of tea?), and let’s dive into the art of making lye from hardwood ashes in a way that feels both modern and accessible.
Understanding Lye and Its Importance
Before we jump into the nitty-gritty of making lye, let’s take a quick moment to understand what lye actually is and why it’s essential in soap-making. Lye, or sodium hydroxide, is the magic ingredient that transforms oils into soap through a chemical reaction known as saponification. Without lye, the transformation simply wouldn’t happen.
Lye can seem intimidating; it’s caustic and should be handled with care. But here’s the silver lining—when you use lye in your soap-making, you’re creating something that’s not only beautiful but also has skin-loving properties. The end result? Soft, nourishing soap that’s free from harmful chemicals and synthetic additives!
Gathering Supplies for Your Lye-Leaching Barrel
Here’s what you’ll need to get started (don’t worry—most of this you probably already have around):
Materials Needed
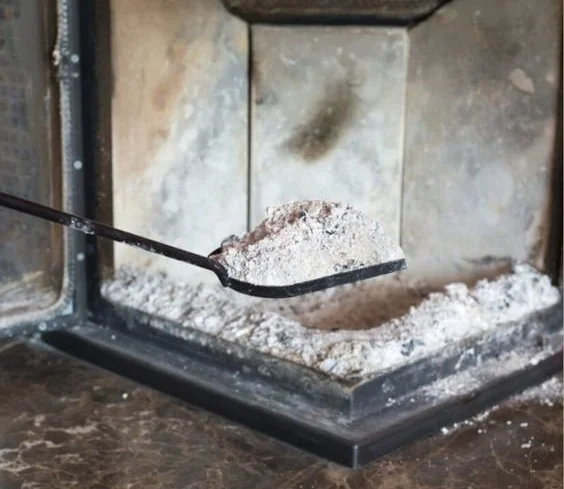
- Hardwood ashes: Avoid using softwoods as they don’t produce the right type of lye.
- Rainwater or distilled water: It’s best to use clean, filtered water to avoid impurities.
- A large plastic or wooden container: This will hold your ashes and water.
- Old coffee filter or fine cheesecloth: To strain the lye solution.
- A container for the lye solution: Something glass or food-safe.
- Protective gear: Gloves and goggles are a must when handling lye.
Setting Up Your Barrel
Now that you’ve got your materials laid out—let’s transform those ashes into something useful. A lye-leaching barrel allows the rainwater to pass through the ashes, drawing out the lye. Here’s how you can set it up:
Choose Your Lye-Barrel Location: Opt for a dry area where it won’t be too disturbed, and make sure there’s a sloped surface so the rainwater can flow away from the barrel.
Prepare Your Ashes: Collect your hardwood ashes and sift them to remove any large, unburned bits. Remember, the finer your ashes, the better the lye extraction will work.
Layer Wisely: Place about 4-6 inches of ashes into the bottom of your prepared barrel. This provides the foundation for the leaching.
Fill with Water: Gently pour your rainwater over the ashes. The key is to use enough water to saturate the ashes thoroughly but not so much that it runs over the top (this can lead to a less concentrated lye).
Let it Leach: Allow the mix to sit for a week or so. Nature will do its thing as the water slowly filters through the ashes, extracting lye with every passing hour. Sound familiar? It’s truly nature doing its magic!
Collecting the Lye: After your waiting period, you should notice a solution forming below the ashes. Carefully strain this liquid through your coffee filter or cheesecloth into another container. This is your lye solution.
Understanding Your Lye Solution
You might be wondering about the strength of your lye solution. It’s essential to gauge this before diving into soap-making. A simple test is to take a small piece of fresh fruit (like an apple) and dip it briefly in the solution. If it has a reaction and begins fizzing or bubbling, you’ve got lye! However, the best way is to get a pH test strip; look for a reading between 12-14, confirming you’ve got a nice strong solution.
Soap-Making with Your Homemade Lye
You’ve made it to the fun part! Get that creative energy going because now you can dive into crafting your soap. Here’s a simple recipe to guide you:
Basic Soap Recipe
Ingredients:
- 1 cup of lye solution
- 4 cups of olive oil
- 3 cups of coconut oil
- 2 cups of shea butter
Step-by-Step Process
Prepare Your Molds: Ensure you have soap molds ready to pour your soap into. Silicone molds work beautifully for easy release.
Mix Oils: Melt your coconut oil and shea butter together in a large pot, then mix in your olive oil. Let this cool slightly, aiming for around 100°F.
Combine Lye and Water: In a separate, well-ventilated area, carefully combine your lye solution with an equal weight of water (remember, safety first!). The solution will heat up, so allow it to cool before combining it with your oils.
Blend Together: Pour the cooled lye solution into your oils slowly while mixing with an immersion blender. Blend until you reach "trace," which looks like a pudding-like consistency.
Add Scents (Optional): Want to elevate your soap? Now’s your chance! Add a few drops of essential oil or natural fragrance to personalize it.
Pour and Set: Pour your soap mixture into your molds, and let it sit undisturbed for 24-48 hours.
Unmold and Cure: Once it’s set, carefully remove from the molds and let cure for 4-6 weeks in a cool, dry place. This is when the magic really happens!
Common Mistakes to Avoid
While making soap sounds exciting, there are always a few pitfalls. Here are a couple of common mistakes to keep in mind:
Not Using Safety Gear: You’re dealing with lye, so don’t skip the goggles and gloves!
Incorrect Measurements: Always weigh your ingredients to avoid miscalculations—this is not a place for estimates.
Being Impatient: Soap-making requires time. Rushing the process can lead to unpleasant surprises.
FAQs about Making Lye from Ashes
Is making lye from ashes safe?
As long as you observe safety precautions, it can be safe. Make sure to wear gloves and goggles, and work in a well-ventilated area.
Can I use any type of ash?
No, stick with hardwood ashes like oak, maple, or hickory for the best results.
How strong is homemade lye compared to store-bought?
Homemade lye can vary in strength based on the ash and water used. It’s essential to test with pH strips to ensure it’s suitable for soap-making.
Bonus Self-Care Ideas
Once you’ve mastered soap-making, don’t stop there! Dive deeper into the realm of self-care with these ideas:
Create an Aromatherapy Experience: Infuse your homemade soap with calming scents to enhance mood during baths or showers.
Pamper Yourself with a Spa Day: Pair your DIY soap with natural scrubs or face masks for an ultimate self-care retreat.
Gift Your Creations: Spread the love by gifting your homemade soap to friends and family—everyone appreciates a thoughtful, handmade gift.
Embrace Your Soap-Making Journey
As we wrap up this little adventure, remember: making lye from ashes is more than just a method; it’s a journey of self-discovery and craftsmanship. Every bar of soap you create is a reflection of your love for natural beauty and wellness.
So the next time you find yourself in that moment of panic over needing lye, take a step back and remember the lye-leaching barrel. Grab your gear and embrace the magic of creating something uniquely yours. You’ll be amazed at what you can achieve, and trust me—your skin will thank you for the love and care you put into each glorious bar. Happy soap-making!