
Fabulous Exfoliating Mint Poppy Seed DIY Soap Recipe
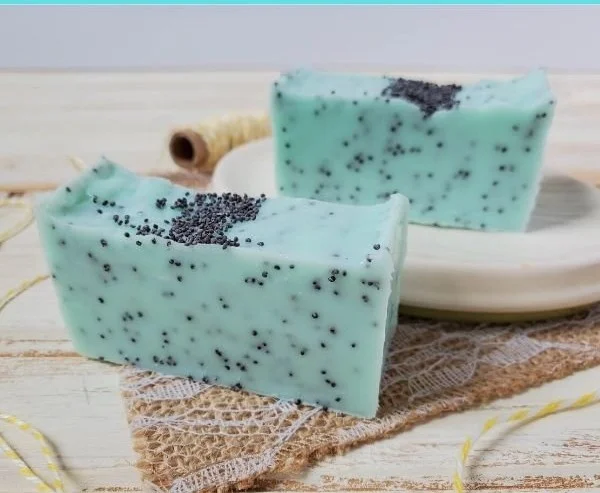
Today I’m excited to share a fantastic exfoliating DIY soap recipe that will leave your skin feeling smooth and refreshed: Mint Poppy Seed Soap. This homemade soap combines the invigorating scent of peppermint essential oil with the gentle exfoliating power of poppy seeds, making it perfect for keeping your skin soft and hydrated. Plus, it’s a vibrant addition to your bathroom décor or a thoughtful gift for friends and family during the holiday season.
Why You Will Love This Recipe
This Mint Poppy Seed Soap is not just visually stunning; it’s also highly effective for exfoliation. The combination of poppy seeds and goat’s milk in the melt and pour soap base caters to all skin types by providing both moisture and gentle scrubbing action. Whether you’re indulging in a self-care day or looking for a unique gift, this soap fits the bill. With a simple and fuss-free process, even beginners will appreciate how easy and rewarding it is to create.
Ingredients
For the Soap
- Goat’s milk melt and pour soap base: 1 lb (can be found at craft stores or online)
- Peppermint essential oil: 2 teaspoons (for a fresh, revitalizing scent)
- Kiwi soap colorant: A few drops (this will add a beautiful green hue)
- Poppy seeds: 1 tablespoon (for exfoliation)
- Additional additives (optional): You may choose to add a tablespoon of honey or oatmeal for extra skin benefits.
Equipment
- Double boiler or microwave-safe bowl: For melting the soap base
- Soap molds: Silicone molds are ideal for easy release
- Mixing spoon or stick blender: For combining the ingredients
- Measuring spoons
- Digital scale (optional): For precise ingredient measurement
Step-by-Step Instructions
Preparation Time: 10 minutes
Making Time: 30 minutes
Yield: Approximately 4-6 bars of soap, depending on mold size
Cut the Soap Base: Begin by cutting the goat’s milk melt and pour soap base into small, even cubes. This will help it melt more evenly.
Melt the Soap Base: Place the cubes in a double boiler or a microwave-safe bowl. If using a microwave, heat in 30-second intervals, stirring between each until fully melted. Be careful not to overheat.
Add Color and Scent: Once the soap base is completely melted, add a few drops of kiwi soap colorant until you achieve your desired shade. Next, mix in the peppermint essential oil, ensuring it’s evenly distributed.
Incorporate Poppy Seeds: Stir in the poppy seeds gently, ensuring they are dispersed throughout the mixture.
Pour the Mixture: Carefully pour the soap mixture into your soap molds. Tap gently to remove any air bubbles.
Cool and Set: Allow the soap to set at room temperature for 20-30 minutes. If you’re in a hurry, placing them in the refrigerator will speed up the process.
Remove from Molds: Once fully hardened, gently pop the soap out of the molds. They should release easily if silicone molds are used.
Cure the Soap: While melt and pour soap doesn’t need curing like cold process soap, it’s a good idea to let the bars rest for a day or two for optimal hardness.
Tips for Success
- Temperature Control: Avoid overheating the soap base; it can bubble or scorch, altering the texture.
- Custom Scent Strength: Adjust the amount of peppermint essential oil according to your preference; just remember that a little goes a long way!
Common Mistakes to Avoid
- Adding Exfoliants Too Early: Ensure the soap base is cooled slightly before adding poppy seeds to prevent them from sinking to the bottom.
- Using Too Much Colorant: Start with a little and incrementally add more as needed; too much can make the soap look dark and unappealing.
Variations and Customization Ideas
- Oils for Scent: Substitute peppermint essential oil with other favorites like lavender for a calming effect or citrus oil for a refreshing twist.
- Add Milk: You can experiment with different melt and pour bases, like shea butter or olive oil soap, to find your perfect blend.
- Layering Soap: Create layers with different colors and scents for a more visually appealing soap bar.
Storage and Shelf Life
Store your finished soaps in a cool, dry place away from direct sunlight. When properly stored, these bars can last for up to six months without losing fragrance or quality.
Safety Tips
While making soap using the melt and pour method is relatively safe, you should still take basic precautions:
- Keep your workspace clean and organized to prevent slipping or spilling.
- If you have sensitive skin, perform a patch test with the essential oil before adding it to the entire batch to avoid any adverse reactions.
Frequently Asked Questions
1. Can I use other essential oils instead of peppermint?
Yes, feel free to substitute peppermint essential oil with your preferred fragrance, but ensure to adjust the quantity to match the scent strength.
2. How can I adjust the exfoliating properties of this soap?
You can add more poppy seeds or try other exfoliating ingredients like ground oatmeal or coffee grounds for a different texture.
3. Is it safe to use melt and pour soap base during pregnancy?
Generally, melt and pour soap bases are safe, but always consult with a healthcare professional regarding specific essential oils.
4. Can I create larger batches of this soap?
Absolutely! Just multiply the ingredient amounts based on the number of bars you want to make, and follow the same process.
5. How do I wrap these soaps for gifting?
Use clear cellophane bags tied with colorful ribbons, or consider using decorative boxes to make the presentation special.
Conclusion
Now that you have all the information to create your very own Mint Poppy Seed Soap, it’s time to put your skills to the test! This delightful DIY project not only beautifies your bathroom but also makes for wonderful gifts. Enjoy the process of crafting homemade soap, and marvel at how rewarding it is to create something personal and useful. Happy soap-making!