
Create Your Own Coffee Soap Inspired by a Latte
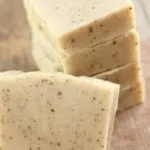
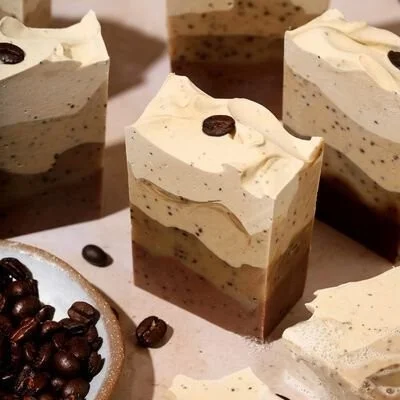
If you’re a coffee lover who enjoys getting crafty, this DIY coffee soap project will become one of your favorites. This soap not only includes coffee seed oil and used coffee grounds but also replaces distilled water with brewed coffee. The rich, aromatic scent of the Caffe Latte Fragrance Oil, combined with the physical benefits of coffee grounds, makes this soap a delightful indulgence. The creation process mimics the creamy layers of a latte, which is sure to captivate anyone who takes a whiff.
Whether you’re new to soap making or looking to enhance your skills, this guide will walk you through every step, ensuring you can create stunning homemade coffee soap. So brace yourself; it’s going to be a flavorful adventure!
Why You Will Love This Recipe
- Aromatically Two-Toned: The layers resemble a latte, making both an attractive and functional bar of soap.
- Gentle Exfoliation: Used coffee grounds provide a gentle scrubbing action, leaving your skin feeling smooth and exfoliated.
- Natural Ingredients: This homemade soap is made with natural ingredients, free from artificial additives.
- Perfect Gift: Once completed, you’ll have a gorgeous bar of soap that makes a fantastic handmade gift for friends and family.
Ingredients
To make this creamy latte-inspired coffee soap, you will need the following ingredients:
Base Ingredients
- Olive Oil: 8 oz
- Coconut Oil: 8 oz
- Palm Kernel Oil: 4 oz
- Coffee Seed Oil: 2 oz
- Used Coffee Grounds: 1 oz
- Distilled Water: Instead of distilled water, use 8 oz brewed coffee
Lye (Sodium Hydroxide)
- Lye: The amount may vary based on the specific oils used. Use a reliable soap calculator to determine the correct measurement based on the total weight of your oils.
Fragrance
- Caffe Latte Fragrance Oil: 1 oz
Optional
- Titanium Dioxide: For lightening the top layer; the amount can vary, but typically about 1 tsp is used.
Equipment
Before getting started, gather the following equipment:
- Scale: For accurate measurements
- Soap Mold: Silicone molds work best for easy removal.
- Stick Blender: For mixing the oils and lye.
- Thermometer: To check temperatures of oils and lye solution.
- Safety Gear: Gloves, goggles, and a mask for handling lye safely.
- Mixing Bowls: Stainless steel or heat-resistant glass.
- Spoons: For mixing and pouring.
Step-by-Step Instructions
Preparation Time: 30 minutes
Making Time: 1 hour
Approximate Yield: 4-6 bars of soap
Follow these steps to make your coffee soap:
Prepare Your Coffee: Brew a strong cup of coffee (about 8 ounces) and allow it to cool completely.
Gather Your Materials: Ensure you have all your equipment and ingredients in a well-ventilated area.
Safety First: Put on your gloves, goggles, and mask before handling lye.
Mix the Lye: Carefully measure the lye based on your soap calculator. Slowly add the lye to the cooled coffee (never the other way around), stirring gently until dissolved. Allow it to cool to around 100°F.
Measure Oils: While the lye cools, measure your oils in a separate bowl. Ensure that they are melted and combined. Aim for the oils to be around 100°F as well.
Blend: Slowly add the lye mixture to the oils. Use the stick blender to combine until you reach a light trace (the mixture should thicken and leave a trail when drizzled over the surface).
Incorporate Coffee Grounds and Fragrance: Add the used coffee grounds and Caffe Latte Fragrance Oil. Blend again to ensure everything is fully combined.
Lightening the Top: If using titanium dioxide, take a small portion of the soap batter and mix with the titanium dioxide until the desired shade is achieved. Gradually fold this lighter mixture into the main soap until you get a mixed appearance.
Pour into Molds: Pour the soap batter into the molds. Tap the molds gently to remove air bubbles.
Cure: Cover the molds with a towel and let them sit undisturbed for 24-48 hours (you may want to check for any signs of gel phase).
Unmold: Once hardened, carefully remove the soap from the molds and cut into bars if necessary.
Cure Time: Place the bars on a curing rack and let them cure for 4-6 weeks in a cool, dry area to allow the saponification process to complete.
Tips for Success
- Coffee Grounds: Use dried coffee grounds from your brew to avoid them bleeding into the soap.
- Temperature: Monitor the temperatures carefully; both the lye solution and oils should be close before mixing.
- Stick Blending: Be careful not to over-blend, as this could cause the mixture to thicken too quickly.
Common Mistakes to Avoid
- Incorrect Lye Measurement: Always use a soap calculator and double-check your measurements before mixing.
- Lye Safety: Never inhale lye, and always keep it away from children and pets.
- Skipping the Cure Time: Do not skip letting the soap cure; it’s crucial for safety and to prevent a harsh bar.
Variations and Customization Ideas
- Colorants: Add natural colorants like mica or clay for visually appealing shades.
- Additional Scents: Mix in other fragrance or essential oils for custom scents.
- Additives: Incorporate oatmeal for extra exfoliation or honey for moisturizing properties.
Storage and Shelf Life
Once your coffee soap is fully cured, store it in a cool, dry place away from direct sunlight. Properly stored, the soap can last for up to a year or more, keeping its fragrance and qualities intact.
Safety Tips
- Always wear protective gear when handling lye.
- Work in a well-ventilated space while mixing lye and oils.
- Store lye in a tightly sealed container, properly labeled, and out of reach of children.
Frequently Asked Questions
Can I use regular water instead of coffee?
- Yes, but the recipe calls for the unique properties of coffee that enhance both scent and exfoliation.
What should I do if my soap is too soft?
- It may need more time to cure. Ensure you’re allowing it to sit for the full 4-6 weeks.
How should I store my coffee soap?
- Store in a cool, dry place away from moisture and sunlight.
Can I use fresh coffee grounds instead of used?
- Used coffee grounds are preferred to avoid any bleeding effects in the soap.
Can I make this soap using the hot process method?
- Yes, but the steps will slightly differ due to the nature of the hot process, which involves cooking the soap mixture.
How can I tell if my soap is ready to use?
- The soap should feel hard and have no residual lye smell; it should have a balanced pH.
Conclusion
Crafting your own coffee-inspired soap is not just a fun project; it’s a delightful way to indulge in your love of coffee while exercising your creative skills. With its unique blend of ingredients and gratifying scent, this DIY coffee soap undoubtedly stands out. Whether you’re treating yourself or making gifts for loved ones, this lotion-like bar of soap encapsulates the comforting vibe of a coffee shop right in your home. Give it a try, and enjoy the scrumptious results!