
6 Ways to Make DIY Beeswax Candles from Scratch at Home
Making DIY beeswax candles is a delightful and rewarding project that brings together the beauty of handmade artistry with the cozy ambiance of soft candlelight. With just a few ingredients and the right techniques, you can create a variety of candle styles, from dipped to jarred, crafted entirely from natural beeswax and DIY cotton wicks. Let’s dive into the wonderful world of candle making with six methods that will suit any beginner!
Why You Will Love This Recipe
Beeswax candles are not only stunning but also offer numerous benefits. They burn cleaner than paraffin candles, emit a warm, honey-like aroma, and even purify the air by releasing negative ions. Additionally, making candles at home is a fantastic way to express your creativity and provide thoughtful handmade gifts. Plus, once you master the basics, you can experiment with scents and colors, tailoring each candle to your taste!
Ingredients
- Beeswax: 1 lb (for most recipes).
- Cotton wicks: Pre-made wicks are preferred, size varies based on the candle style.
- Optional: Natural essential oils for scent (approximately 1 oz).
- Optional: Candle dye or crayons for color (if desired).
Equipment
- Double boiler or a microwave-safe container
- Pouring pitcher or heat-resistant glass measuring cup
- Thermometer (optional but recommended)
- Candle molds or jars (depending on chosen style)
- Wick holder or chopsticks (to stabilize wicks)
Step-by-Step Instructions
Choose one of the six methods below to make your own beeswax candles!
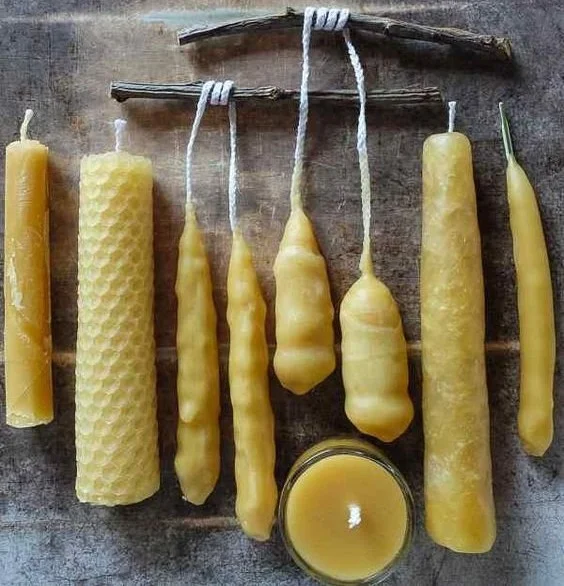
1. Dipped Beeswax Candles
Preparation Time: 10 minutes
Making Time: 2 hours (including cooling)
Yield: Approximately 6-8 candles
- Melt the beeswax: Set up your double boiler, fill the bottom pot with water, and bring it to a simmer. Place beeswax in the top pot and melt completely.
- Prepare your wick: Cut your cotton wick to about 10 inches longer than the desired candle height. Attach one end to a wick holder and secure it on the bottom of a heat-safe surface.
- Dip the wick: Once the wax is melted, dip the wick in for a few seconds. Pull it out and let excess wax drip off. Allow it to cool for a minute before dipping again. Repeat this process until the candle reaches your desired thickness.
- Trim the wick: Once done, trim the wick to about ¼ inch above the candle surface.
2. Poured Beeswax Candles
Preparation Time: 10 minutes
Making Time: 1 hour
Yield: 1-2 medium candles
- Melt the beeswax: Using your double boiler, melt 1 lb of beeswax until fully liquid.
- Add fragrance and color (optional): Once melted, if using, mix in your essential oils or dyes.
- Prepare the container: Secure the wick in the center of a candle jar or mold.
- Pour the wax: Carefully pour the melted beeswax into the container, leaving a small amount of wax for topping off as it cools.
- Cool and trim: Let the candle cool completely, then trim the wick.
3. Rolled Beeswax Candles
Preparation Time: 5 minutes
Making Time: 30 minutes
Yield: 3-4 small candles
- Prepare beeswax sheets: Purchase pre-cut beeswax sheets or cut your own (10 inches x 8 inches is standard).
- Warm the sheets: Gently warm the beeswax sheets with a heat gun or hairdryer to make them pliable.
- Roll the candles: Place the wick at one edge of the beeswax sheet and roll it tightly, applying light pressure as you go for a firm candle.
- Cut off excess wax: Once rolled up, trim any excess beeswax. Secure the end with a little melted beeswax.
4. Jarred Beeswax Candles
Preparation Time: 10 minutes
Making Time: 1 hour
Yield: 2 medium candles
- Set up your jars: Prepare clean, dry jars and secure the wick to the bottom with a drop of melted wax.
- Melt wax: Following the melting process described earlier, melt your beeswax.
- Fragrance and color: If desired, blend essential oils into the melted wax.
- Pour into jars: Slowly pour melted beeswax into the jars, leaving a little space at the top.
- Cool and set: Allow the candles to cool completely before trimming the wick.
5. Molded Beeswax Candles
Preparation Time: 10 minutes
Making Time: 1 hour
Yield: 2 larger candles
- Prepare your molds: Make sure your molds are clean and dry before securing the wick.
- Melt the wax: Melt the beeswax using the double boiler method.
- Pour into molds: Pour the melted beeswax into your candle molds, ensuring the wick stays centered.
- Cool and remove: After cooling completely, gently remove the candles from their molds and trim the wick.
6. Beeswax Sheet Candles
Preparation Time: 5 minutes
Making Time: 30 minutes
Yield: As many as you produce with sheets!
- Warm the sheets: Use a heat gun or hairdryer to warm beeswax sheets until they become pliable.
- Cutting: Cut the sheets into desired shapes (rectangles or other forms) for easy rolling.
- Roll and secure: Roll the sheets around cotton wicks, pressing gently to secure the shape.
- Final touches: Trim any excess beeswax from the ends and adjust the wick length.
Tips for Success
- Measure Wax Accurately: Use a kitchen scale for precise measurements.
- Temperature Control: Aim to melt beeswax at a low temperature (around 150°F) to preserve its quality.
- Adjust Wicks Accordingly: Check wick sizes based on your candle diameter for the best burn.
Common Mistakes to Avoid
- Overheating Wax: Too high a temperature can alter the properties of beeswax.
- Ignoring Wick Size: Using the wrong wick size can result in improper burning.
- Insufficient Cooling Time: Allow your candles to cool completely before handling.
Variations and Customization Ideas
- Scents: Experiment with various essential oils, like lavender or citrus, for fragrant candles.
- Colors: Use natural candle dyes or crayons for colorful creations.
- Shapes: Try various molds to create different designs and shapes.
Storage and Shelf Life
Store your candles in a cool, dark place away from direct sunlight or heat sources. Properly stored beeswax candles can last for several years without losing their quality.
Safety Tips
- Always work in a well-ventilated area.
- Be cautious with hot wax to avoid burns.
- Never leave melted wax unattended.
Frequently Asked Questions
1. Can I use paraffin wax instead of beeswax?
While you can, beeswax offers a natural alternative with better air-purifying properties.
2. How can I fix a candle with a wick that’s too short?
Melt a little beeswax and dip the wick or use a wick holder to extend it.
3. Why do my candles have cracks?
Cracks can occur from uneven cooling. Pour wax slowly, allowing it to cool gradually.
4. Can I use my homemade beeswax candles outdoors?
Yes, but be mindful of wind as it may blow out the flame.
5. Will my candles smell like beeswax?
Yes, beeswax has a delightful natural scent, even without added fragrances.
6. How can I tell if my wick is the right size?
Conduct a burn test; if the candle doesn’t burn evenly or produces too much soot, try a different wick size.
Conclusion
Creating DIY beeswax candles is an enjoyable experience that offers endless possibilities for creativity. With these six methods, you can craft unique candles that brighten your home or serve as thoughtful gifts. So gather your supplies and get started on your candle-making journey today! You’ll not only create something beautiful but also enjoy the calming benefits of the warm glow and delightful aroma that your handmade candles will provide. Happy crafting!