
Make Your Own Pressed Rosemary Candles
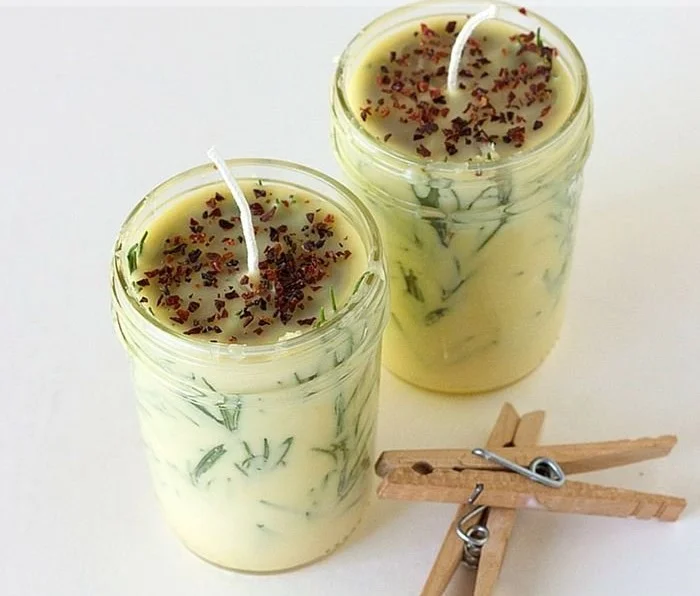
Are you looking for a unique and delightful way to add a touch of nature to your home or create heartfelt gifts? Pressed rosemary candles are not only visually stunning but also fill your space with the enchanting aroma of fresh herbs! This DIY project is perfect for beginners and sweetens up your home decor or makes thoughtful gifts for friends and family. Let’s dive into how you can create these beautiful candles using rosemary harvested right from your garden.
Why You Will Love This Recipe
- Natural Beauty: The delicate appearance of pressed rosemary adds a rustic charm to any space.
- Aromatic Enjoyment: Candles made with natural materials infuse your home with delightful scents.
- Personal Touch: Handmade gifts show thoughtfulness, making them more valuable to recipients.
- Easy to Customize: You can modify this recipe according to your style and scent preferences.
Ingredients
To make your own pressed rosemary candles, you will need the following ingredients:
- Soy wax: 1 pound (approximately 16 ounces)
- Essential oils (optional): 1-2 ounces (common choices are lavender or eucalyptus for a fresh scent)
- Fresh rosemary: Enough to cover the surface of your candle container
- Candle dye (optional): If you want to add color
Equipment
Gather the following tools and equipment before you begin your DIY project:
- Double boiler: For melting the wax
- Pouring pitcher: To transfer melted wax into the candle containers
- Candle wick: Size will depend on your container (usually 6-8 inches)
- Wick holder or chopstick: To keep the wick centered while pouring
- Candle containers: Glass jars or metal tins work perfectly
- Thermometer: To monitor the wax temperature
- Scissors: For trimming the wick post-making
- Paper towels: For spills and clean-up
Step-by-Step Instructions
Step 1: Prepare Your Rosemary
- Harvest Rosemary: If your rosemary is homegrown, pick sprigs early in the morning for the best fragrance. Make sure they’re clean and dry.
- Press Rosemary: Place the sprigs between two sheets of absorbent paper and press them flat using a heavy book or a flower press for a few days. This will ensure they stay flat against your candle.
Step 2: Measure and Melt the Wax
- Measure Wax: Weigh out 1 pound of soy wax flakes using a kitchen scale.
- Set Up Double Boiler: Fill the bottom of the double boiler with water and bring it to a simmer over medium heat.
- Melt Wax: Add the soy wax to the top part of the double boiler. Stir occasionally until fully melted (about 10-15 minutes). Use your thermometer to monitor the temperature, aiming for about 170-180°F (76-82°C).
Step 3: Add Fragrance (Optional)
- If you’re using essential oils for fragrance, remove the melted wax from heat. Add in 1-2 ounces of essential oils and stir well.
Step 4: Assemble Your Candles
- Attach Wick: Secure the wick to the bottom of your candle container using a small amount of melted wax or a wick sticker.
- Insert Pressed Rosemary: Carefully place the pressed rosemary against the interior walls of the container, ensuring they are well positioned for visibility.
- Pour Wax: Gently pour the melted wax into the container, ensuring it covers the rosemary but doesn’t disturb it. Leave a small gap at the top (about 1/4 inch).
Step 5: Secure the Wick
- Keep Wick Centered: Place a wick holder or a chopstick across the top of the container to hold the wick in place as the wax sets.
Step 6: Let it Cool
- Allow the candles to cool and solidify completely at room temperature, which may take about 4-6 hours. Avoid moving them during this time.
Step 7: Trim the Wick
- Once hardened, trim the wick to about 1/4 inch above the wax surface.
Tips for Success
- Temperature Control: Try not to pour the wax too hot. If it’s boiling, it may harm the pressed herbs.
- Test Burns: If this is your first time making candles, test burn one to ensure it has a good scent throw and burn time.
Common Mistakes to Avoid
- Overheating Wax: Always monitor the wax temperature and never let it overheat, as it could become unsafe.
- Wick Size: Using the wrong size may result in poor burning. Always choose the appropriate wick for your container size.
- Not Enough Fragrance: If you enjoy scented candles, be sure to experiment with the essential oil amount for your favorite balance.
Variations and Customization Ideas
You can customize your pressed rosemary candles in various ways:
- Different Herbs: Try mixing in other pressed herbs or flowers like lavender, thyme, or even dried flowers.
- Color Dyes: Add candle dye to give your candles a pop of color. Remember to add it before adding your fragrance.
- Scent Combinations: Experiment with various scent combinations using essential oils for a more complex aroma.
Storage and Shelf Life
Store your finished pressed rosemary candles in a cool, dry place away from direct sunlight. When kept properly, they can last up to a year. Before use, trim the wick if it has grown longer during storage.
Safety Tips
- Burn Candles Safely: Always burn candles on a flat, stable surface, away from flammable materials. Never leave candles unattended.
- Handling Wax: Be cautious when working with hot wax. Use pot holders if necessary to avoid burns.
Frequently Asked Questions
1. Can I use other wax types besides soy?
Yes, you can use beeswax or paraffin, but you may need to adjust the melting temperature.
2. How do I know if my wick is the right size?
Follow the wick manufacturer’s guide based on your container diameter. Consider testing different sizes for best results.
3. What should I do if my candle doesn’t burn evenly?
Make sure the wick is trimmed to the right height and try to center it properly when pouring the wax.
4. Can I add color to my candles?
Absolutely! Candle dye can be added during the melting process for a custom aesthetic.
5. What’s the best way to remove spilled wax from surfaces?
For hard surfaces, allow it to cool and then peel it off. You can also use a scraper for stubborn bits. For fabric, heat through a paper towel to melt it slightly before removing.
Conclusion
Making your own pressed rosemary candles can be a delightful and fulfilling project that enhances your home or provides thoughtful gifts. This step-by-step guide equips you with all the tools and knowledge necessary to create beautiful, aromatic candles right in your kitchen. So gather your materials, let your creativity flow, and enjoy the charming touch of handmade candles in your life. Happy crafting!