
Creating a 100-Hour Candle: A Simple and Enjoyable DIY Project
Have you ever found yourself in the dark, searching for a reliable source of light during an emergency or cozy evening in? Creating a 100-hour candle is an excellent solution that’s both practical and fun. With just a few household items—a thin candle, a jar, and some Crisco—you can make a long-lasting light source. This beginner-friendly DIY project allows you to enjoy the warm glow of candlelight without the worry of it burning out too quickly. Let’s dive into how you can make your very own 100-hour candle!
Why You Will Love This Recipe
Creating a 100-hour candle is not only straightforward but also an engaging activity that can provide comfort during power outages or enhance a quiet night at home. You will appreciate:
- Affordability: You already have many of the materials at home.
- Time-efficiency: Preparing and crafting this candle takes minimal time.
- Sustainability: Using a jar reduces waste, making it an environmentally friendly option.
- Customizability: You can modify the scent and design to make this candle uniquely yours.
Ingredients
To create your 100-hour candle, you will need the following ingredients:
- Thin candle: 1 standard thin candle (approximately 4-6 inches long)
- Crisco vegetable shortening: 1 can (16 oz)
- Optional: Scented oil (if desired for fragrance – 1-2 teaspoons)
Feel free to adjust the amount of Crisco based on the size of your container.
Equipment
Gather the following equipment to ensure a smooth candle-making experience:
- Heat-resistant glass jar or container: A mason jar works beautifully.
- Double boiler or a makeshift double boiler (e.g., placing a mixing bowl over a pot of simmering water)
- Spoon or stick: For stirring the mixture
- Wick (if not using a pre-made candle): Typically a cotton wick, cut to fit your jar
- Scissors: For trimming the wick
Step-by-Step Instructions
Preparation Time: 10 minutes
Making Time: 15-20 minutes
Yield: 1 candle (approx. 100 hours of burn time)
Prepare Your Workspace: Begin by covering your work area with newspaper or a plastic sheet to catch any spills.
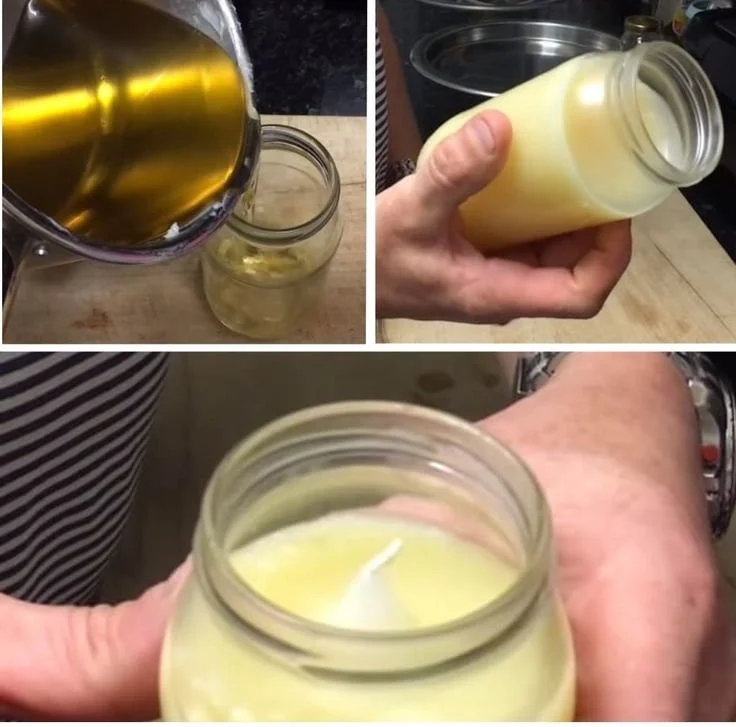
Melt the Crisco: In your double boiler, add the entire contents of your Crisco can. Allow it to melt over medium heat, stirring occasionally to ensure even melting. This should take about 10 minutes.
(Optional) Add Fragrance: If you want your candle to have a scent, add 1-2 teaspoons of your preferred scented oil to the melted Crisco. Mix well with a spoon or stick.
Secure the Wick: If you’re using a wick, prepare your jar by placing the wick at the center of the bottom. You can secure it lightly with a bit of melted Crisco or a dab of hot glue.
Pour the Mixture: Carefully pour the melted Crisco into the jar, ensuring the wick remains centered. Leave a little space at the top, about half an inch.
Set and Cool: Allow the candle to cool at room temperature for several hours until completely solidified. This could take up to 2 hours.
Trim the Wick: Once the candle is fully set, trim the wick to about ¼ inch above the surface of the candle.
That’s it! You now have a homemade 100-hour candle ready to brighten your space or to be gifted as a handmade gift!
Tips for Success
- Humidity Matters: Ensure that your Crisco is stored in a cool and dry place before use; excess moisture can affect the melt.
- Even Burning: When lighting your candle, allow it to burn until the top layer is fully liquefied. This prevents tunneling and ensures an even burn.
Common Mistakes to Avoid
- Using the Wrong Type of Candle: Make sure to use a thin candle for the best results. Thicker candles may not melt evenly.
- Not Securing the Wick: If the wick isn’t secured well, it will lean and not burn properly.
- Pouring Too Fast: Pour the melted wax slowly to avoid air bubbles.
Variations and Customization Ideas
- Scent Variations: Experiment with different scented oils like lavender, vanilla, or eucalyptus for a pleasant aroma.
- Coloring: Add candle dye to your melted Crisco for a pop of color.
- Decorative Adding: For a rustic feel, consider adding dried flowers or herbs to your candle.
Storage and Shelf Life
Store your finished candles in a cool, dark place to maximize shelf life. The Crisco will solidify, maintaining its integrity for years.
Safety Tips
- Handle Melted Crisco with Care: It can become very hot. Use potholders when handling the double boiler.
- Use in a Safe Environment: Always burn candles in a well-ventilated area away from flammable materials.
- Never Leave Unattended: Don’t leave a burning candle unattended, and extinguish it when you leave the room.
Frequently Asked Questions
Can I use other types of shortening besides Crisco?
Yes, other vegetable shortenings can work, but make sure they are of high quality for the best results.
How can I prevent my wick from burning out too quickly?
Ensure that your wick is the correct size for the jar and candle mixture. A wick that is too thick may burn too quickly, while a wick that is too thin may not be able to sustain the flame.
How should I extinguish the candle safely?
Use a candle snuffer to extinguish the candle rather than blowing it out, as this minimizes smoke.
How do I clean the jar if there’s leftover wax?
Heat the jar gently in a double boiler to melt the residue and then wipe with a paper towel. Avoid scouring pads that can scratch the glass.
How can I make my candle last longer?
Ensure the wick is trimmed to the correct length and avoid burning the candle for prolonged periods at once.
Can I use an electric stove for melting Crisco?
It’s better to use a gas stove if possible, to have more control over the heat. If using an electric stove, use a medium heat setting to avoid overheating.
Conclusion
Making a 100-hour candle is a fantastic DIY project that suits both beginners and seasoned creators. It’s easy, affordable, and provides a lasting source of warmth and light. The options for customization allow you to express your creativity, while your finished product becomes a helpful addition to your home or a thoughtful handmade gift. So gather your materials, clear your workspace, and enjoy crafting your very own candle! Happy candle-making!