
Easy Beeswax and Coconut Oil Candles Recipe
Making homemade candles can be a delightful and rewarding project, providing you with beautifully scented creations that light up your home. If you’re ready to dive into the world of candle making or are looking for a new DIY project, this beeswax and coconut oil candles recipe is both easy and affordable. You’ll be amazed by how simple it is to craft these natural, eco-friendly candles!
Why You Will Love This Recipe
Candle making can seem daunting at first, but this recipe keeps things simple. You’ll find that using beeswax and coconut oil not only produces a clean-burning candle but also infuses your space with a lovely, subtle fragrance. Plus, working on this project can be a great way to relax and unleash your creativity.
Ingredients
For this project, you will need the following ingredients:
- 1 cup of beeswax pellets
- ½ cup of coconut oil
- Essential oils (optional): 15-30 drops for fragrance
- Wicks: Pre-waxed cotton or wood wicks
- Containers: Glass jars or metal tins to hold your candles
Equipment
Gather the following equipment to make your candle-making process smooth:
- Double boiler or a microwave-safe bowl
- Thermometer
- Stirring spoon or stick
- Pouring pitcher (optional but helpful)
- Wick holder (can be a pencil or a dedicated candle wick holder)
- Scale (for precise measurements)
- Safety gloves and glasses (for protection)
Step-by-Step Instructions
Follow these straightforward steps to create your beeswax and coconut oil candles:
Prepare Your Workspace: Lay down newspaper or a protective covering on your work surface. Ensure good ventilation in your workspace.
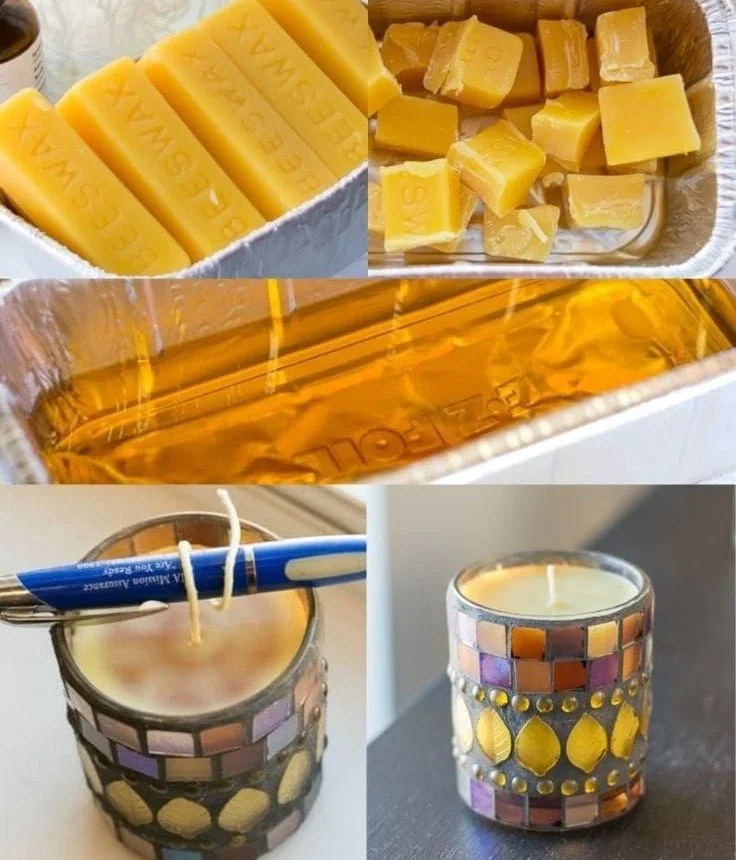
Measure Ingredients: Using a scale or measuring cups, measure out 1 cup of beeswax pellets and ½ cup of coconut oil.
Melt the Candles:
- If using a double boiler: Fill the lower pot with water and bring it to a gentle simmer. Place the beeswax in the top pot and let it begin to melt. Stir occasionally until melted.
- If using a microwave: Place the beeswax in a microwave-safe bowl and heat in 30-second intervals, stirring in between, until fully melted.
Add Coconut Oil: Once the beeswax is melted, add in the coconut oil. Stir gently until completely blended and melted together.
Incorporate Fragrance (Optional): If you’d like to add fragrance, remove the mixture from heat and let it cool slightly. Add 15-30 drops of your chosen essential oil and stir thoroughly.
Prepping Wicks: While the wax cools, attach the wick to the bottom of your chosen container using a dot of melted wax or a wick sticker. Use a wick holder to keep the wick centered.
Pour the Wax: Carefully pour the melted wax mixture into your prepared containers, leaving about half an inch of space at the top.
Secure the Wicks: Ensure that the wicks remain centered as the wax begins to cool and harden.
Cool the Candles: Allow your candles to cool at room temperature for at least 4-6 hours or until completely solid.
Trim the Wicks: Once cooled, trim the wicks to about ¼ inch above the surface of the candle.
Tips for Success
- Temperature Control: Keep an eye on the temperature of the wax. It should not exceed 185°F (85°C) to ensure the oils do not break down.
- Wick Size: Use an appropriate wick size for your container’s diameter for an even burn. A wick that’s too small will burn out quickly, while one too large may create excessive smoke.
- Fragrance Testing: If you’re experimenting with essential oils, test small batches first to find the scent strength you prefer.
Common Mistakes to Avoid
- Overheating the Wax: High temperatures can alter the wax and essential oils, leading to a poor quality candle.
- Not Centering the Wick: Take your time to ensure your wick remains upright and centered while the wax cools.
- Skipping Measurements: Accurate measurement of wax and oils is crucial for the candle’s performance.
Variations and Customization Ideas
Feel free to customize your candles with the following ideas:
- Color: Add candle dyes specifically designed for wax if you desire colored candles.
- Fragrance Blends: Experiment with different essential oil blends or natural extracts like vanilla, lavender, or citrus for unique scents.
- Decorative Toppings: Once poured, you can sprinkle dried herbs or flowers on top for decoration.
Storage and Shelf Life
Store your candles in a cool, dry place away from direct sunlight. When kept properly, your beeswax and coconut oil candles can last up to a year.
Safety Tips
- Always work in a well-ventilated area and keep a fire extinguisher nearby.
- Never leave melting wax unattended and use caution when handling any hot materials.
- Use gloves and safety goggles when necessary to protect yourself.
Frequently Asked Questions
Q1: Can I use other oils besides coconut oil?
A: Yes, you can substitute coconut oil with other carrier oils like jojoba or sunflower oil, though it may affect the candle’s texture and burn.
Q2: How do I know if my wick is appropriate?
A: Conduct a burn test once your candle is made. If the flame flickers or the candle doesn’t burn properly, adjust your wick size accordingly.
Q3: Can I use leftover candle wax?
A: Absolutely! Just ensure that any leftover wax is cleaned of impurities and blended properly with new wax.
Q4: How can I ensure my candle burns evenly?
A: Choose the correct wick size and maintain a proper wick length when trimming. Regular tests can help find the right size for your container.
Q5: What should I avoid adding to my candles?
A: Avoid adding water, as it can disrupt the wax and cause it not to set properly. Also, do not use fragrance oils that are not designed for candle making.
Conclusion
Creating beeswax and coconut oil candles is a fantastic way to bring warmth and ambiance into your home while enjoying a satisfying DIY project. With just a few simple ingredients and tools, you can craft beautiful candles that make for wonderful gifts or delightful personal treats. So gather your supplies and give this candle-making recipe a try—you might discover a new favorite hobby! Happy crafting!