
How to Make a Halloween Witches Brew Cauldron Candle
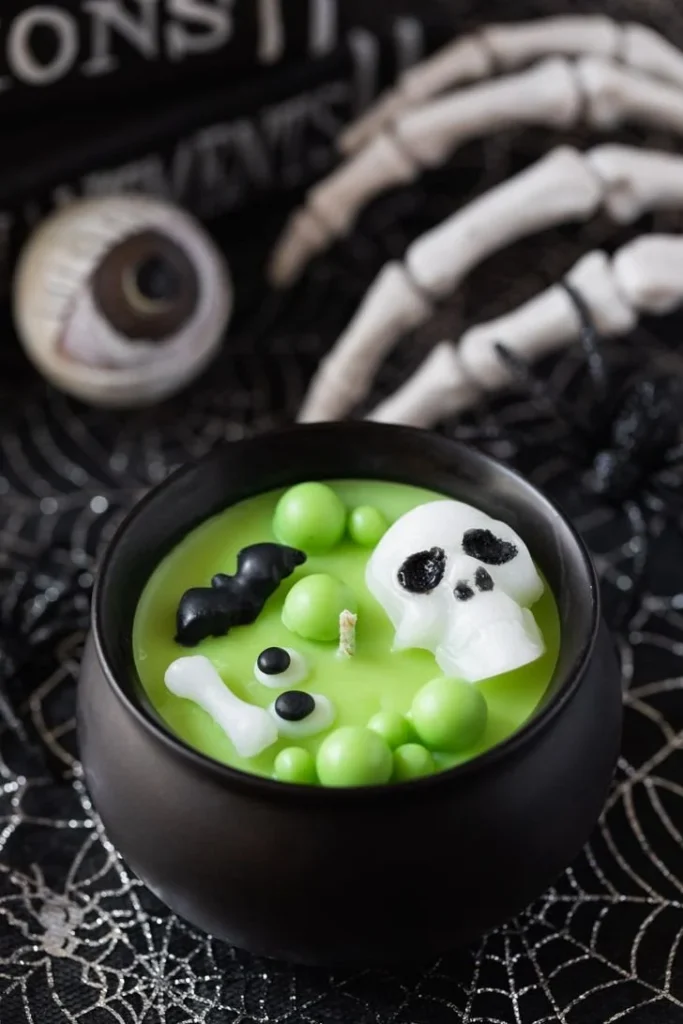
As the air turns crisp and nights grow longer, Halloween enthusiasts begin to prepare for their favorite spooky season. What better way to celebrate than with a delightful Halloween witches brew cauldron candle? This candle, adorned with skulls, bats, bones, and eerie green brew bubbles, not only adds a festive touch to your Halloween décor but also fills your home with a cozy scent. In this guide, we’ll walk you through the process of creating this enchanting candle, making it an enjoyable project even for beginners.
Why You Will Love This Recipe
There’s something magical about candle-making, especially when it ties into Halloween. Making your own candles allows you to customize scents, colors, and decorations to perfectly fit your theme. Plus, this project is an opportunity to be creative and let your imagination run wild! This witches brew candle serves not only as beautiful decor but also as a fun, homemade gift for friends and family.
Ingredients
To make your witches brew cauldron candle, you will need:
Candle Ingredients:
- Soy Wax Flakes: 16 ounces (makes approximately 2 standard candles)
- Fragrance Oil: 1-2 ounces (choose your favorite fall scent, like pumpkin spice or cinnamon)
- Dye: Green candle dye (or crayon shavings as a natural alternative)
Decorative Elements:
- Skulls, Bats, Bones, and Plastic Eyeballs: As many as you like for decoration
- Green Glitter: Optional, for added shimmer
- Brew Bubble Bubbles: Small glass or plastic beads in green
Container:
- Cauldron or Black Candle Vessels: 2 (you can find small cauldron-shaped containers at craft stores)
Equipment
Here is the equipment you will need for candle-making:
- Double Boiler: For melting wax
- Thermometer: To monitor wax temperature
- Candle Wicks: Pre-waxed and with metal sustainer (two for this project)
- Wick Holders or Skewers: To keep the wick centered during pouring
- Pouring Pitcher: For an easy transfer of melted wax into containers
- Measuring Cups and Spoons: For accurate measuring of wax and fragrance
- Stirring Spoon: A wooden or silicone spoon for stirring the dye and fragrance into the wax
Step-by-Step Instructions
Preparation Time: 15 minutes
Making Time: 1 hour (including cooling)
Yield: 2 candles
Steps:
Prepare Your Work Area: Lay down newspaper or a protective cloth to catch any spills. Gather all your materials and equipment.
Melt the Wax:
- Fill the bottom pot of your double boiler with water and heat it on medium-low.
- Place 16 ounces of soy wax flakes into the top pot and allow them to melt, stirring occasionally until fully liquid. This usually takes around 10-15 minutes.
- Check the temperature using your thermometer; it should reach around 170°F (77°C).
Add Color:
- Once the wax is melted, carefully add green dye according to the manufacturer’s instructions. Stir well until the color is even. If using crayon shavings, add them in small amounts until your desired hue is achieved.
Incorporate Fragrance:
- Remove the wax from heat. Add 1-2 ounces of your chosen fragrance oil for the perfect seasonal aroma. Stir thoroughly to ensure it is evenly distributed.
Prepare the Containers:
- While the wax cools slightly, place the wick in the center of each cauldron or black vessel. Use wick holders or skewers to stabilize the wicks.
Pour the Wax:
- Pour the melted wax carefully into each container, leaving about half an inch from the top. Make sure the wick remains centered. Allow the candles to cool for about 30 minutes.
Add Decorations:
- While the candles are cooling, sprinkle the surfaces with green glitter and arrange your decorative elements (skulls, bats, bones, and plastic eyeballs) on top. Use a few beads as "bubbles" for visual interest.
- If the wax has formed a surface skin before adding decorations, reheat the top layer with a heat gun or hairdryer briefly.
Set and Cure:
- Allow the candles to cool fully, typically 1-2 hours. Once set, trim the wick to about 1/4 inch above the wax surface.
Tips for Success
- Testing Fragrance Strength: Use 1 ounce of fragrance for a more subtle scent and 2 ounces for a stronger aroma.
- Cool Temperature: Do not pour wax at temperatures higher than indicated, as it can affect the scent throw and cause more inconvenience.
- Bubbles in Wax: If you notice bubbles forming while pouring, lightly tapping the sides of the container can help release them.
Common Mistakes to Avoid
- Overheating the Wax: Stick to the recommended temperatures. Overheating can lead to discoloration or the scent being burnt off.
- Skipping the Wick Testing: Always perform a wick test with a small candle first. This allows you to ensure the wick size is correct and prevents soot or uneven burning.
Variations and Customization Ideas
- Scent Options: Choose any seasonal scent like apple cider, autumn leaves, or even caramel corn.
- Decor Style: Utilize different colors or larger decorations based on your Halloween theme.
- Layered Candles: Create layers with different colors and scents by allowing each layer to cool before adding the next.
Storage and Shelf Life
Store your finished candles in a cool, dry place away from direct sunlight. Properly stored, these candles should last for about 6-12 months. Keep them in their containers or in a box to prevent dust accumulation.
Safety Tips
- Candle Burning: Use your candles on a heat-resistant surface and never leave burning candles unattended. Keep candles away from drafts and flammable materials.
- Handling Hot Wax: Use gloves when handling hot equipment or wax to avoid burns.
- Ventilation: Ensure your workspace is well-ventilated, especially when working with fragrances.
Frequently Asked Questions
Can I use other types of wax instead of soy?
Yes, you can use paraffin or beeswax, but remember that each wax has different melting points and may require specific wicks.
How do I troubleshoot my candles burning poorly?
If your candle is not burning evenly, it might be due to incorrect wick size or positioning. Always perform a wick test before making larger batches.
Can I use essential oils instead of fragrance oils?
Yes, you can! However, essential oils may not provide as strong a scent throw as fragrance oils, so adjust your quantity accordingly.
How do I clean up spills?
Wax spills can be cleaned up easily when they’re still warm. Use paper towels to absorb the wax; hardened wax can be removed by scraping gently.
What if my candles have cracks?
Cracks can occur if the wax cools too quickly. Try pouring the wax at a slightly higher temperature or re-melting the top layer.
Conclusion
Making your own Halloween witches brew cauldron candle is a fun, rewarding project that adds charm and ambiance to your Halloween celebrations. As you fill your home with the glow and scent of your creations, you’ll also gain confidence in your DIY candle-making skills. Don’t hesitate to experiment with scents and decorations, making this project uniquely yours. Gather your supplies, set the mood with some spooky music, and let your creativity shine! Happy crafting!