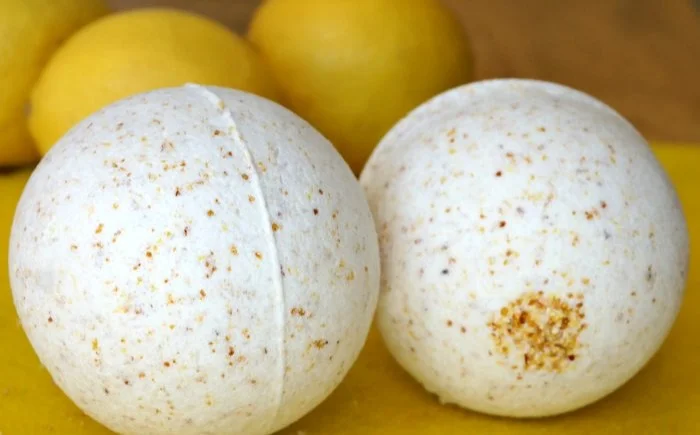

Lemon Vanilla Bath Bomb Fizzy
Creating your own bath bombs is one of the most enjoyable and rewarding DIY projects. The delightful fizz combined with invigorating scents makes bath time a restorative ritual. In this article, I’ll guide you through making exquisite Lemon Vanilla Bath Bomb Fizzy, which not only adds luxury to your bathing experience but also serves as a wonderful homemade gift. So, gather your materials and let’s get started!
Why You Will Love This Recipe
This Lemon Vanilla Bath Bomb recipe combines the invigorating scent of lemon with the warm sweetness of vanilla, creating a refreshing and calming experience. Plus, making bath bombs is surprisingly simple! You can customize them with colors, additional scents, or different shapes to suit your fancy. They are perfect for personal use or as thoughtful gifts for friends and family.
Ingredients
For your bath bombs, you will need the following ingredients:
- 1 cup baking soda
- 1/2 cup citric acid
- 1/2 cup Epsom salt
- 1/2 cup cornstarch
- 2 1/2 tablespoons coconut oil (melted)
- 20 drops lemon essential oil
- 10 drops vanilla essential oil
- Optional: A few drops of yellow food coloring
Equipment
To successfully create your Lemon Vanilla Bath Bombs, you’ll need the following equipment:
- Two mixing bowls
- A whisk
- A bath bomb mold (silicone molds work great)
- A measuring cup and spoons
- Gloves (optional)
- A baking sheet or tray for drying
- An airtight container for storage
Step-by-Step Instructions
Follow these easy steps to make your Lemon Vanilla Bath Bombs:
Mix the Dry Ingredients: In a large mixing bowl, combine 1 cup of baking soda, 1/2 cup of citric acid, 1/2 cup of Epsom salt, and 1/2 cup of cornstarch. Whisk them together until well blended, and there are no lumps.
Melt the Coconut Oil: In a small microwave-safe bowl, melt 2 1/2 tablespoons of coconut oil in the microwave. Be careful not to overheat it.
Combine Wet Ingredients: In another bowl, mix the melted coconut oil with 20 drops of lemon essential oil and 10 drops of vanilla essential oil. If you’re using food coloring, gradually add a few drops until you achieve your desired hue.
Mix Wet and Dry Ingredients: Slowly add the wet mixture to the dry mixture. It’s best to do this in small amounts to prevent fizzing. Mix together until the texture resembles damp sand and holds its shape when squeezed in your hand. If it’s too crumbly, you can add a little more liquid.
Mold the Bath Bombs: Pack the mixture firmly into your bath bomb molds, pressing down to ensure it holds its shape. Overfilling slightly can help ensure they stay together.
Drying Time: Allow the bath bombs to sit in the mold for about 24 hours. Once set, gently remove them and place them on a baking tray to air dry further for another 24 hours.
Store: Once completely dry, store your bath bombs in an airtight container away from moisture. They can last for up to six months!
Tips for Success
- Humidity Matters: Bath bombs need to be made in dry weather. Humidity can cause them to fizz prematurely during the mixing process. If you’re in a humid environment, make them quickly and in small batches.
- Don’t Rush: Allow the bath bombs ample time to dry. If they are removed from the molds too soon, they may crumble.
- Consistent Mixing: Ensure the dry and wet ingredients are mixed well to produce an even texture and scent.
Common Mistakes to Avoid
- Too Much Liquid: Adding too much liquid too quickly can create an immediate fizz and ruin your bath bombs. Introduce wet ingredients gradually.
- Using the Wrong Mold: Ensure your molds are designed for bath bombs. Silicone molds work best as they allow easy release.
- Skipping Drying Time: Patience is key. Make sure they are completely dry before use or storage.
Variations and Customization Ideas
Feel free to get creative with your bath bombs! Here are some suggestions:
- Add Dried Flowers: Incorporate dried lavender, chamomile, or rose petals for a beautiful touch.
- Change the Scents: Experiment with other essential oils like lavender, eucalyptus, or peppermint for a different aromatic experience.
- Color Play: Consider using layering techniques with colors or creating swirls for a visually stunning effect.
- Use Molds: Use heart-shaped, star-shaped or other themed molds for seasonal gifts.
Storage and Shelf Life
Store your finished bath bombs in an airtight container in a cool, dry place. They generally last up to 6 months but are best used within a few weeks for maximum fizz and fragrance.
Safety Tips
While making your bath bombs, here are some crucial safety tips to keep in mind:
- Essential Oils: Always conduct a patch test before using new essential oils, especially if you have sensitive skin.
- Coconut Oil: While generally safe, avoid using it in excessive amounts, as it may make the tub slippery.
- Mold Handling: When removing bath bombs from molds, do so gently to avoid breaking them.
Frequently Asked Questions
Q1: Can I use regular oils instead of essential oils?
A: While you can use fragrance oils, essential oils are preferable for both their aromatic and therapeutic properties.
Q2: What happens if my bath bombs don’t fizz?
A: If your bath bombs are too dry or have too much moisture due to humidity, they may not fizz properly. Ensure the ingredients are mixed correctly and the drying time is adequate.
Q3: Can I add glitter to my bath bombs?
A: You can use biodegradable glitter as a safe and eco-friendly option, but avoid conventional plastic glitter which can harm the environment.
Q4: What if the bath bombs crumble after removing them from the mold?
A: If they crumble, they may have been removed too soon or were too dry. If you encounter this, try adding more coconut oil next time for better binding.
Q5: Can children use these bath bombs?
A: Yes, as long as they are made with skin-safe ingredients. It’s best to supervise young children during bath time.
Q6: How can I enhance the color and scent of my bath bombs?
A: Increase the number of essential oil drops slowly and use food coloring gradually to prevent over-saturation.
Conclusion
Making Lemon Vanilla Bath Bomb Fizzies doesn’t just elevate your bath time; it’s a wonderful learning experience. With just a few ingredients and some patience, you can craft delightful treats that nourish both body and mind. Don’t hesitate to experiment with different scents and designs—you might discover your signature bath bomb! Enjoy the luscious fizz and the heavenly aroma while pampering yourself or giving thoughtful gifts to loved ones. Happy crafting!