
How to Make Beautiful DIY Honey Lemon Lavender Soap Bars
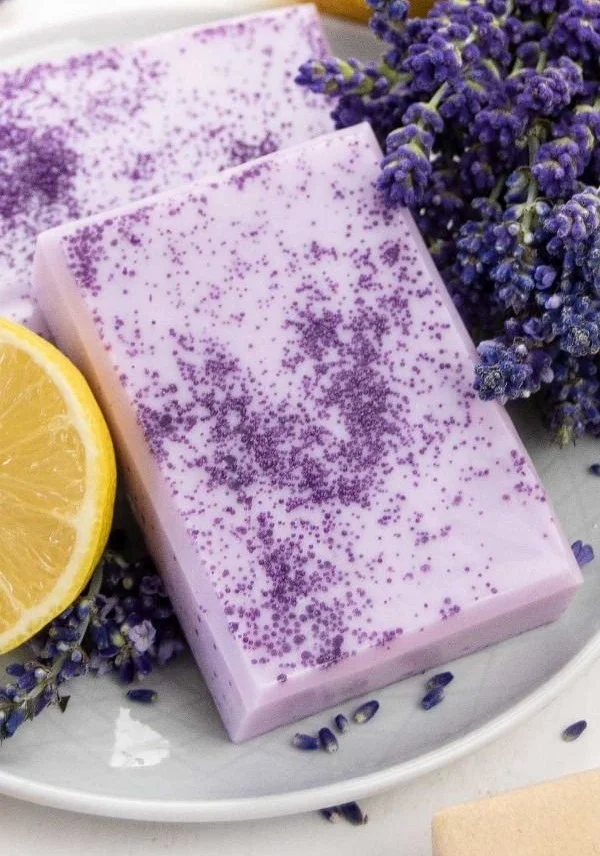
Creating your own soap at home can be a delightful experience, combining creativity with practicality. In this guide, you’ll learn how to make beautiful DIY honey lemon lavender soap bars that not only smell divine but also offer great skincare benefits. This beginner-friendly recipe uses a melt-and-pour method, making it safe and accessible for everyone. Plus, with the soothing scents of lemon and lavender, these soap bars can double as thoughtful handmade gifts!
Why You Will Love This Recipe
- Easy and Fun: Perfect for beginners, this recipe requires no lye or complicated tools.
- Customizable: You can adjust scents and ingredients to match your preferences.
- Natural Ingredients: Using a goat milk or shea butter base ensures your soap is gentle and nourishing for your skin.
- Giftable: With printable labels and wrapping ideas, these soap bars make lovely gifts for friends and family.
Ingredients
To make approximately 8-10 soap bars, you will need:
- 1 lb goat milk or shea butter soap base
- 1 tablespoon honey (preferably raw)
- 1 teaspoon lemon essential oil
- 1 teaspoon lavender essential oil
- A few drops purple soap colorant (optional)
- Soap molds (silicone molds work best)
Equipment
- Microwave-safe bowl or double boiler
- Stirring spoon or spatula
- Measuring spoons
- Soap molds
- Printable labels for packaging (optional)
Step-by-Step Instructions
Preparation Time
- Prep Time: 10 minutes
- Making Time: 30 minutes
- Cooling Time: 1-2 hours (until completely set)
Instructions
Cut the Soap Base: Begin by cutting your soap base into small cubes (about 1-inch) to ensure even melting.
Melt the Soap Base: Place the soap cubes in a microwave-safe bowl. Heat in the microwave in 30-second intervals, stirring between each, until completely melted. Alternatively, use a double boiler for a more controlled melting process.
Add Honey: Once melted, add 1 tablespoon of honey to the soap base and stir well. Honey is a natural humectant, which means it helps retain moisture in your skin.
Incorporate Essential Oils: Add 1 teaspoon each of lemon and lavender essential oils. Stir thoroughly to distribute the scents evenly. If you want your soap to have a lovely purple hue, add a few drops of purple colorant and mix until you reach your desired shade.
Pour into Molds: Carefully pour the soap mixture into your molds. Leave a little space at the top, as the soap may expand slightly as it cools.
Cool and Set: Allow the soap to sit at room temperature for at least 1-2 hours until completely hard. If you’re in a hurry, you can place them in the refrigerator for about 30 minutes to speed up the cooling process.
Unmold: Once set, gently pop the soap bars out of the molds.
Label and Wrap: If you’re gifting these soaps, print out labels and wrap them in decorative paper or clear cellophane bags.
Tips for Success
- Temperature Control: Avoid overheating the soap base, as it can lose its beneficial properties. Melting gently is key.
- Mix Well: Make sure to stir the honey and essential oils thoroughly to prevent them from clumping at the bottom.
- Test Scents: If you’re unsure about the strength of the essential oils, start with a smaller amount and gradually increase based on your preference.
Common Mistakes to Avoid
- Not Measuring Ingredients: Accurate measurements ensure that the soap sets correctly and has the intended fragrance.
- Skipping Cooling Time: Be patient; allowing your soap to cool completely prevents warping and ensures a nice finish.
- Forgetting to Use a Silicone Mold: Other types of molds can be difficult to remove the soap from and may result in damage to your bars.
Variations and Customization Ideas
- Add Exfoliants: Incorporate natural exfoliants like oatmeal or poppy seeds for a textured bar.
- Change Scents: Swap lavender for other essential oils, such as eucalyptus, rose, or tea tree, to create different scent profiles.
- Add Botanicals: Dried flowers or herbs can be mixed into the soap base for added visual interest and aroma. Experiment with dried lavender or lemon zest for a beautiful touch.
Storage and Shelf Life
Store your finished soap bars in a cool, dry place away from direct sunlight. If kept in an airtight container, they can last up to 6 months, retaining their scent and moisturizing properties.
Safety Tips
- Always work in a well-ventilated area when using essential oils.
- If you have sensitive skin or allergies, it’s a good idea to perform a patch test before using the soap.
- Keep essential oils away from the eyes and avoid ingesting them.
Frequently Asked Questions
1. Can I use any type of soap base?
Yes, while this recipe calls for goat milk or shea butter, you can use any melt-and-pour soap base that suits your needs.
2. How do I know when my soap is fully set?
The soap should feel firm to the touch and should not leave an imprint when you press it lightly.
3. Can I use fresh lavender instead of essential oil?
While you can use dried lavender, essential oils will offer a stronger, more consistent fragrance.
4. What if my soap has bubbles on top?
To remove bubbles, you can spray the top of the poured soap with rubbing alcohol right after pouring. This will help eliminate air bubbles.
5. Can I make my soap vegan?
Yes! Use a vegan soap base and consider plant-based alternatives to honey, such as agave syrup for similar moisturizing properties.
6. How can I change the color of my soap?
You can use soap-safe colorants. Always add colorants gradually until you achieve your desired hue.
Conclusion
Making your own honey lemon lavender soap bars is an enjoyable and rewarding DIY project, especially when you see the finished product and know you created it from scratch. With their delightful scent, moisturizing properties, and beautiful presentation, these soap bars are perfect as gifts or just for yourself. Embrace the creativity, experiment with variations, and enjoy the benefits of using natural, handmade soap. So gather your ingredients, get crafty, and dive into the world of DIY soap making today!