
DIY Loofah Soap Bars That Cleanse and Exfoliate: A Step-by-Step Guide
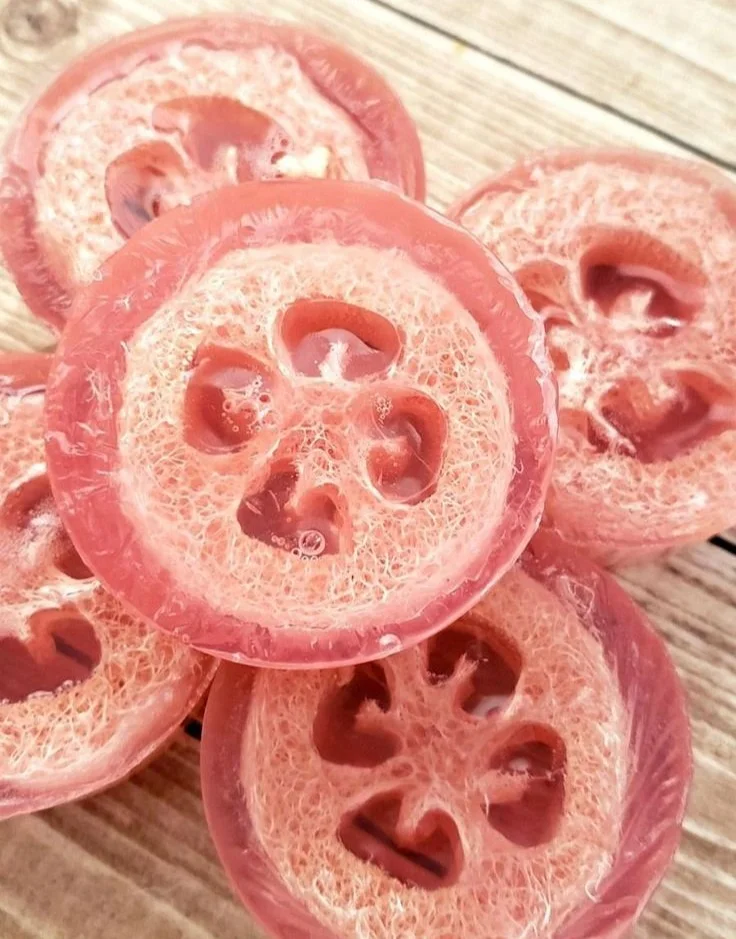
Making your own DIY loofah soap bars is a delightful and rewarding project that not only allows you to create stunning, functional pieces but also offers a unique combination of cleansing and exfoliation for your skin. Using the melt-and-pour soap method, these bars are simple to craft yet yield luxurious results that smell amazing and feel fantastic against the skin.
Why You Will Love This Recipe
This loofah soap recipe is perfect for anyone looking to elevate their bathing experience. Here’s why you should definitely give it a try:
- Exfoliating Action: The natural loofah fibers give your skin a gentle exfoliation, helping to remove dead skin cells and improve circulation.
- Customization: You can personalize these soap bars with different scents and colors, allowing you to create something unique for yourself or as handmade gifts.
- Easy to Make: The melt-and-pour method is beginner-friendly, requiring no experience or complex equipment.
- Sustainable Choice: By making your own soap, you control the ingredients for a more eco-friendly bath product.
Ingredients
To create your loofah soap bars, you’ll need the following ingredients:
- Melt and Pour Soap Base:
- 1 pound of clear or white glycerin soap base
- Dried Loofah:
- 1 loofah sponge (cut into pieces)
- Colorants (Optional):
- Soap colorant or natural colorants like mica powder
- Fragrance Oils:
- 1-2 teaspoons of essential or fragrance oils (like lavender, citrus, or eucalyptus)
- Optional Additives:
- 1 tablespoon of natural exfoliants (like oatmeal or coffee grounds)
- 1 teaspoon of vitamin E or other skin-benefitting oils
Equipment
Here’s what you’ll need to gather to create your soap bars:
- Microwave-safe bowl or double boiler
- Soap mold (silicone molds work best)
- Stirring stick or spoon
- Knife (for cutting loofah)
- Measuring spoons
- Scale (optional, for precise measurements)
Step-by-Step Instructions
Now that you have your ingredients and equipment ready, let’s get started with making your loofah soap bars!
Preparation Time: 15 minutes
Making Time: 60 minutes (including setting time)
Approximate Yield: 4-6 bars of soap
Prepare the Loofah:
- Cut your dried loofah sponge into slices about 1/2 inch thick, ensuring they fit inside your soap mold.
Melt the Soap Base:
- Chop the melt-and-pour soap base into small cubes for faster melting.
- Place in a microwave-safe bowl or double boiler.
- If using a microwave, heat the soap base in 30-second intervals, stirring in between until fully melted. Be careful not to overheat, as the soap can burn.
Add Color and Fragrance:
- Once melted, remove from heat and add soap colorants if desired. Stir well until combined.
- Add the fragrance oil and mix thoroughly.
Incorporate Loofah:
- Pour a small amount of melted soap into the bottom of each mold, enough to cover the bottom.
- Place a slice of the loofah in each mold, then pour in more melted soap to cover it.
- If you’re using additional exfoliants, you can add them at this stage.
Set the Soap:
- Allow the soap to cool at room temperature for about 30-60 minutes until completely hardened.
- To speed up the process, you can place the molds in the refrigerator for 15-20 minutes.
Remove from Molds:
- Once the soap has hardened, gently pop the loofah soap bars out of the molds.
Tips for Success
- Quality Matters: Choose a high-quality melt-and-pour base for the best results. Look for one that is free from harmful chemicals.
- Freshness: If using essential oils, ensure they are fresh and high-quality for the best aroma and skin benefits.
Common Mistakes to Avoid
- Overheating the Soap Base: This can cause bubbles or a burnt smell. Always melt slowly and in short increments.
- Too Much Additive: Excessive fragrance or coloring can cause your soap to not set properly.
Variations and Customization Ideas
Feel free to experiment and personalize your loofah soap bars:
- Scent Combinations: Try combining different essential oils like lavender with eucalyptus for a relaxing blend.
- Color Fun: Use multiple colors by layering different melted soap.
- Additives: Incorporate herbs or botanical extracts for extra skin benefits.
Storage and Shelf Life
- Store in a Cool, Dry Place: Keep your soap bars in a cool, dry environment, away from direct sunlight.
- Shelf Life: Typically, you can expect your loofah soap bars to last for about 6-12 months, depending on the ingredients used.
Safety Tips
- Before You Start: Always wear gloves and, if sensitive, keep your work area well-ventilated.
- Ingredient Safety: If you’re using essential oils, perform a patch test to ensure you don’t have sensitivity to the chosen oils.
Frequently Asked Questions
1. Can I use liquid soap instead of melt-and-pour?
No, liquid soap won’t work for this method. Melt-and-pour soap is designed to set firmly and hold the loofah pieces well.
2. How do I know which fragrances are safe for skin?
Always choose fragrance oils that are specifically labeled for use in cosmetic products.
3. What if my soap doesn’t harden?
If the soap remains soft or sticky, it may have been overheated or not set long enough. Allow it more time at room temperature.
4. Can I add natural colorants like beet juice?
Yes, natural colorants can be used, but be cautious as they can affect the soap’s texture and setting time.
5. How do I make my soap bars more decorative?
You can add layers of differently colored soaps or embed small soap pieces into your bases for a fun design.
Conclusion
Creating DIY loofah soap bars is not only a great project for beginners, but it also yields beautiful, practical gifts for friends and family. By following these simple steps and using your creativity, you’ll have exfoliating soap bars that are enjoyable to use and highly customizable. So gather your ingredients, unleash your inner DIYer, and enjoy the rewarding process of soap-making! Happy crafting!