
How to Naturally Color Soap with Plants, Roots, and Clays: Natural Soap Coloring Techniques
If you’re venturing into the world of homemade soap or candles, you may be wondering how to add beautiful, natural colors to your creations. Ditch the synthetic dyes and embrace the vibrant hues found in nature! Using plants, roots, and clays not only enhances the visual appeal of your products but also aligns with a more eco-friendly approach to DIY projects. In this guide, we’ll explore how to color soap naturally, providing you with everything you need to create stunning, colorful bars of soap using simple, natural ingredients.
Why You Will Love This Recipe
Natural coloring offers unique hues that can’t be replicated with commercial dyes. It adds a personal touch to each batch of homemade soap while providing the peace of mind that comes from using wholesome ingredients. Additionally, using vegetable-based colors is a fantastic way to engage with traditional crafts, tap into creativity, and have fun with the whole process.
Ingredients
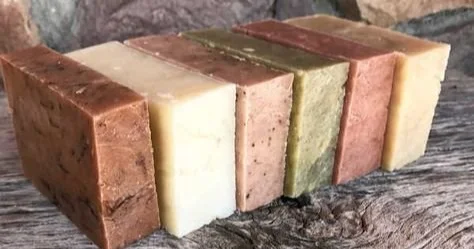
To color your soap using natural methods, here’s a list of some commonly used plants, roots, and clays along with their coloring properties:
- Beetroot Powder: Deep pink to burgundy (Color intensity: High)
- Turmeric Powder: Bright yellow (Color intensity: Medium)
- Spirulina Powder: Vibrant green (Color intensity: High)
- Activated Charcoal: Deep black (Color intensity: High)
- Cocoa Powder: Light to dark brown (Color intensity: Medium)
- Annatto Seed Powder: Reddish-orange (Color intensity: Medium to High)
- Purple Cabbage Powder: Purple to blue (Color intensity: Low)
Equipment
- Mixing bowls
- Measuring spoons
- Hand mixer or stick blender
- Soap molds
- Sifter (for powders)
- Disposable gloves (for hygiene)
- Protective eyewear and face mask (if handling strong colors)
Step-by-Step Instructions
Step 1: Prepare Your Soap Base
For this tutorial, we’ll use the cold process method. This method allows the soap to cure naturally and is perfect for incorporating natural colors.
- Safety First: Wear gloves, protective eyewear, and work in a well-ventilated area.
- Measure your oils and lye carefully. Use a reliable soap calculator to get precise weights for the sodium hydroxide based on the oils you are using.
- Mix the lye with water in a safe container and let it cool.
- Prepare your oils by gently heating them until melted.
Step 2: Choosing Your Natural Color
- Select your natural dye based on the desired color.
- Use a sifter to add 1–2 teaspoons of the chosen powder into the soap batter for lighter shades, and up to 1 tablespoon for deeper colors.
- Mix well with a hand mixer or stick blender until evenly combined.
Step 3: Mixing and Pouring
- Once your lye solution reaches around 100°F and your oils are melted and around the same temperature, slowly combine them.
- Blend until you reach a light trace.
- Add your natural color mixture and blend until fully integrated.
- Pour the soap into molds and tap lightly to minimize air bubbles.
Step 4: Curing
- Cover your soap molds with a towel or plastic wrap to help retain heat and help the saponification process.
- Let it cure for 24-48 hours before removing from the mold.
Tips for Success
- Test Colors: Always test a small batch first to determine your desired color intensity before attempting larger portions.
- Different Bases: Different soap bases can react differently with natural dyes. Experiment with various oils and fats to see how they affect the final color.
- Storage: Store unused colors in airtight containers away from light to preserve their potency.
Common Mistakes to Avoid
- Overuse of Dyes: Using too much natural dye can lead to undesired effects or instability once the soap cures. Start small and gradually increase.
- Not Accounting for Color Changes: Some colors may darken or change when saponified. Testing a small amount can save you from disappointing results.
Variations and Customization Ideas
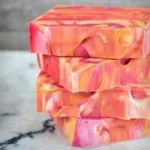
Feel free to customize your soap recipes by combining natural colors! For example, mixing activated charcoal and turmeric can create an eye-catching contrast. Experiment and have fun with layering colors or creating swirls.
Storage and Shelf Life
Once your soap is fully cured (generally 4-6 weeks), store it in a cool, dry place away from direct sunlight. Properly cured soap can last up to a year or more if stored correctly.
Safety Tips
- Handle Lye with Care: Remember that sodium hydroxide is a hazardous substance, and it should always be handled with appropriate precautions. Use gloves, eyewear, and work in a well-ventilated area.
- No Food Dyes: Avoid food-grade dyes as they may not provide the same stability in soap.
Frequently Asked Questions
1. Can I use fresh plants for coloring?
Fresh plants often contain moisture, which can affect the saponification process and may not yield consistent color results. It’s generally better to use powdered dried forms.
2. How do I store leftover natural colorants?
Store your natural colorants in airtight jars away from light. This prolongs their shelf life and potency.
3. Will the color remain vibrant in the soap?
Some natural colors may fade slightly over time, especially if exposed to sunlight. Keep your soaps stored in a cool and dark place when not in use.
4. How can I achieve more intense colors?
Increasing the quantity of natural pigments gradually can help, but be mindful of the amount to avoid altering the soap’s texture or consistency.
5. Are there any other natural options for coloring?
Yes! You can also explore spices like paprika for vibrant reds or various herbs for more muted tones.
6. Can I blend different colors?
Absolutely! Combining different natural colors can create beautiful shades. Always test a small batch first to ensure you’re happy with the result.
Conclusion
Creating colorful homemade soap using natural ingredients can be a fulfilling and artistic adventure. Embrace the beauty of nature by experimenting with various plants, roots, and clays to achieve stunning results. With thoughtful preparation and a bit of practice, your DIY soap will not only be a feast for the eyes, but it will also reflect your creativity and dedication to eco-friendly crafting. So roll up your sleeves and dive into this colorful endeavor—you’ll be amazed by what you can create!