
Ladybug Nails Are the Luckiest Trend of 2026
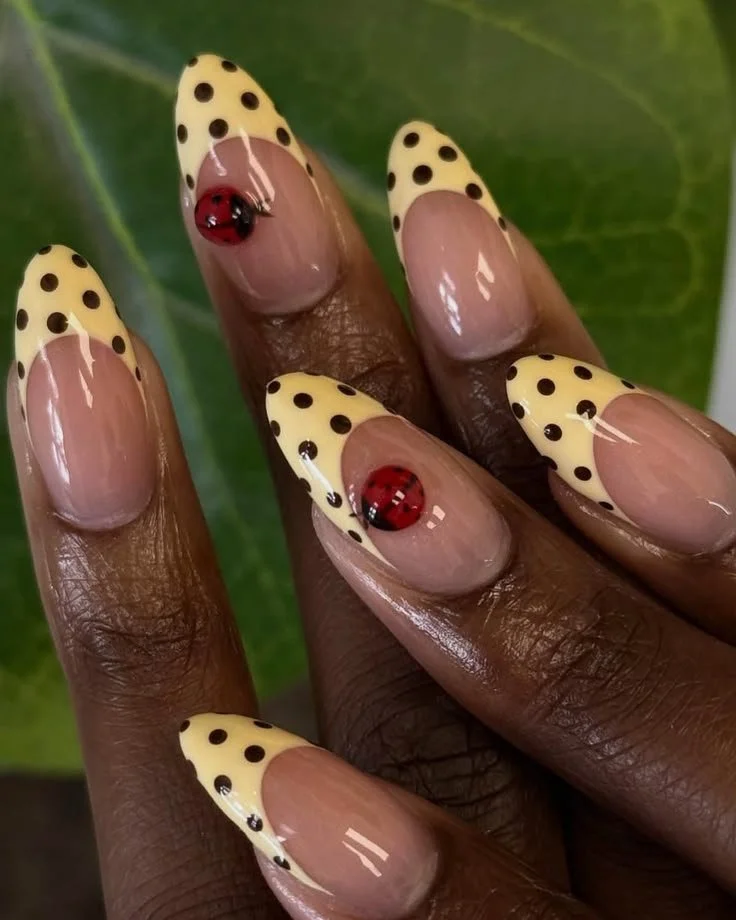
Every year, new nail trends whiz by, but some make an unforgettable mark. Enter ladybug nails, the charming design capturing hearts in 2026. Inspired by the delightful little beetles known for bringing good fortune, these nails combine whimsy and style in a way that’s both beautiful and wearable. As we dive into this enchanting trend, you’re sure to find tons of inspiration for your next manicure.
Why You Will Love These Nails
Ladybug nails are not only adorable but they also embody positivity and luck. With their vibrant colors and playful designs, they’re perfect for anyone wanting to add a touch of cheer to their look. Plus, they’re versatile enough to fit a variety of occasions, making them a staple for your nail art repertoire. Whether you opt for a subtle nod to this trend or go all out, ladybug nails are a whimsical way to express your personal style.
What You Need
To recreate these delightful ladybug nails, gather the following supplies:
- Base coat
- Red nail polish
- Black nail polish
- White nail polish (for the eyes)
- Top coat
- Dotting tools or fine brush
- Nail art tape (for those who prefer precision)
- Optional: Stickers for quick application
Best Nail Shapes for This Design
Ladybug nails look fabulous on various nail shapes. Here are a few suggestions:
- Almond nails: Their tapered edges create a delicate canvas for intricate designs.
- Square nails: A strong base for bold, graphic ladybug designs.
- Oval nails: Soft and feminine, perfect for enhancing the playful nature of the ladybug look.
The shape you choose can influence the overall vibe of your manicure, so select one that resonates with your style.
Best Nail Length
Ladybug designs are charming on both short and long nails. If you prefer short nails, a simple design with fewer details can be just as effective. Long nails allow for more creativity with intricate designs, making them perfect for showcasing an array of ladybug styles, accentuating every tiny detail.
Color Combinations
The classic ladybug color palette includes:
- Red: The star of the show; this vibrant hue is eye-catching.
- Black: Essential for the ladybug’s spots and outlines, creating contrast.
For a twist on this trend, consider pairing your ladybug design with:
- Pastel shades: Soft pinks or lavenders as background colors can create a lovely springtime feel.
- Gold or silver: Adding metallic details can provide sophistication and glam, making your ladybug nails ideal for parties.
Cute Variations to Try
While the traditional ladybug design is a classic, there are countless charming variations to consider:
- Minimalist style: Paint your nails in a solid color with just one accent ladybug on an accent nail.
- Gradient background: Blend shades of red or create a sunset effect behind your ladybugs.
- Cartoon styles: Go for a more cartoonish vibe with exaggerated features, like big eyes and oversized spots.
Nails for Different Occasions
Ladybug nails can fit seamlessly into various occasions:
- Casual outings: A simple ladybug accent nail paired with a solid color can be perfect.
- Fun at the beach: Bright colors with specks of glitter can imitate the shine of summer.
- Special events: Create an elaborate design for weddings or parties with added sparkles or gems for a glamorous touch.
Seasonal Ideas
These cheerful nails lend themselves beautifully to seasonal themes:
- Spring: Bright reds and greens can celebrate rebirth and renewal.
- Summer: Pair ladybug nails with tropical accents for a fun beach vibe.
- Fall: Incorporate oranges and browns for an autumnal twist on the classic design.
How to Recreate the Look
- Prepare your nails: Start with clean, shaped nails. Apply a base coat to protect your nails and extend the wear of your polish.
- Base color: Apply two coats of red polish, allowing each coat to dry completely.
- Create the ladybugs: Use a dotting tool to make black spots or a semi-circle for the ladybug’s body. Outline the shape with black polish.
- Add details: With a fine brush, paint smaller dots for eyes using white polish, followed by tiny black dots for pupils.
- Top coat: Finish with a glossy or matte topcoat to seal your design and enhance its longevity.
How to Make Your Manicure Last Longer
To extend the life of your ladybug manicure, follow these tips:
- Always apply a base coat – it protects your nails and avoids staining.
- Use a high-quality topcoat and reapply it every few days to maintain shine.
- Regularly moisturize your cuticles to prevent them from becoming dry or brittle.
- Avoid using your nails as tools to prevent chipping.
Beginner Tips
If you’re new to nail art, here are some practical tips to help you get started:
- Start with simple designs before tackling more complex styles.
- Use nail stickers for easier application – they can be cute and save time!
- Consider practicing your design on a nail wheel before attempting it on your fingers.
- Don’t rush! Take your time to ensure clean lines and precise details.
Frequently Asked Questions
Are ladybug nails suitable for all nail lengths?
Absolutely! Ladybug nails can be styled on both short and long nails, allowing for versatile design options.
Can I use gel polish for this design?
Yes! Gel polish can provide a longer-lasting finish and shine. Just follow the usual gel application process.
What if I don’t have nail art supplies?
You can create a similar look using simple tools like bobby pins or toothpicks for dotting.
Conclusion
Ladybug nails are undoubtedly the luckiest trend of 2026, infusing charm and creativity into your manicure. With their playful spirit and bold colors, they’re perfect for anyone looking to add a splash of excitement to their nail art. Embrace this trend, explore the variations, and don your ladybug nails with pride. Don’t forget to save your favorite designs for your next manicure adventure—happiness and good fortune await!