
Playful, Chic, and Timeless Polka Dot Nail Trends
Polka dots have made a spectacular comeback in the world of nail art, appealing to those who crave a playful yet sophisticated touch on their fingertips. From minimalist touches to vibrant displays, polka dot nail designs offer an enchanting way to express your creativity. This article will guide you on how to rock this versatile nail art trend with fresh, modern twists. Whether you’re searching for cute nails that are perfect for everyday wear or trendy nails suitable for special occasions, polka dots can do it all!
Why You Will Love These Nails
One of the best aspects of polka dot nail trends is their extraordinary versatility. You can adapt them to fit any personality or occasion. Want to add a touch of whimsy to your workweek? Go for subtle dots in pastel shades. Looking to elevate your evening look? Bold, contrasting colors can command attention. Polka dots also easily complement various nail shapes and lengths, making them suitable for everyone.
Whether you’re an expert at nail art or just starting out, creating polka dot designs can be a breeze, providing a fun way to explore your artistic side.
What You Need
To recreate these charming polka dot designs, gather the following materials:
- Base coat
- Nail polish in your desired colors (three to four shades)
- A dotting tool or a toothpick
- Top coat for a professional finish
- Nail brush for clean-up
- Optional: Nail tape for perfect lines
How to Recreate the Look
Creating your polka dot nails doesn’t require advanced skills. Here’s a simple step-by-step guide to get you started:
- Prep Your Nails: Start with clean, trimmed nails. Push back your cuticles and file your nails into your preferred shape.
- Apply Base Coat: This step protects your nails from staining and helps your polish adhere better.
- Choose Your Base Color: Opt for a solid color that will serve as the backdrop for your dots. Apply two coats for full coverage, allowing each coat to dry.
- Add Dots: Using a dotting tool or toothpick, dip it into your chosen color and gently press it onto your nails to create polka dots. Start with larger dots and work your way to smaller ones for a delightful layered effect.
- Finalize the Design: Once your dots are dry, seal your design with a top coat to shine and enhance durability.
- Clean Up: Use a nail brush dipped in polish remover to tidy up your cuticles and any smudges around the nails.
Best Nail Shapes for This Design
Polka dots are incredibly versatile and can suit any nail shape, including:
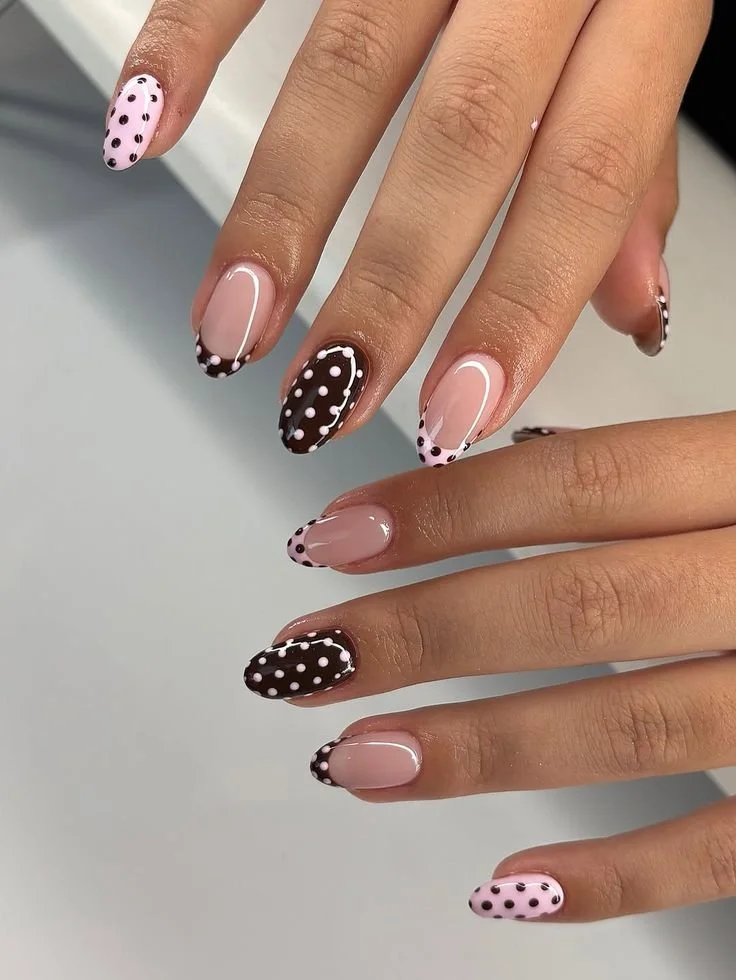
- Almond Nails: The tapered ends provide a chic canvas for polka dots, emphasizing elegance.
- Square Nails: The clean lines of square nails can give a modern touch to your polka dot design.
- Coffin or Ballerina Nails: Long, dramatic shapes create a perfect, playful background for larger dot sizes.
- Short Nails: Even your short nails can look cute with tiny, delicate dots, making them suitable for casual day-to-day wear.
Best Nail Length
Both short and long nails can rock the polka dot trend. Short nails allow for a neat, subtle approach with smaller dots, while longer nails can showcase bold patterns and vibrant colors, offering more creative freedom. Whichever length you prefer, there’s a polka dot style that will suit you.
Color Combinations
Polka dot nail designs are all about expressing yourself with color! Here are some stunning color combinations that you can try:
- Classic Black and White: The timeless combination evokes sophistication and chicness.
- Pastel Paradise: Soft pinks, lilacs, and mint greens create a lovely springtime look.
- Bright and Bold: Pair neon colors like aqua and bubblegum pink for a fun party look.
- Monochrome Magic: Stick to shades of one color—such as varying blues—for an elegant gradient effect.
- Metallic Mix: Try using chrome or glitter polish for your dots against a matte base for added glamour.
Cute Variations to Try
To keep things fresh, here are some playful variations on the classic polka dot design:
- Polka Dot French Tips: Add small dots along the tips of your nails for a fun twist on the classic French manicure.
- Mixed Pattern Dots: Combine polka dots with stripes or chevrons for an eye-catching design.
- Negative Space Dots: Leave some unpainted areas to create a negative space effect with your dots.
- Gradient Dots: Use a gradient base color and place dots that transition from dark to light, creating an ombre effect.
Nails for Different Occasions
There’s a polka dot design for every occasion:
- Everyday Chic: Soft pastel dots on a nude background work for casual outings or workplace environments.
- Party Ready: Choose bright, eye-catching colors for a night out with friends.
- Wedding Elegance: Delicate white dots on a light pink or pale blue base can be perfectly romantic for bridal events.
- Seasonal Fun: Incorporate seasonal colors, such as deep red and green for the holidays, or bright oranges and yellows in summer.
Seasonal Ideas
Polka dots can seamlessly transition through the seasons. Here are some ideas to inspire your designs:
- Spring: Use pastel colors and floral accent nails to celebrate the season.
- Summer: Bright, vivid colors mimic the sun and flowers blooming.
- Autumn: Earthy tones like mustard, terracotta, and forest green can create a cozy vibe.
- Winter: Deep jewel tones paired with silver or gold dots embody chic winter elegance.
Beginner Tips
If you’re new to nail art, here are a few tips to ease you into polka dot designs:
- Start Simple: Begin with a basic dot pattern before moving on to more intricate designs.
- Practice on a Fake Nail: Use a nail wheel or plastic nail tips to practice your dotting technique.
- Use a Straw: For larger dots, dip the end of a plastic straw into polish and stamp it onto your nail for an instant dot.
- Have Fun: Enjoy the process and don’t stress over perfection; nail art is meant to be playful!
How to Make Your Manicure Last Longer
Keeping your polka dot nails looking pristine is all about care and maintenance. Here are some excellent tips:
- Use a Good Base and Top Coat: Invest in quality products that protect and add longevity to your manicure.
- Avoid Water Exposure: Try to keep your hands away from water for a few hours post-manicure to allow the polish to set.
- Apply Cuticle Oil: This keeps your cuticles moisturized, which can prevent chipping along the nail edges.
- Be Gentle: Avoid using your nails as tools to minimize the risk of chipping or breaking.
Frequently Asked Questions
Can I mix polka dot sizes?
Absolutely! Mixing small and large dots can create a playful and dynamic look.
Are polka dots appropriate for formal occasions?
Yes! Opt for simpler designs in elegant color combinations, such as black and gold.
How can I remove my polka dot nails?
Regular nail polish remover should work just fine. Soak a cotton pad and place it on your nail for a few seconds before wiping.
Conclusion
Polka dot nail trends energize the nail art scene with their playful charm and endless versatility. Whether you’re dressing up for a special event or looking for an everyday chic style, polka dots can provide the perfect accent. Incorporating fresh, modern twists on this classic design allows you to show off your creativity in delightful ways. So grab your nail polish, gather your tools, and let your imagination run wild. Your next beautiful manicure awaits, just waiting for those lovely polka dots!