
How To Make Soothing Blood Orange And Lime Loofah Soap – So Easy
Creating your own homemade soap can be both a rewarding and creative outlet. Today, I’m excited to share a delightful recipe for Blood Orange and Lime Loofah Soap that will leave your skin feeling refreshed and rejuvenated. This melt-and-pour soap method is perfect for beginners, so let’s dive right in!
Why You Will Love This Recipe
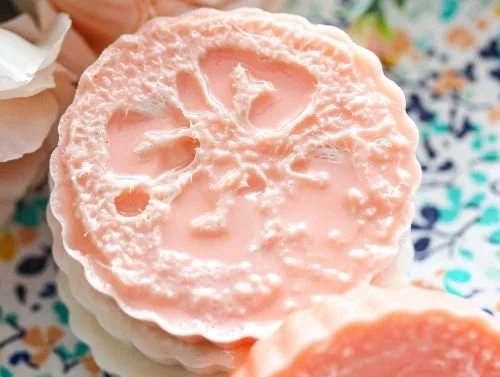
This Blood Orange and Lime Loofah Soap not only smells heavenly, but the loofah adds a gentle exfoliating factor that helps to scrub away dead skin cells while nourishing your skin. With vibrant colors and a combination of energizing scents, this soap makes a fantastic gift for friends and family or a luxurious treat for yourself!
Ingredients
To make this refreshing soap, you’ll need the following ingredients:
- Melt and Pour Soap Base: 1 pound (choose a clear glycerin or shea butter base for added benefits)
- Blood Orange Fragrance Oil: 2 teaspoons (or to your preference)
- Lime Essential Oil: 1 teaspoon (you can adjust this for intensity)
- Dried Blood Orange Peel or Zest: 1 tablespoon (for decoration)
- Loofah Slices: 2-3 slices (cut into pieces)
- Soap Colorant (optional): A few drops, in orange and green to match the scents
Equipment
Before you start, gather the following supplies:
- Double Boiler or Microwave Safe Bowl
- Soap Mold: Silcone mold or any that suits your design
- Mixing Spoon or Stick Blender: For blending the oils
- Thermometer: To check soap temperature (optional)
- Cutting Board and Knife: For slicing the loofah
- Spray Bottle with Rubbing Alcohol: For removing bubbles
Step-by-Step Instructions
1. Prepare Your Ingredients
- Cut the loofah into desired pieces. If it feels too hard, soak it in water for a few minutes to soften it.
2. Melt the Soap Base
- Cut the melt-and-pour soap base into small cubes for even melting.
- In a double boiler, melt the soap base slowly over low heat, stirring occasionally until fully melted.
- Alternatively, microwave the soap base in a microwave-safe bowl in 30-second intervals, stirring in between until completely melted.
3. Add Fragrance and Color
- Once melted, remove from heat and let it cool down slightly (around 120°F).
- Add the blood orange fragrance oil and lime essential oil. Stir well to combine.
- If desired, add a few drops of soap colorant and mix until you reach your preferred color.
4. Incorporate the Loofah Slices
- Place the sliced loofah into your soap mold. Gently pour some of the melted soap over the loofah.
- Allow the soap to set for just a couple of minutes, then add the remaining soap mixture on top. This ensures the loofah is suspended within the soap.
5. Remove Bubbles
- Lightly spray the top of the soap with rubbing alcohol to eliminate any surface bubbles.
6. Let It Cool
- Allow the soap to cool completely at room temperature. This usually takes about 1-2 hours.
7. Pop Out the Soap
- Once fully cooled and set, gently remove the soap from the mold.
Tips for Success
- Work Quickly: Melt-and-pour soap can start to harden quickly once it cools, so have all your ingredients prepped ahead of time.
- Temperature Matters: Be mindful of the temperature when adding fragrance and color; it should not be too hot, or you risk losing the scent.
- Use Rubbing Alcohol: This helps remove bubbles on the surface and gives your soap a smooth finish.
Common Mistakes to Avoid
- Overheating the Soap Base: This can cause it to scorch and affect the scent. Always use low heat.
- Adding Oils When Too Hot: Fragrance oils can evaporate if the soap base is too hot when added.
- Not Completely Cooling: Ensure the soap is fully set in the mold before trying to remove it; otherwise, it might break.
Variations and Customization Ideas
- Fragrance Variations: Feel free to mix in other essential oils like lemon or grapefruit for a citrus blend.
- Color Customization: Use different colorants to make unique patterns or layers.
- Additives: Consider adding ingredients like oatmeal for additional exfoliation or skin-nourishing oils like jojoba or coconut after melting the base.
Storage and Shelf Life
Once your loofah soap is ready, store it in a cool, dry place away from direct sunlight. Wrap in wax paper or store in a glass container to retain its fragrance. Shelf Life: Typically, this soap lasts about 6-12 months if stored properly.
Safety Tips
- Use Gloves and Goggles: When handling essential oils or soap bases, it’s good practice to wear gloves and eye protection to avoid any skin irritation.
- Ventilation: Ensure you’re in a well-ventilated area, especially when using fragrance oils.
Frequently Asked Questions
1. Can I use fresh blood orange zest instead of dried peel?
While you can use fresh zest for fragrance, it might not hold up well in the soap, leading to a shorter shelf life and possible spoilage.
2. What if my soap is still sticky after cooling?
Sticky soap indicates it may not have been heated properly or wasn’t cooled at the right temperature. Try experimenting with heating and cooling times.
3. Can I reuse leftover soap scraps?
Yes! Simply melt down the scraps using the same process and pour them into a mold.
4. Is there a scent-free version of this soap?
Absolutely! Simply omit the fragrance oils and substitute with a scent-free soap base.
5. How can I troubleshoot soap that has a cloudy appearance?
Cloudiness may occur if the soap was overheated. Next time, melt it more gently and avoid adding colors or fragrances at high temperatures.
Conclusion
Making your own Blood Orange and Lime Loofah Soap is an enjoyable process that brings a fresh burst of citrus to your bathing routine. With simple ingredients and a straightforward method, you’re well on your way to creating personalized, fragrant soap. Don’t hesitate to experiment with variations, and enjoy gifting them or treating yourself! Happy soap-making!