
Create Your Own Bloom & Vine Soap: A DIY Guide
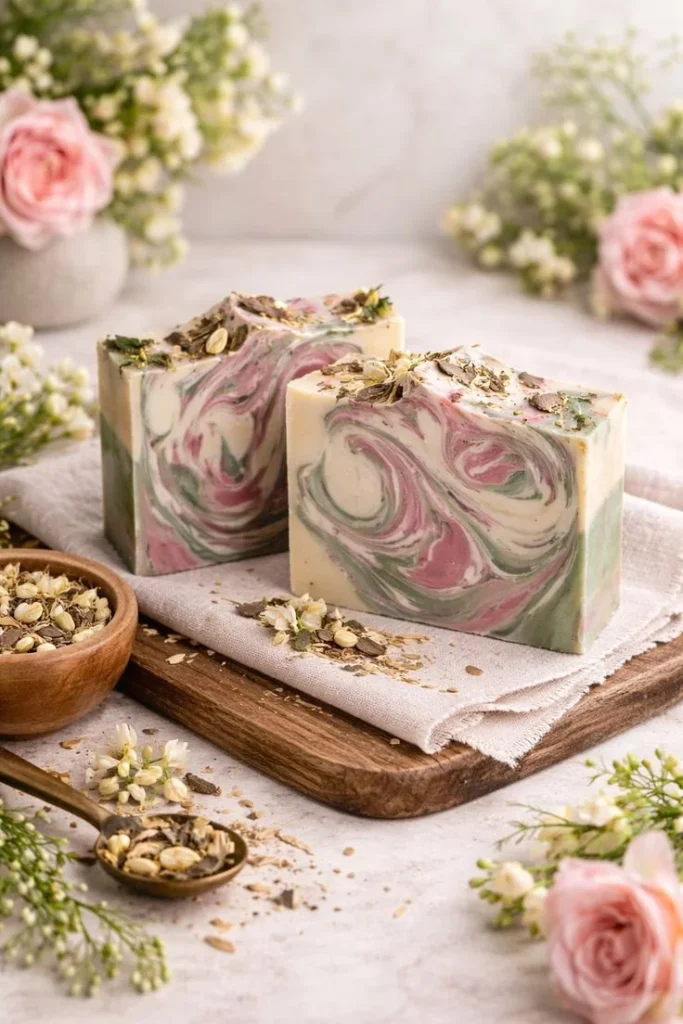
Creating your own soap at home is not only a fun and creative project, but it also allows you to personalize your skincare routine using natural ingredients. In this guide, we will walk you through the steps to make a luscious, romantic Bloom & Vine soap, inspired by gardens in full bloom. This homemade soap recipe captures the essence of bright fruits and gentle florals, offering a delightful fragrance and nourishing properties for your skin.
Why You Will Love This Recipe
Our Bloom & Vine Soap is a vibrant blend of fruity and floral notes that will transport you to a serene garden. Here are a few reasons why this recipe is worth trying:
- Personal Touch: You can customize the scents and colors to match your personal preferences.
- Natural Ingredients: Using nourishing oils and butters means your soap will be gentle on your skin.
- Perfect Gifts: Handmade soap makes for thoughtful and unique gifts for friends and family.
Ingredients
To make Bloom & Vine Soap, you will need the following ingredients:
Base Oils (for lather and nourishment)
- 12 oz Olive Oil
- 8 oz Coconut Oil
- 8 oz Palm Oil
- 4 oz Shea Butter
Lye Solution
- 4.4 oz Sodium Hydroxide (lye)
- 10 oz Distilled Water
Fragrance Oils
- 1 oz Blueberry Fragrance Oil
- 0.5 oz Wild Grape Fragrance Oil
- 0.5 oz Pomegranate Fragrance Oil
- 1 oz Blend of White Freesia, Lily, Magnolia, and Violet Fragrance Oil
Colorants
- 1/2 tsp Pink Mica Powder
- 1/2 tsp Green Mica Powder
Equipment
Before getting started, ensure you have the following equipment:
- Safety goggles and gloves
- Digital kitchen scale
- Measuring cups and spoons
- Heat-resistant mixing bowls
- Stick blender
- Soap mold
- Thermometer
- Slicing knife or soap cutter
- Parchment paper (for lining the mold, if needed)
Step-by-Step Instructions
Preparation Time: 15 minutes
Making Time: 1 hour
Yield: Approximately 10 bars of soap
Prepare Your Workspace: Ensure your area is clean and organized. Wear gloves and goggles for safety while working with lye.
Make the Lye Solution:
- Carefully measure out 10 oz of distilled water and pour it into a heat-resistant container.
- Slowly add 4.4 oz of sodium hydroxide to the water, whisking gently. Beware of fumes. Let the solution cool until it reaches about 100-110°F.
Melt the Oils:
- In a large saucepan, combine the olive oil, coconut oil, palm oil, and shea butter.
- Heat the mixture on low until everything is melted. Allow it to cool to about 100-110°F, similar to the lye solution.
Combine Lye and Oils:
- When both the lye solution and oil mixture are within the desired temperature range, slowly pour the lye solution into the oils.
- Use a stick blender, pulsing intermittently, to mix until you reach “trace” (the mixture thickens and leaves a light trail on the surface).
Add Fragrance and Color:
- Once at trace, add your fragrance oils and mix thoroughly.
- Divide the soap mixture into two separate bowls, adding pink mica powder to one and green mica powder to the other.
- Swirl the two mixtures together in the mold for a marbled effect.
Pour into Mold:
- Carefully pour the soap into your mold, tapping it gently to remove air bubbles.
- Cover the mold with a towel and let it sit for 24-48 hours until it hardens.
Unmold and Cure:
- Remove the soap from the mold and cut it into bars using a knife or soap cutter.
- Place the bars on a drying rack in a cool, dry place to cure for 4-6 weeks, allowing excess moisture to evaporate.
Tips for Success
- Measure Accurately: Precision is key in soap-making, especially with lye.
- Stick Blender: Blend in short bursts to avoid over-mixing. Over-mixing can cause the soap to set too quickly.
- Temperature Monitoring: Both the lye and oil needs to be at similar temperatures to ensure proper saponification.
Common Mistakes to Avoid
- Pouring Too Quickly: Pour the lye solution slowly into the oils to avoid splashes.
- Skipping Safety Gear: Always wear gloves and goggles when handling lye; safety is a priority.
- Not Curing Enough: Failing to cure the soap long enough can lead to a harsh product. Always allow for complete saponification.
Variations and Customization Ideas
Feel free to experiment with different essential oils or fragrance oils to create your unique scent blend. You can also add natural exfoliants like oatmeal or dried flowers for added texture.
Storage and Shelf Life
Store your finished soap bars in a cool, dry place away from direct sunlight. Well-cured soap can last for several months to a year. Make sure to keep them wrapped to prevent moisture absorption.
Safety Tips
- Lye Handling: Always add lye to water, not the other way around. This prevents dangerous reactions.
- Ventilation: Ensure your workspace is well-ventilated when working with lye and melting oils.
Frequently Asked Questions
1. Can I use different oils in this recipe?
Yes! You can substitute oils based on your preference but keep in mind that different oils have different properties, which may affect the soap’s lather and hardness.
2. What if my soap feels too soft after curing?
This could mean you didn’t use enough lye or didn’t allow enough curing time. Check the measurements and ensure proper curing.
3. How do I know if my soap has reached trace?
When the mixture thickens and leaves trails on the surface when dripped from the stick blender, it has reached trace.
4. Can I use fresh fruits or herbs in my soap?
While some fresh ingredients can be used, they may spoil or affect the shelf life of your soap. Use dried or oil-based alternatives.
5. How can I tell if my lye solution is safe to use?
Always let the lye solution cool to the recommended temperature before combining it with oils. It should be clear and have dissolved completely.
6. Is this soap suitable for sensitive skin?
This recipe uses natural ingredients, but always perform a patch test with a small piece of soap to ensure it’s suitable for your skin type.
Conclusion
Making your own Bloom & Vine Soap is not only a delightful DIY project but a wonderful way to engage with nature’s scents and nourish your skin. With the right ingredients and a little patience, you’ll create a beautifully fragrant soap that you can enjoy or gift to loved ones. So gather your supplies, follow these steps, and watch as your beautiful soap unfurls just like the flowers in a blooming garden. Happy soaping!