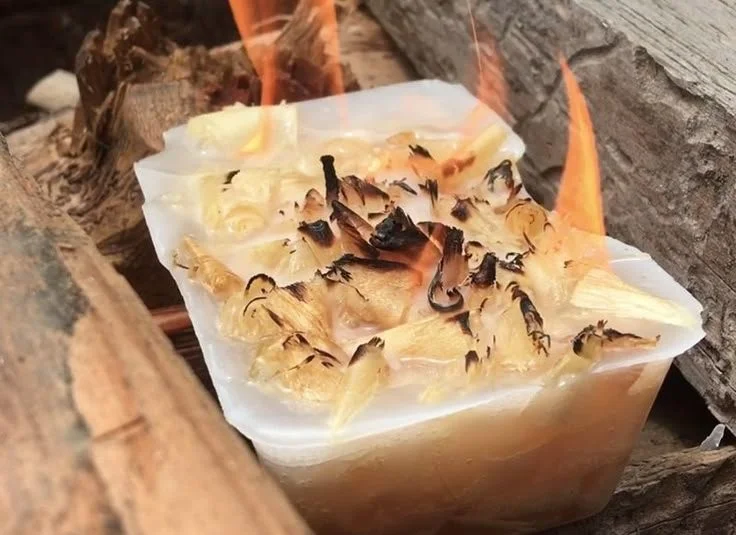

Collection of Water Resistant Fire Starters in an Ice Cube Tray
Creating your own water-resistant fire starters using wood shavings and wax is not only practical for camping and outdoor activities but also a fun DIY project that showcases the beauty of upcycling. In this article, I’ll guide you through the step-by-step process to make these amazing fire starters that will be exceptionally useful during your summer adventures, emergencies, or simply for enhancing your bushcraft skills. Let’s get started!
Why You Will Love This Recipe
- Convenience: Having fire starters that are waterproof ensures you can easily ignite a fire, even in damp situations.
- Eco-friendly: Utilizing wood shavings and leftover wax is a great way to reduce waste and recycle materials.
- Customizable: You can easily adjust the ingredients to suit your preferences or to use up what you have on hand.
Ingredients
- Wood Shavings: About 2 cups (finely shredded)
- Wax: 1.5 cups (any type will do; paraffin, beeswax, or soy wax)
- Essential Oils (Optional): 10-15 drops (for fragrance)
- Cotton Balls or Dryer Lint (Optional): For added flammability
Equipment
- Ice cube tray (silicone ones work best for easy removal)
- Double boiler or a microwave-safe bowl
- Stirring stick (like a skewer or spoon)
- Baking sheet or parchment paper (to catch any spills)
- Heat-resistant gloves (for safety)
Step-by-Step Instructions
Preparation Time: 10 minutes
Making Time: 30 minutes
Yield: About 12-16 fire starters, depending on tray size
Gather Your Materials: Ensure you have all the ingredients and equipment ready before you start.
Melt the Wax:
- If using a double boiler, fill the bottom pot with water and place on medium heat. Add the wax to the top pot and stir until it melts completely.
- If using a microwave, heat the wax in a microwave-safe bowl in 30-second intervals, stirring in between until fully melted.
Prepare Wood Shavings:
- If you don’t have wood shavings, you can create them using a wood planer or buy them pre-made at craft stores. Measure out about 2 cups.
Combine Ingredients:
- In a large bowl, mix the melted wax with the wood shavings until they are fully coated. If you want to add essential oils for fragrance, mix them in now. You can include cotton balls or dryer lint for extra flammability if desired.
Fill the Ice Cube Tray:
- Carefully spoon the mixture into the ice cube tray, packing it down slightly so it’s tightly compressed. Leave a small amount of space at the top as the mixture will expand slightly when cooling.
Cool and Set:
- Allow the tray to cool for about 30 minutes at room temperature. You can place the tray in the refrigerator to speed up the cooling process.
Remove Fire Starters:
- Once set, gently push on the bottom of the ice cube tray to pop out the fire starters. If they don’t release easily, try flexing the tray gently.
Store:
- Keep your fire starters in a dry, cool place. A resealable plastic bag or a small container with a lid works great. Make sure they are kept away from moisture.
Tips for Success
- Choosing Wax: Paraffin is inexpensive and easy to work with, while beeswax is natural and has a pleasant smell but may be slightly more costly. Soy wax is another eco-friendly alternative.
- Make it Colorful: You can add crayon pieces to your wax for a splash of color, though this is purely optional.
- Essential Oils: Not only do they provide a pleasant aroma, but some oils like cedarwood or eucalyptus can also enhance the flammability of your starters.
Common Mistakes to Avoid
- Overheating Wax: Be careful not to overheat your wax as it can ignite or lose its effectiveness. Always use low to medium heat.
- Too Much Moisture: Ensure your wood shavings are dry before mixing with wax; dampness can hinder flammability.
- Not Packing the Mixture: If the mixture isn’t packed well in the mold, your fire starters may break apart when removed.
Variations and Customization Ideas
- Add Herbs or Spices: Experiment with adding dried herbs (like rosemary or sage) or spices (such as cinnamon) for unique scents.
- Use Different Fillers: Instead of cotton balls, try using shredded paper, dried leaves, or small twigs mixed in with the wood shavings for varied textures.
Storage and Shelf Life
Your homemade fire starters will last for several months if stored properly. Keep them in a cool, dry place, away from direct sunlight. If you notice any signs of moisture, it’s best to use them right away rather than risk them becoming ineffective.
Safety Tips
- Fire Safety: When using your fire starters, do so in a safe and controlled environment. Use them in a designated fire pit or fireplace and never leave a fire unattended.
- Handling Hot Wax: Always wear heat-resistant gloves when handling melted wax to avoid burns.
Frequently Asked Questions
1. Can I use any type of wax?
Yes, you can use paraffin, beeswax, or soy wax. Each has its own properties, but they will all work effectively for fire starters.
2. How effective are these fire starters in wet conditions?
These fire starters are designed to be water-resistant, making them effective even in damp conditions. However, when possible, ensure that your fire area is as dry as possible.
3. How many fire starters can I expect to make?
The yield depends on the size of your ice cube tray. Typically, you can make about 12–16 fire starters if you fill each section adequately.
4. Can I use any kind of wood for the shavings?
Yes, any type of untreated wood is suitable for fire starters. Avoid using wood that has been chemically treated.
5. What if my fire starters don’t light?
Check that the mixture is well combined and the wax is evenly distributed. If they continue to fail, consider using a little more flammable filler like dryer lint or cotton.
6. How can I customize the fragrance?
You can add any essential oil that you prefer. Just make sure it is safe to burn and that you are not using too much, as this can affect the combustion of your fire starter.
Conclusion
Making water-resistant fire starters in an ice cube tray is a rewarding and straightforward DIY project that benefits every outdoor enthusiast. With these handy fire starters, you’ll be equipped to tackle any camping trip, emergency, or simply enjoy a backyard fire with confidence. So roll up your sleeves, gather your supplies, and create your own collection of eco-friendly fire starters today! Happy crafting!