
Embrace the Outdoors with DIY Citronella Candles
Imagine this: it’s a beautiful summer evening, the sun is setting, and the air is warm with the delightful sounds of nature all around you. But oh no, the mosquitoes are out in full force, ready to ruin your peaceful time. Sound familiar? We’ve all been there—juxtaposing the bliss of a summer night against the annoyance of those pesky insect bites. Here’s the truth: while we can’t control the buzzing bugs, we can definitely make our own natural mosquito repellent with these charmingly rustic citronella candles! Today, I’m sharing a step-by-step guide on how to create eco-friendly citronella candles from upcycled tin soup cans, recycled candle wax, and natural citronella oil. You’ll not only beautify your outdoor space but also do something wonderful for the environment.
Why Citronella Candles?
Let’s be honest. The beauty and wellness industry is filled with products that make bold claims about repelling insects. However, many commercial repellents are loaded with chemicals, making us question whether they’re safe for our skin (or our little ones). With citronella candles, you get a natural solution that’s effective, safe, and even kind of beautiful (who doesn’t love the warm glow of a candle?). They work by masking the scents that attract mosquitoes, creating a more enjoyable outdoor experience for you and your family.
Gathering Your Materials
Before we jump into the crafting, let’s gather everything you’ll need. You’re going to love how simple this list is:
For the Candles:
- Tin Soup Cans: Upcycled and unique, these will be your candle holders. Make sure to clean them thoroughly after use.
- Recycled Candle Wax: Use old candles, wax remnants, or purchase pre-made wax if you don’t have enough recycled material at hand. While you’re getting your recycling on, check out thrift stores for cheap options too!
- Natural Citronella Oil: The star of the show! This oil is the key ingredient that helps keep mosquitoes away. You can usually find this at health food stores, online, or in well-stocked supermarkets.
Additional Supplies:
- A pot for melting the wax.
- A double boiler, or a heat-safe container that fits into the pot with an inch of water.
- A stirring stick or a wooden spoon.
- Wick clips (available online or at craft stores) or can be fashioned from any metal or wooden piece to hold your wick in place.
- A thermometer for monitoring the wax temperature (optional, but great if you want to be precise).
Step-by-Step Guide to Making Citronella Candles
Now that you have everything ready, let’s get crafty! It’s time to dive into making these gorgeous and effective citronella candles.
Step 1: Prepare Your Workspace
To start, ensure your workspace is clean and free from clutter. I recommend laying down some newspaper or an old tablecloth to catch any drips of wax because, let’s be honest, things can get a bit messy.
Step 2: Clean the Soup Cans
If you’re using tin soup cans, remove the labels and wash them out thoroughly. I like to soak them in warm, soapy water for a while. Get rid of any residue or glue, and make sure they’re completely dry before moving to the next step.
Step 3: Melt the Candle Wax
Place your wax in the double boiler setup. You want to warm the wax slowly—this is key for a smooth release. If you’re using recycled wax, chop it into small pieces to help it melt quicker. Keep an eye on it and stir occasionally until it’s completely liquefied.
Step 4: Add Citronella Oil
Once your wax is melted, it’s time to add the natural citronella oil. You should aim for about 1 ounce of oil per pound of wax, but feel free to customize based on your scent preference. Stir it well to make sure the oil is evenly distributed throughout the wax.
Step 5: Set Up Your Wicks
While the wax cools slightly, prepare your wicks. If you’re using wick clips, simply secure the wick to the bottom of the can. If you don’t have wick clips, you can anchor the wick by pouring a small amount of cooled wax into the bottom of the can and letting it set.
Step 6: Pour the Wax
Carefully pour the melted wax into your prepared soup cans. But here’s a friendly tip: pour it slowly! This way, you minimize bubbling and swirling. Leave a little space at the top—around half an inch is usually good—to allow for any wax shrinkage during the cooling process.
Step 7: Secure the Wicks
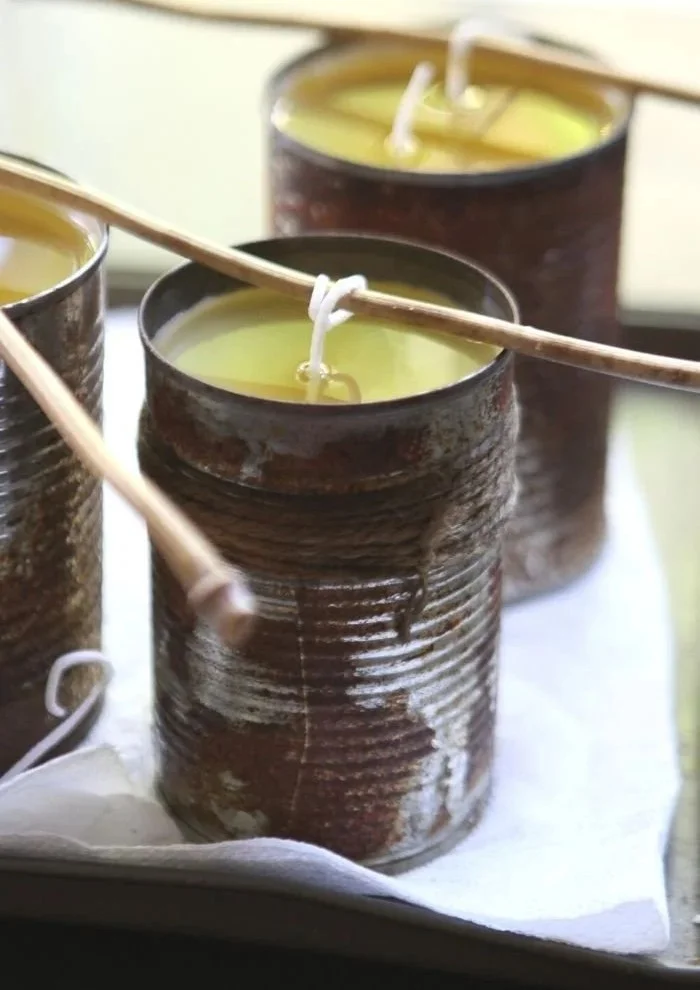
To keep the wick straight while the wax cools, use a skewer or a stick to hold it in place across the top of the can. Make sure it’s centered! You want that beautiful glow to illuminate evenly.
Step 8: Allow to Cool
Now for the hard part—patience! Let your candles cool for at least 4-6 hours before moving them. I know it’s tempting, but trust me when I say the wait will be worth it.
Step 9: Customize Your Candles
Here’s where you can truly make the candle your own. Consider adding dried herbs like lavender, rosemary, or mint for added visual texture and complementary scents. Just remember to place them in the wax before it fully sets to keep everything in place.
Step 10: Light and Enjoy
Once your candles are completely cooled and hardened, it’s time to light them up and enjoy your outdoor space! Sit back, relax, and let the natural citronella do its job while you soak in the ambiance.
Quick Beauty Tips for Candle Making
- Choose Eco-Friendly Materials: Whenever possible, opt for organic, sustainable materials for your candles, both for the wax and the containers.
- Experiment with Scents: Play with other essential oils like eucalyptus or lemon for a multi-layered scent profile.
- Use Repurposed Containers: Don’t limit yourself to soup cans! Old glass jars, teacups, or medical-grade small containers also work beautifully.
Common Mistakes to Avoid
- Heating Wax Too Quickly: Ensure your wax melts slowly to avoid bubbles and discoloration.
- Not Securing the Wick: A wobbly wick means an uneven burn. Always ensure it’s straight before the wax sets.
- Overloading on Oil: While it may be tempting to add more oil for stronger scent, too much can clog the wick and lead to poor burning.
FAQs About Citronella Candles
Q: How long will these candles last?
A: This depends on the size and amount of wax used, but generally, they should burn for several hours.
Q: Can I use other oils in addition to citronella?
A: Absolutely! Mixing citronella with other essential oils can add delightful and unique fragrances while enhancing its mosquito-repelling properties.
Q: Is it safe to use citronella candles indoors?
A: Ideally, citronella candles are best suited for outdoor use since strong scents can be overwhelming indoors.
Bonus Self-Care Ideas for Outdoor Relaxation
Now that your candles are ready and you’re set up for outdoor enjoyment, why not pair your beautiful citronella candles with these self-care ideas?
- Create a Cozy Seating Area: Throw some comfy blankets and cushions on your porch for a relaxing spot to unwind.
- Sip on Herbal Teas: Infuse your evening with calming herbal teas that enhance relaxation.
- Enjoy a Skin-nurturing Routine: While you’re enjoying the outdoors, give your skin some love with a gentle exfoliating scrub or hydrating body oil.
Conclusion
Making your own citronella candles is not only a fun and rewarding DIY project, but it also brings a sense of accomplishment while helping you take care of yourself and your family. You’ve transformed upcycled materials into beautiful, functional items that brightened your space and repelled those pesky mosquitoes. So, next time you’re preparing for a lovely evening outside, remember the light (and scent) you crafted yourself. Embrace the beauty of nature, and know that you’re equipped with the tools to enjoy every moment, mosquito-free. Enjoy the glow, and here’s to many delightful summer nights ahead!