
Embrace Nature with Homemade Citronella Candles
Imagine this: a warm summer evening, you’re sitting on your patio, glass of lemonade in hand, enjoying the gentle breeze as you wind down from a busy day. Suddenly, you hear that dreaded buzzing sound. Mosquitoes! They’re here, ready to disrupt your peaceful moment. Sound familiar? We’ve all been there. But what if I told you there’s a simple, eco-friendly solution that not only keeps those pesky bugs away but also adds a touch of charm to your outdoor space? Enter the homemade citronella candle!
Let’s explore how you can make these delightful candles from upcycled tin soup cans, recycled candle wax, and natural citronella oil. Not only will this project allow you to reclaim some used materials, but you’ll also be creating a natural mosquito repellent that’s perfect for your next gathering or a peaceful night outdoors.
Why Choose Citronella Candles?
Before we dive into the "how-to" bit, let’s chat about why citronella candles are a fantastic choice for both your beauty routine and your home. Citronella oil is a natural repellent derived from the leaves of the citronella grass, and it’s known for its ability to keep mosquitoes at bay.
Here are a few reasons to love these candles:
- Natural Ingredients: Unlike many store-bought repellents packed with chemicals, these candles contain natural ingredients that are safe for you and your loved ones.
- Upcycling: Using tin soup cans not only reduces waste but adds a rustic charm to your decor.
- Customizable: You can tweak the fragrance blend to your liking, adding other essential oils if you want a unique aroma.
Now that you understand why these candles are a fantastic addition to your home, let’s jump into it!
Gather Your Materials
You might be wondering what exactly you need to make these candles. Don’t worry; it’s pretty straightforward. Here’s a handy list of materials to gather before starting your project:
- Tin soup cans: Be sure to rinse them out and remove the labels. You can use as many as you like!
- Recycled candle wax: You can save leftover wax from previous candles or purchase wax beads online.
- Natural citronella oil: Look for pure citronella essential oil, as it’s most effective in repelling mosquitoes.
- A double boiler: If you don’t have one, you can create your own with a pot and a heatproof bowl.
- Wicks: You can buy pre-made candle wicks, or salvage some from old candles.
- Coloring agents or other essential oils: Optional, but can add a fun twist to your candles.
- Pencil or chopstick: To hold the wick in place while the wax sets.
Step-by-Step Guide to Making Citronella Candles
Now that you’ve prepped your materials, let’s get to the fun part! Here’s a step-by-step guide to help you make your citronella candles from scratch.
Step 1: Prepare Your Soup Cans
Start by carefully removing the top of the soup cans and cleaning out any residue. Make sure to dry them thoroughly. If you’re feeling crafty, you can paint the outside of the cans in pastel colors or even add decorative elements with washi tape or stickers.
Step 2: Melt the Wax
Fill the bottom pot of your double boiler with water and bring it to a gentle boil. Then, place the candle wax in the top bowl and slowly melt it down, stirring occasionally. Keep an eye on the temperature – you want it to reach about 170-180°F.
Step 3: Add Citronella Oil
Once your wax is melted, it’s time to infuse that lovely citronella scent. For a standard recipe, add about 1 ounce of citronella oil per pound of wax. But feel free to adjust according to your scent preference. Here’s a secret – you can mix in other essential oils like lavender or eucalyptus for additional aromatic benefits!
Step 4: Prepare the Wick
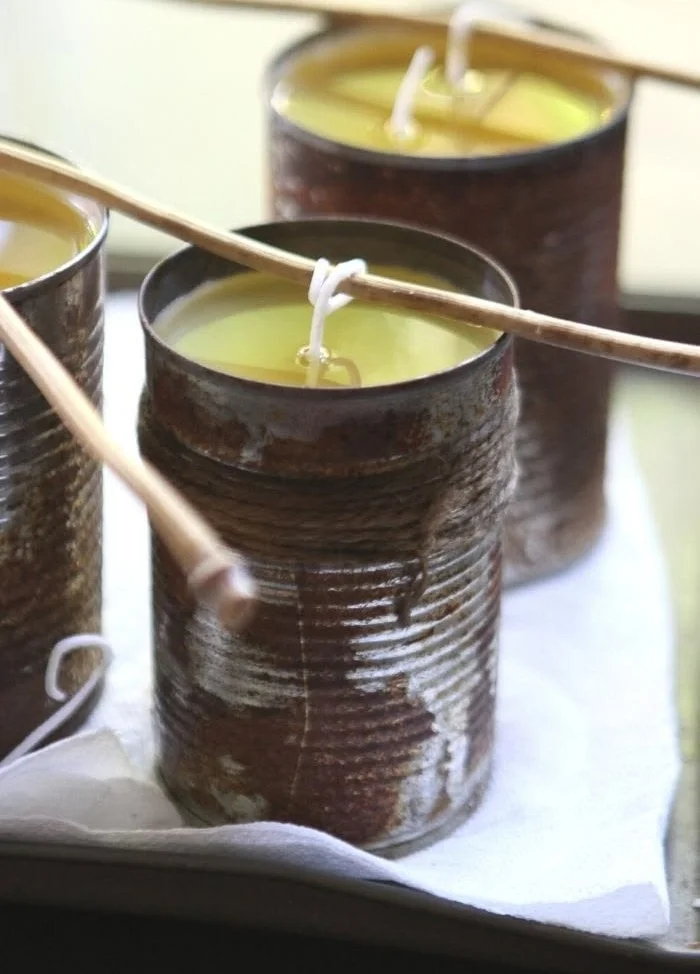
As your wax cools slightly (to about 160°F), place the wick into the center of the soup can. You can dip the bottom of the wick in the melted wax to help it stick, or use a pencil or chopstick to hold it in place. You’ll want to ensure the wick remains upright as you pour in the wax.
Step 5: Pour the Wax
Carefully pour the melted wax into your prepared soup can, leaving about half an inch of space at the top. If you’re feeling adventurous, you can pour in layers, allowing each layer to set slightly before adding the next one. This can create a beautiful, marbled effect!
Step 6: Secure the Wick
Hold the wick in position with your pencil or chopstick until the wax begins to harden, which should take about 10-15 minutes. You want to be sure it stays centered for an even burn.
Step 7: Let It Set
Allow your candles to cool completely, which can take a few hours. Once they’re fully set, you can trim the wick to about half an inch above the wax surface.
Step 8: Decorate and Finish
If you’ve left your cans plain, consider adding a ribbon or twine around the top for a pretty finish. You could even create personalized labels – think “Mom’s Mosquito Miles Away” or “Summer Serenity Candles.”
Quick Beauty Tips for Setup and Use
- Create an Outdoor Ambience: Consider placing multiple candles around your patio or in various spots in your garden to enhance the vibe.
- Make It a Family Activity: Gather the kids for a fun afternoon of candle making. They’ll love getting hands-on and can help with decorating.
- Store Safely: When not in use, store your candles in a cool, dry place to prevent them from melting.
Common Mistakes to Avoid
While making citronella candles is relatively easy, there are a few common pitfalls you’ll want to watch out for:
- Don’t rush the cooling process. Allow enough time for your candles to set properly; otherwise, you might have messy results!
- Avoid overestimating the amount of citronella oil. Too much might overwhelm the candle and create an unpleasant smell.
- When pouring wax, keep the pouring spout high above the can to minimize spills.
FAQs about Homemade Citronella Candles
What if I can’t find recycled wax?
If you don’t have leftover wax from previous projects, you can purchase wax pellets at craft stores or online. Soy or paraffin wax works well for this type of candle.
Can I use other essential oils?
Absolutely! If you enjoy mixing scents, consider using lavender, lemon, or eucalyptus in combination with citronella for different aromatic benefits.
How long do these candles last?
The longevity of your candle depends on its size and the thickness of the wax. Generally, you can expect them to burn for about 20-40 hours.
Bonus Self-Care Ideas
While you’re preparing your homemade candles, why not indulge in a little self-care? Take a moment to unwind with a soothing facial mask or dive into that book you’ve been meaning to read. It’s all about creating an experience, right?
Best Routine for Busy Women
We’ve all had days where we feel stretched too thin. Here’s a quick routine to incorporate candle making and self-care:
- Set Aside One Evening: Dedicate one evening to this project. It’s a great way to unwind and do something crafty.
- Gather Supplies in Advance: The day before, compile everything you need to eliminate stress on the day of the activity.
- Get in the Mood: Play your favorite music or light some music to set the mood while you work.
Conclusion
Making your own citronella candles from upcycled materials isn’t just a crafty way to reduce waste; it’s a beautiful way to enhance your outdoor experience while keeping the bugs away. Remember, you’re not just lighting a candle; you’re nurturing your space and creating an inviting atmosphere for those summer evenings.
So, as you sit back and relax with your beautifully scented candles, take pride in knowing you crafted something wonderful that’s both functional and eco-friendly. Trust me, once you dive into this creative project, you’ll wonder why you haven’t done it sooner! Happy crafting, and here’s to a mosquito-free summer!