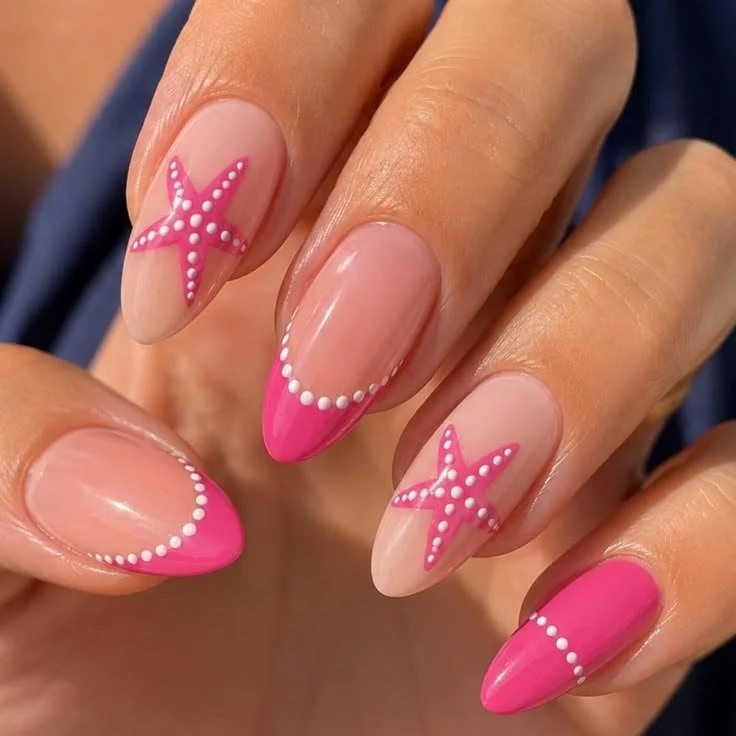

Embrace the Joy of Pink Starfish Nail Art with White Dots
Imagine lounging on a sun-soaked beach, the warm sand beneath your toes and the gentle sound of waves lapping at the shore. Now, picture your perfectly manicured nails glistening in the sunlight, each finger adorned with a playful design that captures the essence of summer. Sounds dreamy, right? If you’re someone who loves to express their personality through nail art, you’ve probably thought about trying something fun and beachy this season. Enter the charming combination of pink starfish nail art with white dots.
This trendy design not only brightens up your look but also brings a whimsical touch to your summer aesthetic. Whether you’re a seasoned nail artist or a total beginner, I promise you, creating this cute nail art is much easier than it looks. So let’s dive in and explore how you can achieve this stunning summer nail art.
Getting Started with the Right Tools
Before we jump into the actual process, let’s chat about what you’ll need. Having the right tools makes a huge difference when you’re crafting your nail masterpiece.
Essential Nail Art Supplies
Base Coat: Always start with a good quality base coat. It protects your nails and helps the color adhere better.
Nail Polish: You’ll need a pink nail polish for the base, plus white polish for the dots and detailing. Choose shades that scream summer – think coral pink or bubblegum pink.
Dotting Tools: These are essential for creating those adorable white dots. You can pick up a set at any beauty supply store, or improvise with a bobby pin or the end of a paperclip.
Top Coat: Finish your beautiful artwork with a top coat to add shine and durability.
Nail Clipper and File: Prep those nails by trimming and shaping them.
Quick Beauty Tips Before You Start
Clean Your Nails: Make sure your nails are clean and free from old polish. You can use a nail polish remover and a cotton ball for this.
Moisturize: Apply a little cuticle oil to hydrate your nails and cuticles before you start painting. Your nails will look healthier and the application will be smoother.
Choose the Right Environment: Pick a well-lit and comfortable spot to do your nails. You want to feel relaxed while working on this creative endeavor.
Step-by-Step Guide to Creating Pink Starfish Nail Art
Ready to unleash your inner artist? Here’s a simple guide to help you achieve the stunning pink starfish effect with white dots on your nails.
Step 1: Prep Your Nails
Start by clipping and filing your nails to your desired shape. I love an almond shape for summer – it feels breezy and chic. Apply your base coat and allow it to dry completely.
Step 2: Apply the Pink Base Color
Once your base coat is dry, it’s time to apply that gorgeous pink polish. Depending on the opacity of the polish you choose, you might need two coats for full coverage. Don’t rush this part – let each coat dry completely before moving on.
Step 3: Create the Starfish Design
Let’s talk details. Take your dotting tool (or bobby pin) and dip it into your white polish. Gently press it onto the nail to create small dots – these will serve as the base for your starfish.
- Dot Placement: Think about the points of a starfish. Start with a central dot and add five smaller dots around it to form arms.
Step 4: Add the Starfish Details
For that charming touch, you can create cute little starfish elements using your dotting tool. You can follow the outline of the starfish by connecting the dots slightly to create a more defined shape. It doesn’t have to be perfect – the fun lies in the artistry!
Step 5: Top It Off
Once your design is complete and dry, it’s time for the top coat! This not only seals the design but gives your nails that gorgeous shine. Apply it carefully to avoid smudging your masterpiece.
Tips to Make Your Nail Art Last
Let’s be honest; nothing is worse than ruining your fresh manicure the very next day. Here are some tips to help make your beautiful pink starfish nails last as long as possible.
Skip Water Immersion: Avoid soaking your nails in water for at least a few hours post-application. It helps the polish set better.
Use Gloves: If you’re doing any household chores, slip on a pair of gloves. Chemicals in cleaning supplies can chip and dull your polish.
Reapply Top Coat Regularly: Every few days, add a new layer of top coat to restore shine and protect your design.
Common Mistakes to Avoid
We’ve all been there, haven’t we? You’re excited to try a new nail art design, but things don’t go as planned. Here are a few common missteps you might want to watch for:
Rushing the Drying Process: Nail polish needs time to dry. If you don’t give it enough time, you could ruin your design before it even has a chance to shine.
Not Using Base and Top Coats: These two steps are crucial! Skipping them can lead to damage and peeling.
Too Much Polish on the Brush: This can lead to clumping and uneven application. Wipe excess polish off your brush before applying.
Frequently Asked Questions
How long will my nail art last?
With proper care—such as avoiding heavy water immersion or wearing gloves while cleaning—you can expect your nail art to last anywhere from a week to two weeks.
Can I customize the colors?
Absolutely! Feel free to swap out the pink and white for colors that you love or that better suit your personal style.
Is nail art suitable for every occasion?
Yes! Nail art adds a fun personal touch to your look. From casual outings to more formal events, fun nail designs can be adapted to fit any occasion.
Bonus Self-Care Ideas for Nail Lovers
While we’re talking about self-care, let’s embrace a few additional pampering ideas. Because you deserve it!
At-Home Manicure: Once a week, treat yourself to an at-home manicure. Think a warm soak, gentle exfoliation, and a hydrating mask for your hands.
Nail Growth Support: Incorporate biotin into your diet for healthier nails. Foods like eggs, avocados, and nuts are fantastic sources.
Mindfulness during Nail Art: Take this time to relax and unwind. Put on some calming music and allow yourself to enjoy the moment, focusing only on your creative expression.
Conclusion
There’s something truly uplifting about taking the time to express yourself through nail art. The pink starfish with white dots design not only embodies the fun and carefree spirit of summer but also allows you to channel your inner artist and stand out from the crowd. So next time you’re planning a beach day or simply indulging in some self-care, why not treat yourself to this playful, gorgeous nail art?
Embrace your creativity, laugh at the imperfections, and remember—the process of getting there is just as enjoyable as the final result. Now grab those polishes and let your nails tell a summer story that’ll surely turn heads!