
Unleash Your Inner Artisan with DIY Candle Making
Imagine this: It’s a cozy evening. You’ve got your favorite playlist playing softly in the background. The aroma of bubbly wax fills the air as you pour your very own blend of scented candle goodness. Sounds delightful, right? Maybe you’ve always wanted to try candle making, or perhaps you’re searching for a creative outlet during those quieter moments of motherhood. Here’s the truth: making candles is easier than you think, and I’m here to guide you through each step.
Whether you’re looking to add a personal touch to your home or you just want to enjoy the meditative process of crafting something beautiful, this simple step-by-step guide will help you create stunning homemade candles in no time. Let’s dive in, shall we?
Why Make Your Own Candles?
Before we jump into the nuts and bolts of candle making, let’s talk about the benefits of embarking on this fun DIY project.
Control Over Ingredients
When you make your candles, you choose every ingredient. Want to go for a soy candle because it’s eco-friendly? Perfect! Prefer a faux scent that reminds you of a sun-soaked beach? Go for it! Plus, you can avoid all the unpronounceable chemicals that often come with store-bought options.
A Perfect Gift
Candles are gifts that most people genuinely appreciate. Imagine gifting a friend a beautifully crafted candle with a personalized scent that reflects their personality. It’s thoughtful, unique, and shows you’ve put in effort.
Therapeutic and Fun
Let’s be honest; crafting is a fantastic form of self-care. The repetitive motions of pouring wax, stirring, and creating can be quite therapeutic. Plus, it’s a great way to bring kids into the mix and make beautiful memories together.
Customization
From color to scent, you can customize your candles to fit any theme, mood, or season. Bright yellows and citrus for summer, deep reds and pine for winter—your options are endless!
Gather Your Supplies
Now that you’re convinced, let’s get ready to roll! Here’s a simple list of what you’ll need to make your own candles. You’ll feel like a pro in no time.
Basic Supplies
Wax: The heart of your candle! You can choose from various types:
- Soy Wax: Non-toxic, easy to work with, and burns cleaner.
- Paraffin Wax: Commonly used, but not the most eco-friendly.
- Beeswax: Natural and has a beautiful honey scent, but tends to be pricier.
Wicks: Get the right size based on your container. A thicker wick burns longer, while a thinner wick has a gentler flame.
Containers: You can use mason jars, teacups, or any heat-resistant vessel. Get creative!
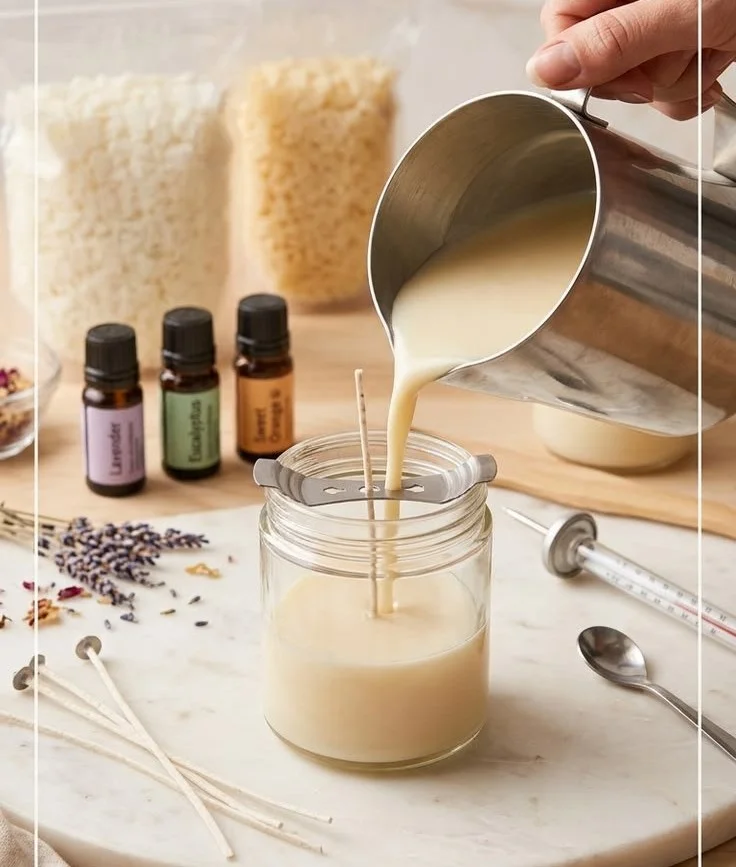
Double Boiler: This is essential for melting the wax. If you don’t have one, you can create your own using a pot and a heat-proof bowl.
Fragrance Oils or Essential Oils: This is where the magic happens! Choose your favorite scents to give your candles a unique touch.
Color Dyes (optional): If you want to add some visual flair to your candles, this is where you can be as colorful as your heart desires.
Thermometer: A simple kitchen thermometer will help you keep track of the wax temperature.
Stirring Stick: A wooden stick or a spoon will work perfectly for mixing.
Safety First
I know, I know; it’s just candle making! But let’s not forget that you’re working with hot wax. Make sure to wear an apron, use heat-resistant gloves, and keep a fire extinguisher handy just in case. Better safe than sorry!
Step-by-Step Candle Making
Step 1: Prepare Your Work Area
Set up a clean workspace; think of it as your very own crafty corner. Lay down some newspaper or old cloth that you don’t mind getting a bit messy. Trust me, things can get drippy!
Step 2: Measure Your Wax
Take your container and fill it with water to find out how much wax you’ll need. Use this measurement as a guide to determine the amount of wax (usually 1 pound of wax will fill a container of roughly 12 ounces).
Step 3: Melt the Wax
In your double boiler, slowly heat the wax until it melts completely. Stir occasionally to avoid any hot spots. It’s important to keep an eye on the temperature; usually, you want it to get to around 170°F to 180°F (77°C – 82°C).
Step 4: Add Color and Scent
Once your wax is fully melted, now’s the time to add your color dyes and fragrance oils. Use about 1 ounce of fragrance oil for every pound of wax to give your candles a delightful scent (but feel free to adjust based on your preference). Stir slowly and make sure everything is evenly mixed.
Step 5: Secure the Wick
While your wax cools a bit to around 150°F (65°C), secure the wick in your container. You can do this by dipping the end of the wick in melted wax and sticking it to the bottom of the container. Alternatively, you can use a wick holder, which helps keep it centered as the candle sets.
Step 6: Pour the Wax
Carefully pour the melted wax into your container. Leave a little room at the top for the wax to expand as it cools.
Step 7: Let it Set
Let the candle cool completely—this might take a few hours. It’s tough to wait, I know, but the best things come to those who are patient!
Step 8: Trim the Wick
Once your candle is set and cooled, trim the wick to about a quarter-inch above the wax. This helps with burning and ensures you get a delightful, even flame.
Step 9: Enjoy or Gift!
Light your candle and take a moment to bask in your achievement. Or wrap it up as a thoughtful gift; your friends will be impressed!
Common Mistakes to Avoid
Even the best of us can make missteps. Here are some common pitfalls to watch for:
- Skipping the Thermometer: If you don’t keep track of the temperature at different stages, you could end up with candles that don’t set well or burn unevenly.
- Using the Wrong Wick Size: If your wick is too small, your candle won’t burn well. Too big, and you’ll get a waxy mess.
- Not Letting It Cool Long Enough: I know the anticipation is real, but pouring too soon can ruin all your hard work.
- Adding Fragrance After Pouring: Always mix it in while the wax is melted to ensure an even scent distribution.
FAQs About Candle Making
Can I use essential oils?
Absolutely! Just remember, essential oils are typically less potent than synthetic fragrance oils, so you may need to use a bit more to get the scent you want.
How long does it take to make candles?
From prep to pour, it can take about a couple of hours, but keep in mind that cooling time is usually the longest, around 2-4 hours.
How do I store my candles?
Keep them in a cool, dry place away from direct sunlight. This will help preserve both the scent and the color.
Bonus Self-Care Ideas
- Turn on your favorite podcast while you craft.
- Make it a family affair and let the kiddos help.
- Light one of your new candles during bath time for the ultimate relaxation experience.
Conclusion
There you have it—a comprehensive guide to making your own beautiful candles right at home. Whether you’re looking to relax after a long week or share a heartfelt gift with a friend, candle making is not just a craft; it’s a way of expressing yourself.
So why not grab those supplies and get started? You’ve got this! Just imagine the lovely glow and aroma that your homemade candles will bring into your space. And remember, this is just the beginning—once you get the hang of it, the possibilities are endless. Happy crafting!