
Light Up Your Life with Candle Making Tips for Beginners
Imagine this: it’s a cozy evening, the aroma of your favorite scent fills the air, and you’re wrapped up in your favorite blanket. All this ambiance comes from beautiful, handcrafted candles that you’ve made yourself. It sounds dreamy, right? But if you’re just stepping into the candle-making world, it’s easy to feel overwhelmed. Trust me, I’ve been there! Learning how to make candles doesn’t have to be complicated or expensive. With just a bit of guidance, you can dive into this creative hobby and enjoy the serene atmosphere of homemade candles in no time.
Let’s be honest, we all love a little self-care moment, and there’s something incredibly therapeutic about crafting your own candles. It’s not just about the end product; it’s about the process and joy of creating. So if you’re ready to light your way into this wonderful craft, here are seven essential candle-making tips that will save you both time and money.
Understand Your Wax Basics
One of the first things you might wonder about is which type of wax to use. There are several options out there, including paraffin, soy, beeswax, and palm. Each has its unique characteristics.
Paraffin Wax: It’s affordable and widely available, making it popular for beginners. It burns well and holds color and fragrance beautifully, but it’s derived from petroleum, which is a downside for some.
Soy Wax: If you’re leaning towards a more eco-friendly option, soy wax is your friend! It’s natural, burns longer, and is less prone to soot.
Beeswax: This luxurious wax has a natural sweet aroma and is highly sought after, but it can be pricier and more challenging to work with.
Palm Wax: This is great for making unique crystal-like textures but requires more experience to master.
So, which one should you choose? If you’re starting, I recommend soy wax for its ease of use and excellent scent retention. Plus, it’s a great conversation starter when people ask about your candles!
Invest in Quality Candle Making Supplies
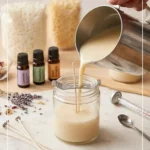
You don’t need to blow your budget for top-notch supplies. Start with the basics—wax, wicks, fragrance oils, and containers. Here’s a quick list of what you’ll need:
- Wax: Choose soy or paraffin based on your preference.
- Wicks: Make sure they’re the right size for your container. This can save you from frustrating sinking or mushrooming.
- Fragrance Oils: Essential for that irresistible smell. You’ll find plenty of options—from floral to spicy, so pick what resonates with you.
- Containers: Anything from glass jars to metal tins works perfectly. Just ensure they’re heat-resistant!
- Double Boiler: Don’t skimp here; a good double boiler will prevent overheating and burning your wax.
You might be tempted to buy every fun accessory in sight, but start simply. You can always add more as you build your skills!
Measure with Precision
You know that feeling when your DIY project turns out less than perfect? (We’ve all been there!) One key reason for this could be improper measurements. Precision is crucial in candle making because the balance of wax and fragrance can heavily affect the scent throw and how well your candle burns.
Wax to Fragrance Ratio: Generally, the optimal ratio is about 10% fragrance to wax. So, if you’re using 1 pound (16 oz) of wax, you’ll want about 1.6 oz of fragrance oil.
Wick Size: Your wick size should correlate with the diameter of your container. So, if you’re using a wide jar, you need a thicker wick for an even burn.
Keep a notebook handy to jot down your measurements, and don’t hesitate to experiment with different ratios. Who knows? You might just discover your signature candle scent along the way!
Don’t Skip Testing Your Candles
Here’s the truth: testing is the magical step that differentiates a novice candle from a professional one. Imagine making a candle only to find it doesn’t burn well after all that hard work. To avoid this heartache, always do a burn test!
Initial Burn: Once you pour your candle, let it cure for at least 48 hours before testing. This will give your wax and fragrance time to bond.
Full Burn: When testing, burn the candle for a few hours and observe the burn pool size, wick performance, and scent throw. If it’s too smoky or doesn’t produce enough scent, you might need to tweak your wax to fragrance ratio or choose a different wick.
Testing isn’t just about avoiding disasters; it’s also a great opportunity to refine your skills. You might stumble upon tricks that elevate your candles from "nice" to "amazing."
Scent and Color Matter
You’re probably thinking about all those beautifully scented candles you’ve seen in shops. So how do they get those rich fragrances? The secret lies in the quality of fragrance oils and how you mix them in.
Choosing Fragrance Oils: Invest in high-quality scent oils made specifically for candle making. Look for companies that offer good reviews for their scent throw and longevity.
Mixing Fragrance with Color: Here’s where the fun starts! You can use dye specifically made for candles. Just a few drops can transform your creations from simple to stunning.
When it comes to combining scent and color, play around! You might find that a sweet vanilla paired with a cool blue is the aesthetic you’re after.
Keep Your Workspace Organized
Picture this: you’re ready to pour your candle, but your supplies are scattered everywhere. Frustrating, right? Keeping your workspace clean and organized can save you time, plus it’s much safer.
Here’s how to tackle the setup:
- Designated Candle Making Zone: Choose a space where you can consistently work, free from distractions.
- Clear Containers for Supplies: Use clear bins or boxes to keep your wax, wicks, and fragrances in one spot. Clearly label everything so you can find things easily on your crafting days.
- Clean Up as You Go: After each step, it’s easy to get messy, but take a moment to tidy up. This also helps prevent accidents—think spilled wax and sticky surfaces.
By creating a wonderful working environment, you’ll not only enjoy the process more, but you’ll also be more productive!
Have Fun and Embrace Creativity
Here’s the best part: candle making is a form of art. So, allow yourself to explore, make mistakes, and perhaps laugh a little at your results (trust me, those "oops" moments often lead to the best stories).
Maybe try themed candles based on the seasons or scents that remind you of your favorite memories. Why not host a candle-making party with friends or do it as a solo self-care session?
You might find unexpected joy in mixing scents that clash in your mind but harmonize beautifully in a candle. Trust your instincts and let your creativity flow—it’s all about making something that makes you happy!
In Conclusion
Candle making might seem like a grand endeavor, but with a few wise tips, you can transform your home into a soothing sanctuary filled with warm, aromatic light. Start small, keep experimenting, and before you know it, you’ll be crafting candles like a pro.
So, the next time someone asks about that lovely scent wafting through your living room, you can proudly say you made it yourself! You’ve got this, and remember, enjoy the journey as much as the destination. Happy crafting!