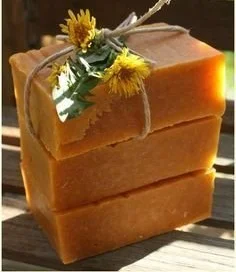

Cold Process Dandelion Soap Recipe with Raw Honey and Organic Tamanu Oil
Are you ready to embark on an exciting DIY journey to create your very own natural soap? This cold process soap recipe is an excellent choice for those looking to harness the power of nature. Packed with fresh dandelions, raw honey from your beehives, and rich organic tamanu oil, this soap is perfect for anyone dealing with persistent skin conditions. Plus, it’s a wonderful addition to your homemade gifts!
Why You Will Love This Recipe
This recipe isn’t just about making soap; it’s about creating a nourishing experience for your skin. Dandelions are known for their anti-inflammatory properties, making them ideal for soothing irritated skin. Raw honey adds a touch of moisture and natural antioxidants, while tamanu oil is celebrated for its skin-repairing abilities.
You’ll appreciate how satisfying it is to craft your soap from scratch, bringing the beauty of nature right into your bathroom. Not only will it make your skin feel fantastic, but it also provides a unique and heartfelt touch to your self-care routine or gift-giving.
Ingredients
For this DIY soap project, you will need the following ingredients:
- Fresh dandelions: 1 cup (finely chopped)
- Coconut oil: 7 oz (198 g)
- Olive oil: 7 oz (198 g)
- Tamanu oil: 3 oz (85 g)
- Raw honey: 3 oz (85 g)
- Distilled water: 8 oz (227 g)
- Lye (sodium hydroxide): 3.67 oz (104 g)
Equipment
Before you start, gather the following equipment:
- Digital scale: For precise measurements
- Heat-resistant mixing bowl: To mix oils and lye
- Glass or plastic measuring cups: For measuring liquids
- Stick blender: For emulsifying the mixture
- Soap mold: Silicone or wooden molds work well
- Safety goggles and gloves: For safety when handling lye
- Thermometer: To check temperatures
- Spoon or spatula: For mixing
- Large stainless steel or glass container: For lye mixing
Step-by-Step Instructions
Step 1: Prepare Your Workspace
Make sure you work in a well-ventilated area. Lay down some newspaper to catch any spills, and put on your safety goggles and gloves.
Step 2: Measure Your Ingredients
Using a digital scale, measure out your lye (sodium hydroxide) and distilled water separately. Always add the lye to the water (never the other way around), stirring carefully until dissolved. This will generate heat, so allow the lye mixture to cool until it’s around 100°F (38°C).
Step 3: Prepare the Oils
In a separate heat-resistant bowl, measure and combine your coconut oil, olive oil, and tamanu oil. Melt the coconut oil (if solid) until it becomes liquid. Once everything is mixed, allow it to cool until it also reaches about 100°F (38°C).
Step 4: Combine the Mixtures
When both the lye mixture and the oils are at a suitable temperature, slowly pour the lye mixture into the oils while continuously stirring.
Step 5: Emulsify the Mixture
Using a stick blender, blend the soap mixture until it reaches “trace.” This means the mixture should be thick enough that when you drizzle some on the surface, it should leave a visible trace.
Step 6: Add Dandelions and Honey
Gently fold in the finely chopped dandelions and raw honey, being careful not to overmix. Ensure everything is well incorporated.
Step 7: Pour into Molds
Pour the soap mixture into your prepared soap mold. Use a spatula to scrape down the sides of the bowl.
Step 8: Insulate and Cure
Cover your molds with a towel to insulate them and let the soap sit for 24-48 hours until it hardens.
Step 9: Unmold and Cut
Once the soap is firm, carefully remove it from the mold and cut it into bars. Allow the bars to cure in a cool, dry place for 4-6 weeks before using.
Tips for Success
- Patience is Key: Allowing the soap to cure fully will enhance its texture and effectiveness. Don’t rush this step!
- Maintain a Clean Workspace: Clean your tools and workspace immediately after use to prevent lye from causing damage or irritation.
- Track Temperature: Utilizing a thermometer can help you keep your oils and lye at optimal temperatures for saponification.
Common Mistakes to Avoid
- Incorrect Measurements: Always weigh your ingredients accurately, as even a small mistake can affect the final product.
- Neglecting Safety: Always wear protective gear when handling lye and ensure you are in a ventilated area.
- Skipping the Trace Test: Make sure you achieve trace before proceeding to add additional ingredients to ensure a successful saponification process.
Variations and Customization Ideas
You can easily customize this soap recipe by adding different essential oils, such as lavender or tea tree, to enhance the aroma and therapeutic properties. Consider incorporating other botanicals for texture or appearance, like oatmeal for exfoliation.
Storage and Shelf Life
Store your finished soap bars in a cool, dry place, away from direct sunlight. Wrapped in a wax paper or in a wooden box, these bars can last for 6 months to a year, while maintaining their efficacy.
Safety Tips
- Always handle lye with care. Use gloves and goggles at all times.
- Ensure all your safety equipment is in good condition before starting.
- Keep lye and soap-making materials out of reach of children and pets.
Frequently Asked Questions
1. Can I use dried dandelions instead of fresh?
Yes, you can use dried dandelions, but fresh ones are preferred for maximum benefits.
2. Where can I find tamanu oil?
Tamanu oil can often be purchased online or at specialty beauty stores.
3. Can I substitute raw honey?
If you’re looking for a vegan option, you can try agave syrup, but it may affect the soap’s lather.
4. What should I do if my soap didn’t trace?
If your soap doesn’t reach trace, give it more time with the stick blender. If it’s still failing, it’s likely an ingredient ratio issue.
5. Is it okay to use scented oils?
Yes, adding essential oils can enhance your soap’s scent, but be cautious with the quantity as they can affect lather.
6. How can I tell if my soap is safe to use?
Once your soap has cured for the recommended time, it should have a neutral pH. A pH test strip can confirm its safety.
Conclusion
Making your own cold process natural soap is both rewarding and practical. With this recipe, you’ll not only improve your skin but also gain the joy and satisfaction of creating something beautiful and natural from scratch. By following these instructions and tips, you’ll be on your way to crafting amazing soap brimming with the goodness of dandelions, raw honey, and tamanu oil. So roll up your sleeves, gather your ingredients, and dive into the wonderful world of DIY soap making!