
How to Make Sugar Plum Christmas Soap
Making homemade soap is a wonderful way to express creativity, give thoughtful gifts, and enjoy some self-care during the festive season. One delightful recipe you can try is Sugar Plum Christmas Soap, which captures the essence of holiday cheer with its sweet and fruity fragrance. In this guide, I’ll walk you through every step of the process, providing helpful tips and insights along the way.
Why You Will Love This Recipe
This Sugar Plum Christmas Soap not only smells incredible but is also gentle on the skin, making it perfect for the holiday season. Using a melt-and-pour soap base allows beginners to create beautiful bars of soap without the complexity of lye. Imagine giving this delightful soap as a gift or using it to freshen up your bathroom during get-togethers with family and friends.
Ingredients
Here’s what you’ll need for approx. 10 bars of Sugar Plum Christmas Soap:
- 1 lb (16 oz) of clear melt-and-pour soap base
- 1 lb (16 oz) of white melt-and-pour soap base
- 2 tablespoons of Sugar Plum fragrance oil
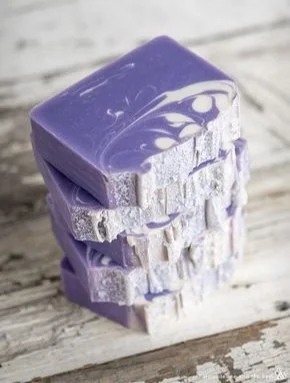
- 1-2 teaspoons of purple mica powder (for coloring)
- Optional: Dried lavender or other decorative elements for embedding in the soap
Equipment
Before getting started, gather the following equipment:
- Microwave-safe bowl or double boiler
- Stirrers (popsicle sticks or silicone spatula)
- Soap mold (silicone molds work best)
- Measuring spoons
- A thermometer (optional but recommended)
- Rubbing alcohol in a spray bottle (to remove bubbles)
Step-by-Step Instructions
Step 1: Prepare Your Work Area
Ensure your work area is clean, and gather all your ingredients and equipment. It’s important to have everything at hand, making the process smoother.
Step 2: Melt the Soap Base
- Cut the Soap Base: Begin by cutting the clear melt-and-pour soap base into small cubes. This helps it melt evenly.
- Melt: Place the soap cubes in a microwave-safe bowl. Heat it in the microwave at 30-second intervals, stirring in between until fully melted. If you’re using a double boiler, fill the bottom pot with water and heat over medium heat, stirring until melted.
Step 3: Add Color and Fragrance
- Color: Once the soap is melted, add 1-2 teaspoons of purple mica powder. Stir until fully incorporated. You can add more if a deeper color is desired.
- Fragrance: Add the Sugar Plum fragrance oil to the melted soap and stir well to combine.
Step 4: Pour the Soap
- Mold It: Carefully pour the melted soap into your silicone mold, filling each cavity almost to the brim.
- Remove Bubbles: Lightly spray the top of the soap with rubbing alcohol to eliminate any bubbles that may have formed.
Step 5: Let It Set
Allow the soap to cool at room temperature. This typically takes between 2-4 hours. For quicker results, you can place the mold in the refrigerator for about 30 minutes.
Step 6: Unmold and Decorate
Once fully set, gently pull the edges of the silicone mold away from the soap, then turn the mold upside down to release the bars. If desired, you can sprinkle dried lavender or other decorative elements on top before it fully hardens.
Step 7: Store or Gift
Place your bars in a cool, dry place, or wrap them up to give as gifts.
Tips for Success
- Use a scale for precision: If you’re more experienced and want to adjust the quantities, using a kitchen scale for measurements ensures consistency.
- Don’t rush the melting: If the soap overheats, it may lose its clarity or develop bubbles. Always melt slowly.
- Customize: Experiment with different colors and fragrances, or even layer different colors for a striped effect.
Common Mistakes to Avoid
- Not spraying alcohol: Remember to spray the surface to eliminate bubbles; otherwise, your finished soap may have an unappealing, bumpy texture.
- Overheating the soap: This can cause the base to become discolored. Pay attention and melt in short bursts.
Variations and Customization Ideas
- Different Fragrances: Feel free to substitute the Sugar Plum fragrance with scents like cinnamon spice, peppermint, or vanilla to create a different holiday vibe.
- Layered Soap: Experiment with layering different colors of melted soap for a visually striking effect.
Storage and Shelf Life
Store your Sugar Plum Christmas Soap in a cool, dry place. When wrapped properly, it can last for up to 6 months. Ensure the soap is kept out of direct sunlight and moisture to maintain its quality.
Safety Tips
- While melt-and-pour soap doesn’t involve lye, be cautious with hot melted soap to avoid burns.
- Use gloves and protective eyewear if you’re experimenting with different colors and fragrances, especially when handling pigments.
Frequently Asked Questions
1. Can I use other bases?
Yes, you can use goats’ milk or shea butter melt-and-pour soap bases for different skin benefits and textures.
2. How do I fix cloudy soap?
Cloudiness usually happens due to overheating. Make sure to melt in short intervals and keep an eye on the temperature.
3. Can I include essential oils instead of fragrance oils?
Absolutely! Just be mindful that essential oils may have different fragrance strengths, so experiment with quantities.
4. What should I do if my soap doesn’t harden?
If soap doesn’t set properly, it might be due to excess water or improper measurements. Melt it down and remold, ensuring accurate measurements next time.
5. Can I add exfoliants like oatmeal or sugar?
Yes, these additions can provide a lovely texture. Just keep the amount around 1 tablespoon per pound of soap, so it doesn’t become too rough.
6. What’s the best way to wrap my homemade soap?
Use parchment paper, cellophane, or clear wrap to keep your soaps fresh. Decorative ribbons can add a charming touch!
Conclusion
Making Sugar Plum Christmas Soap is an enjoyable and fulfilling project, especially as we embrace the cozy spirit of the holidays. Whether you’re crafting for yourself or gifting to loved ones, the blend of sweetness and holiday cheer will brighten anyone’s day. So gather your ingredients, follow this guide, and get ready to whip up your very own batch of delightful holiday soap! Happy making!