
Dive into Natural Soap Making: Dandelion, Honey, and Tamanu Oil Soap Recipe
Creating your own homemade soap is a rewarding experience—especially when you can incorporate the beauty of nature’s ingredients like fresh dandelions, raw honey, and organic tamanu oil. This cold process natural soap recipe is not only fragrant and nourishing but may also be helpful for those with persistent skin conditions. Let’s embark on this exciting DIY soap journey!
Why You Will Love This Recipe
- Natural Ingredients: Embracing the power of dandelions, honey, and tamanu oil offers a gentle, soothing experience for your skin.
- Personalization: You can easily adapt this recipe to your preferences or skin needs.
- Educational Experience: Brush up on your soap-making skills while learning about essential techniques and ingredients.
- Handmade Gifts: Homemade soap makes thoughtful gifts for friends and family.
Ingredients
Gather the following ingredients for one batch, which typically yields about 10-12 bars of soap:
- 8 oz (227g) Olive Oil
- 4 oz (113g) Coconut Oil
- 4 oz (113g) Palm Oil
- 4 oz (113g) Tamanu Oil
- 6 oz (170g) Distilled Water
- 2.5 oz (70g) Sodium Hydroxide (Lye)
- 2 oz (56g) Raw Honey
- 1 cup Fresh Dandelion Petals
- Optional: Essential oils for fragrance (e.g., lavender, chamomile)
Equipment
You’ll need the following tools:
- Safety goggles and gloves
- Digital scale
- Heat-resistant mixing bowls
- Stick blender
- Soap mold (silicone is recommended)
- Measuring spoons
- Thermometer
- High-quality scale for weight measurement
- A spatula and spoon for mixing
- A stick blender for emulsifying the soap mixture
Step-by-Step Instructions
Step 1: Prepare Your Workspace
- Safety First: Engage in proper safety measures: wear goggles and gloves, and ensure your workspace is well-ventilated.
- Prepare Molds: If using a non-silicone mold, line it with parchment paper for easier removal.
Step 2: Lye Solution Preparation
- Mix Lye and Water: In a well-ventilated area, carefully measure 6 oz of distilled water in a heat-resistant bowl. Slowly add 2.5 oz of sodium hydroxide (lye) to the water. Stir until dissolved. This solution will heat up significantly, so be cautious, and never reverse the order.
- Cool the Lye Mixture: Set it aside to cool, ideally to about 100-110°F (38-43°C).
Step 3: Combine Oils
- Measure Oils: Weigh out the olive, coconut, palm, and tamanu oils into a separate heat-resistant bowl.
- Melt Solid Oils: If you have solid coconut or palm oil, gently heat the oils until fully melted.
- Combine Oils: Allow the oil mixture to cool to a temperature that matches your lye (around 100-110°F).
Step 4: Blend Mixtures
- Mix Oils and Lye: Slowly pour the lye solution into the oil mixture. Using a stick blender, mix until you reach "trace," which is when the soap thickens and starts to leave a trail on the surface.
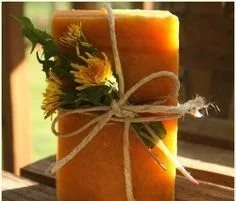
- Add Honey and Dandelions: Incorporate the raw honey and dandelion petals, mixing gently until fully combined.
Step 5: Pour and Cure
- Pour into Mold: Carefully pour your soap mixture into the prepared mold.
- Cover and Insulate: Cover with a towel or blanket to maintain heat, allowing the saponification process to occur.
- Cure the Soap: After 24-48 hours, unmold the soap and cut it into bars. Place the bars on a drying rack and cure for 4-6 weeks.
Tips for Success
- Test Temperature: Ensure both the lye solution and oils are within similar temperature ranges before combining.
- Stir Gently: Avoid splashing lye solution; it can be harmful if it gets on your skin.
- Patience is Key: Curing your soap is necessary for it to harden and reach the best qualities for use.
Common Mistakes to Avoid
- Incorrect Measurements: Always double-check your measurements of oils and lye.
- Skipping Safety Gear: Even if you feel confident, always wear protective gear when handling lye.
- Uneven Cooling: Allow proper cooling of both the lye and oils before mixing to ensure a smooth emulsion.
Variations and Customization Ideas
- Essential Oils: Feel free to add essential oils for scent—lavender, chamomile, or tea tree are great options for skin care.
- Botanicals: Besides dandelions, consider adding chamomile or calendula petals for additional skin benefits.
- Color: You can use natural colorants like spirulina powder or turmeric to give your soap a unique hue.
Storage and Shelf Life
Store your finished soap in a cool, dry place, away from direct sunlight. Properly cured bars can last up to a year. Keep them in a well-ventilated area to prevent moisture buildup and possible mold growth.
Safety Tips
- Lye Handling: Remember that lye is caustic—always work with it in a well-ventilated area, and never let children or pets near your workspace.
- Cleaning: Clean up any spills immediately. A vinegar solution can neutralize lye, but use caution and protective gear.
- Disposal: Dispose of any unused lye solution by diluting it with a large amount of water and letting it cool before safely disposing of it.
Frequently Asked Questions
1. Can I use dried dandelions instead of fresh?
While fresh dandelion petals provide the best fragrance and benefits, dried petals can be used in a pinch. Just keep in mind the visual and aromatic emphasis.
2. What’s the purpose of tamanu oil in this recipe?
Tamanu oil is known for its healing properties, making it excellent for soothing irritated or sensitive skin, which is particularly beneficial for those with skin conditions.
3. How can I tell if my soap is safe to use?
Following the proper curing time of 4-6 weeks allows the lye to saponify completely, ensuring the soap is safe for use. Always check that your soap isn’t soft or sticky when curing time is over.
4. Can I make this soap without lye?
The cold process method inherently requires lye for saponification, which is what turns oils into soap. However, you can explore melt-and-pour soap bases that do not require additional lye.
5. What if my soap doesn’t reach trace?
If your soap mixture doesn’t reach trace after several minutes of blending, it might be due to either oils being too cool or they were not mixed in properly. Make sure to blend until the trace is visible.
6. How can I test for a quality mold?
Silicone molds are ideal for beginners, as they allow for easier removal. You can use basic plastic or wooden molds too, but make sure they’re lined adequately.
Conclusion
Embarking on the journey of making your own cold process natural soap infused with dandelions, honey, and tamanu oil is a beautiful way to connect with nature and enjoy the art of handcrafted products. Your skin will thank you for the gentle touch of natural ingredients, and you might just find yourself embracing this rewarding craft as a favorite pastime. Gather your ingredients, gear up with safety precautions, and get ready to create something delightful! Happy soap-making!