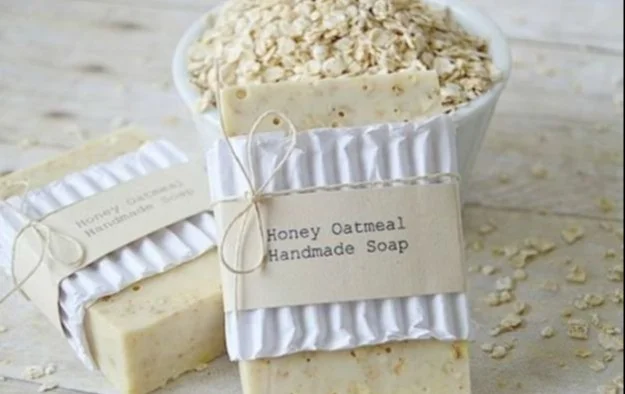

DIY Soap Recipes – Honey Oatmeal Handmade Soap
Introduction
Have you ever tried your hand at making homemade soap? If not, there’s no better starting point than this delightful Honey Oatmeal Handmade Soap recipe! With a simple melt-and-pour method, you can create a luxurious and nourishing soap that’s perfect for all skin types. This DIY soap project is not only fun for adults but also an engaging activity to do with kids, teaching them about natural ingredients and the joy of crafting.
Why You Will Love This Recipe
This Honey Oatmeal Soap is a fantastic addition to your DIY soap repertoire for many reasons:
- Natural Ingredients: Made with wholesome ingredients like honey and oatmeal, this soap is gentle on the skin.
- Easy and Kid-Friendly: The melt-and-pour method eliminates the need for handling lye, making it safe and straightforward for beginners and children.
- Customizable: You can easily modify the recipe to suit your preferences by adding different essential oils or colors.
- Perfect Gifts: Handmade soaps make thoughtful and fast gifts for friends and family on any occasion.
Ingredients
For this recipe, you’ll need the following:
- 1 lb (16 oz) of glycerin soap base (clear or ivory)
- 1/4 cup of finely ground oatmeal (use whole oats and blend them)
- 2 tbsp of honey (preferably raw for more nutrients)
- 20 drops of essential oil (optional, such as lavender or tea tree)
Equipment
To create your Honey Oatmeal Handmade Soap, gather the following tools:
- Heat-resistant mixing bowl
- Soap mold (silicone molds work best)
- Microwave or double boiler
- Spoon or spatula for stirring
- Measuring cups and spoons
- Knife for cutting the soap base
Step-by-Step Instructions
Follow these easy steps to make your Honey Oatmeal Soap:
Prepare Your Workspace: Clear your work area and gather all your ingredients and equipment. This helps in staying organized and makes the process smoother.
Cut the Soap Base: Using your knife, cut the glycerin soap base into small cubes. This helps it melt evenly.
Melt the Soap: Transfer the cubed soap base to your heat-resistant mixing bowl.
- Microwave Method: Place it in the microwave for about 30 seconds. Stir and repeat until fully melted.
- Double Boiler Method: Fill the bottom pot with water and bring it to a simmer. Place your bowl on top and stir until melted.
Add Honey and Oatmeal: Once the soap base is melted, remove it from heat and carefully stir in the honey and finely ground oatmeal. Ensure they are well incorporated.
Add Essential Oils: If using, add the essential oils and mix thoroughly to distribute the fragrance evenly.
Pour into the Mold: Carefully pour the soap mixture into your silicone mold. Leave a small space at the top as the soap may expand slightly.
Cool and Set: Allow the soap to cool completely, usually about 1-2 hours. For quicker results, place it in the refrigerator for 30 minutes.
Remove from Mold: Once fully solidified, gently push from the bottom of the mold to pop out your soap.
Cure and Store: Let the soap sit for another 24 hours to ensure it’s completely firm before storing it in an airtight container.
Tips for Success
- Watch the Temperature: Don’t overheat the glycerin soap, as it can cause it to separate and lose clarity.
- Use Fine Oatmeal: Ensure the oatmeal is finely ground to avoid a gritty texture in your soap.
- Test Different Essential Oils: Experiment with various scents to find your favorite combination!
Common Mistakes to Avoid
- Overheating the Soap Base: This can lead to a lumpy texture. Stir frequently and heat in short bursts.
- Not Mixing Well: Ensure all your ingredients, especially honey and oatmeal, are well combined to avoid uneven texture.
- Not Allowing to Set: Trying to unmold too early may cause the soap to break.
Variations and Customization Ideas
Feel free to get creative! Here are some ways to customize your Honey Oatmeal Soap:
- Add Color: Use natural colorants like turmeric or spirulina to add a fun hue to your soap.
- Incorporate Exfoliants: Consider adding poppy seeds, coffee grounds, or dried herbs for additional exfoliating properties.
- Substitute Ingredients: If you don’t have honey, you can use vegetable glycerin for a similar moistening effect.
Storage and Shelf Life
Store your Honey Oatmeal Handcrafted Soap in a cool, dry place away from direct sunlight. When properly stored, it can last up to 6 months. Keep it in an airtight container to avoid moisture absorption.
Safety Tips
While this recipe is safe and involves no lye, keep the following in mind:
- Always handle hot equipment and melted soap with care.
- Conduct the soap-making process in a well-ventilated area.
- If crafting with kids, supervise them closely during the melting process to prevent burns.
Frequently Asked Questions
1. Can I use a different soap base?
Yes! You can use a shea butter or goat milk soap base for a creamier texture and added skin benefits.
2. What can I substitute for honey?
Vegetable glycerin is a great alternative if you want to make a vegan version of this soap.
3. How can I make my soap smell stronger?
You can increase the amount of essential oil, but always test small amounts first to ensure it doesn’t become overpowering.
4. Can I add colorants to my soap?
Absolutely! Make sure you use soap-safe colorants, and add them after the soap base is melted for the best results.
5. How do I keep my soap from getting wet?
Make sure to store the soap in a dry area. Avoid storing it in the bathroom, where it may come in contact with moisture.
Conclusion
Creating your own Honey Oatmeal Soap is a rewarding endeavor that brightens your day and allows you to gift friends and family with a piece of your craftsmanship. This easy-to-follow recipe, filled with natural ingredients, is perfect for beginners and an enticing project for kids. So gather your supplies, unleash your creativity, and enjoy the therapeutic process of soap-making today. Happy crafting!