
30 DIY Cake-Looking Candle Ideas for Unique Gifts and Decor
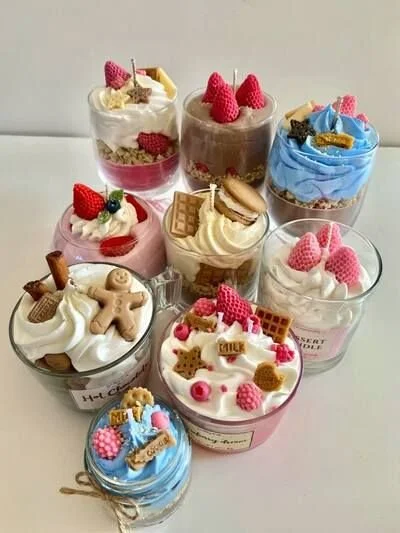
Creating unique candles that resemble delicious cakes is a delightful way to infuse charm into your home decor or gift-giving. Not only will these cake-shaped candles serve as eye-catching decorations, but they also bring a personal touch when created by hand. In this guide, you’ll learn how to make 30 DIY cake-looking candles that are perfect for unique gifts and stunning decor.
Why You Will Love This Recipe
Making cake-shaped candles is a wonderfully creative project. You can experiment with colors, scents, and shapes to design candles that are truly unique. These candles can be used for birthdays, celebrations, or simply as lovely additions to your home. They also make fantastic gifts that show thoughtfulness and care. Plus, crafting your own candles means you can choose natural ingredients and scents that suit your preferences or those of your loved ones.
Ingredients
The basic ingredients you’ll need for your cake-looking candles include:
Wax: You can use paraffin, soy, or beeswax. Soy wax is preferred for its eco-friendliness and ease of use in DIY projects.
- Amount: Approximately 1-2 pounds, depending on how many candles you want to make.
Candle Dye: This will give your candles the desired color.
- Amount: A small amount, follow manufacturer instructions.
Fragrance Oil: Choose cake or dessert scents like vanilla, buttercream, or chocolate.
- Amount: Typically 1 ounce per pound of wax.
Wicks: Make sure to choose the right size and type for the diameter of your candle.
Baking molds or silicone molds: These will shape your candles into cake forms.
Equipment
Before starting, gather the following equipment:
- Double boiler or a melting pot
- Thermometer
- Stirring utensil (like a wooden stick or spoon)
- Scale (for measuring wax and fragrance)
- Wick holder (to keep the wick centered as the wax sets)
- Safety goggles and gloves (for protection)
- Newspaper or protective covering for your workspace
Step-by-Step Instructions
Basic Cake Candle Recipe
Here’s a straightforward guide to making your cake candles:
Prepare Your Workspace: Cover your work surface with newspaper. Make sure you’re in a well-ventilated area and wear your safety goggles and gloves.
Melt the Wax: Using a double boiler, heat the wax until fully melted. Use a thermometer to check that the temperature reaches about 170-180°F (77-82°C).
Add Dye and Fragrance: Once melted, add a few drops of candle dye, stirring well to combine. Then, add your fragrance oil, ensuring it’s evenly distributed.
Secure the Wick: Place your wick in the center of the mold. You can use a wick holder to keep it upright.
Pour the Wax: Carefully pour the melted wax into the mold, leaving some space at the top for decorative layers if desired.
Let it Set: Allow the candle to cool completely, which may take a few hours. For the best results, let the candle sit at room temperature until fully firm.
Decorate Your Cake Candle: To mimic frosting, melt a small batch of wax in a contrasting color and use piping techniques to create a decorative top layer. Consider using sprinkles or faux fruits to embellish your ‘cake’.
Remove from Mold: Once completely solidified, gently remove the candle from the mold.
Trim the Wick: Before using, trim the wick to about ¼ inch above the wax.
Tips for Success
- Test Burn Your Candles: Always test the burn of your candles to ensure they burn evenly and safely. Check the wick size and adjust if necessary.
- Use Thermometer: This is essential for achieving the correct melting and pouring temperatures.
- Experiment with Scents: Don’t hesitate to blend fragrance oils for a more personalized scent.
Common Mistakes to Avoid
- Skipping the Wick Testing: Not testing the wicks beforehand can lead to soot or poor burning.
- Overheating the Wax: This can degrade the quality of the wax and fragrance oils.
- Not Allowing Enough Cooling Time: Rushing the cooling process can affect how evenly the candle will burn.
Variations and Customization Ideas
Feel free to customize your cake candles:
- Color Schemes: Create rainbow cake candles by pouring in layers of different colored wax.
- Frosting Options: Use different techniques to simulate frosting—think pipe bags or brushes.
- Additions: Incorporate biodegradable glitter for extra sparkle or even dried flowers for a natural touch.
Storage and Shelf Life
Store your finished candles in a cool, dark place. If properly stored, they can last for several months without losing their scent or color.
Safety Tips
Candle-making can be a fun process, but safety is paramount. Always:
- Work in a well-ventilated area.
- Wear gloves and goggles.
- Use heat-resistant surfaces for pouring hot wax.
- Never leave melting wax unattended.
Frequently Asked Questions
1. What wax is best for beginners?
Soy wax is the best choice for beginners due to its ease of use, pleasant burn, and ability to hold fragrance well.
2. Can I use essential oils instead of fragrance oil?
Yes, but keep in mind essential oils have a lower scent throw when burned, so you may need to use more to achieve the desired fragrance.
3. How can I fix a candle that has a sinkhole?
If a sinkhole forms, you can melt a small amount of wax and pour it over the area once your candle has cooled.
4. Why is my candle not burning evenly?
This could be due to an improperly sized wick or wax that was poured at the wrong temperature.
5. Can I layer different scented waxes?
While you can layer different scents, ensure that the base wax is the same for cohesiveness.
6. Is it safe to burn my homemade candles?
Yes, as long as you follow safety measures, choose the correct wick, and regularly test your candles.
Conclusion
Crafting your own cake-looking candles is an enjoyable and rewarding experience that results in beautiful, scented decor or thoughtful gifts. With these 30 DIY ideas, you have everything you need to get started on this crafty journey. Dive into the world of candle making, experiment with designs, and delight your family and friends with your handmade creations. Happy crafting!