
Make Beautiful Lilac Soap for Spring Lovers
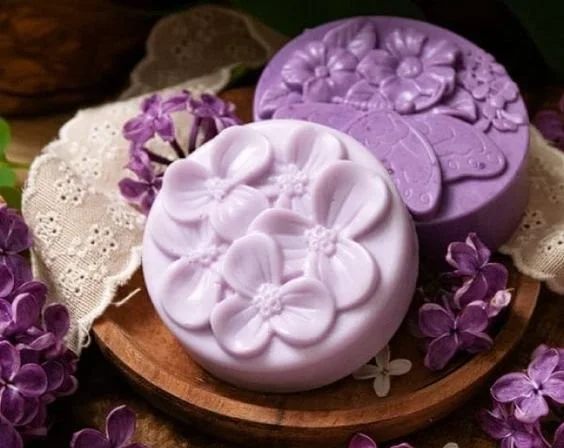
Spring is in the air, and what better way to celebrate the season than by crafting your own beautiful lilac soap? This lovely DIY soap is infused with nourishing lilac oil and has a delightful floral scent that will brighten anyone’s day. Whether you’re an experienced soap maker or a beginner looking to try something new, this guide will walk you through the entire process step-by-step.
Why You Will Love This Recipe
Making homemade soap not only allows you to indulge in your creativity, but it also gives you complete control over the ingredients used. This lilac soap recipe is a wonderful way to add a special touch to your springtime gifts for family and friends. The natural ingredients are gentle on the skin, and the soothing scent of lilac brings a touch of nature into your daily routine. Plus, handmade soap makes a thoughtful and personal gift for any occasion!
Ingredients
For making melt and pour lilac soap, you will need the following ingredients:
- 1 pound (16 oz) of clear glycerin soap base (or white soap base)
- 1 tablespoon of lilac essential oil
- 1-2 teaspoons of lilac-colored soap dye (optional)
- Silicon mold for shaping your soap (flower shapes are lovely for spring)
- Dried lilac flowers for decoration (optional)
Equipment
To successfully create your lilac soap, gather the following equipment:
- A microwave-safe bowl or a double boiler for melting the soap base
- A spoon or spatula for stirring
- An immersion blender (optional, for a smoother finish)
- A thermometer (optional, for precise temperature control)
- Safety goggles and gloves (if you’re using any additives that may irritate skin)
Step-by-Step Instructions
Creating your lilac soap is simple and enjoyable. Follow these steps to make your beautiful spring soap:
Prepare Your Workspace:
- Choose a clean, flat surface for your soap-making. Make sure it’s free of dust and other contaminants.
Melt the Soap Base:
- Cut the glycerin soap base into small cubes. This helps it melt more evenly.
- Place the cubes in a microwave-safe bowl. Heat in the microwave in 30-second intervals, stirring in between until fully melted. Alternatively, you can use a double boiler.
Add Lilac Oil and Color:
- Once the soap is melted, add the lilac essential oil and stir well. If using, add the lilac soap dye gradually until you achieve your desired shade. This step is optional, but it makes your soap visually appealing.
Optional: Blend for a Creamy Texture:
- To achieve a smoother consistency, use an immersion blender to mix the melted soap thoroughly. Blend until any bubbles are minimal and the soap looks creamy.
Pour into Molds:
- Carefully pour the soap mixture into your silicon molds. If you want to add dried lilac flowers for extra beauty, sprinkle some into the mold before pouring the soap.
Let It Cool:
- Allow the soap to cool and harden at room temperature for about 1-2 hours. If you’re in a hurry, you can place the molds in the refrigerator to speed up the process.
Unmold Your Soap:
- Once your soap is completely solid, gently press on the silicon mold to release your beautiful lilac soap.
Tips for Success
Use a Thermometer: If you want to be precise, keep an eye on the temperature; it should ideally be around 130-140°F when you add your essential oils.
Experiment with Scents: Lilac oil is delightful, but you can also combine it with other floral fragrances like lavender or rose for a custom blend.
Common Mistakes to Avoid
Overheating the Soap: Be careful not to overheat the soap base. Prolonged heating can result in an undesirable texture or even burn the soap, leading to a burnt smell.
Shortcutting Cooling Time: Patience is key! Allow the soap to cool completely before removing it from the mold to maintain its shape.
Variations and Customization Ideas
Herb-Infused Oils: Try infusing your oils with dried herbs or flowers beforehand to enhance the aroma and benefits.
Layered Soap: Create a layered look by pouring different colored soap bases one at a time. Allow each layer to harden slightly before adding the next for a beautiful effect.
Personal Touch: Customize your soap by adding personalized labels or wrapping them in lovely paper to give as gifts.
Storage and Shelf Life
Once your lilac soap is complete, store it in a cool, dry place, away from direct sunlight. Properly stored, your soap should have a shelf life of up to one year. Avoid using airtight containers, as they can trap moisture.
Safety Tips
While making soap can be fun, it’s essential to take proper safety precautions:
- Always wear gloves and safety goggles when handling hot soap to prevent burns.
- Work in a well-ventilated area, especially when using essential oils.
Frequently Asked Questions
1. How many bars of soap will this recipe yield?
This recipe makes approximately 4-6 bars of soap, depending on your mold size.
2. Can I use other essential oils?
Absolutely! You can substitute lilac oil with other floral scents like jasmine or rose.
3. What if my soap has bubbles on top?
If you see bubbles, you can use a heat source like a lighter or a heat gun to gently pop them before your soap completely hardens.
4. Can I add exfoliants like oatmeal or coffee grounds?
Yes! You can add exfoliants, but remember to mix them well to distribute evenly.
5. How can I make my soap smell stronger?
You can increase the amount of essential oil, but don’t exceed 3% of the total soap weight to prevent irritation.
6. Can I make this soap without dyes?
Of course! The soap will be clear with a natural color from the essential oils used, which can be just as beautiful.
Conclusion
Making your own lilac soap is a rewarding DIY project perfect for welcoming the spring season. With its gentle floral scent and nourishing properties, it’s an ideal gift for the spring lovers in your life. Take your time, enjoy the process, and don’t hesitate to customize the recipe to suit your preferences. Happy soap making!