
Brighten Up Your Manicure with Playful Handmade Press-On Nails
Are you ready to elevate your nail game this season? Look no further than this delightful handmade press-on nail set that perfectly captures the essence of summer with its soft blue, creamy white, and sunny yellow tones. This playful collection is not only chic but also versatile, making it ideal for all your summer adventures, from picnics to concerts. Let’s dive into the details of this cheerful, retro-inspired nail art that can instantly brighten up your manicure!
Why You Will Love These Nails
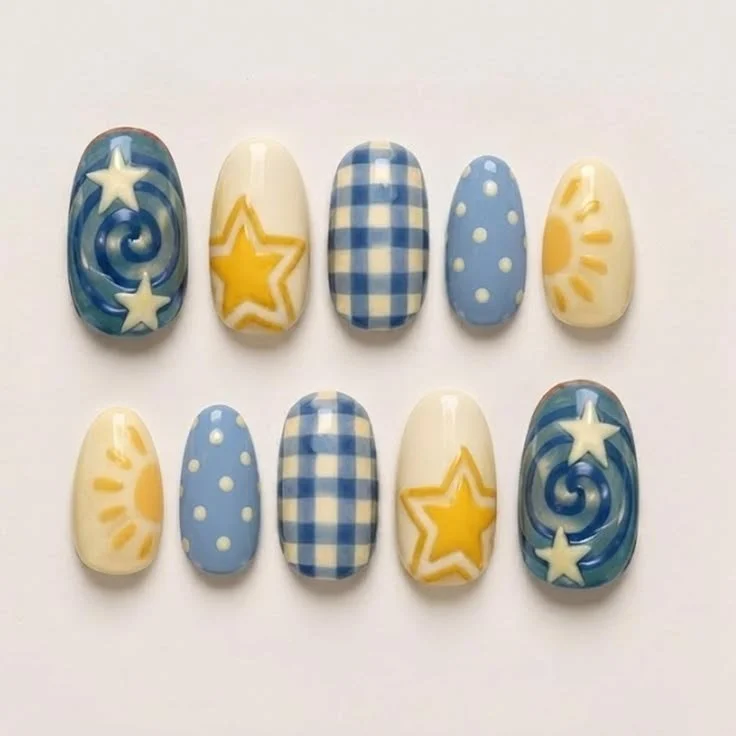
These press-on nails are the epitome of summer fun. With their mismatched designs featuring dreamy blue spirals, dimensional stars, cute yellow sun rays, soft dotted accents, and charming blue-and-white gingham checks, they provide a fresh twist on traditional nail art. The clean and sunny color palette makes the set easy to style with a variety of outfits, ensuring you’ll always feel fabulous. Plus, they are reusable with proper care—get ready to rock multiple bright and playful looks!
Key Features of This Nail Set
- Color Palette: Soft blue, creamy white, and sunny yellow.
- Design Details: Stars, sunshine rays, polka dots, swirls, and checkerboard patterns.
- Finish Options: A glossy finish enhances the bright colors and brings out the playful details.
What You Need
To replicate this beautiful handmade nail set at home or during your next appointment, here’s a simple list of supplies you might need:
- Press-On Nail Set: Seek out a set that includes a variety of the outlined designs.
- Nail Glue or Adhesive Tabs: Choose based on your preference for application ease.
- Nail File: For prepping your natural nails.
- Nail Buffer: To create a smooth surface.
- Top Coat: Optional, for extra shine and longevity.
- Nail Art Tools: Pens or dotting tools can help create your unique accents.
How to Recreate the Look
Creating this fun manicure is a breeze, thanks to the easy-to-apply press-on nails. Here’s a step-by-step guide for achieving a similar look:
- Prep Your Nails: Begin by cleaning your natural nails. Gently file the edges and polish your nails with a buffer for a smooth surface.
- Select Your Press-Ons: Choose a combination of the fun designs included in your set. Mix the blue spirals with the yellow suns and gingham patterns.
- Apply Adhesive: Depending on your choice between glue or adhesive tabs, apply a small amount to your natural nail or the press-on itself.
- Press and Hold: Align the press-on with your natural nail and press down firmly for a few seconds.
- Finish: Seal it with a top coat if desired, for longevity and shine.
Best Nail Shapes for This Design
Different nail shapes can enhance the beauty of your manicure. Here are some popular options that work well with this playful vibe:
- Almond Nails: Soft, feminine, and perfect for elongating the fingers.
- Square Nails: A trendy choice that gives a bold look while showcasing intricate designs.
- Coffin Nails: Ideal for those who love a longer look; the unique shape emphasizes detailed designs and playful colors.
Best Nail Length
For this design, medium-length nails work exceptionally well. They provide enough space for intricate patterns while remaining manageable for daily wear. If you prefer a shorter look, these press-ons can also be cut down to fit your preference, maintaining a chic and playful aesthetic.
Color Combinations
While the classic blue, white, and yellow palette is striking, don’t hesitate to customize further! Consider blending pastels for a softer look or adding pops of other colors like mint green or peach for a more vibrant finish. Here are some ideas:
- Blue and Coral: Breathe new life with a bright coral accent.
- Yellow and Lavender: Combine soft hues for a dreamy look.
- White and Peach: Freshen up your design while keeping it playful.
Cute Variations to Try
Once you’ve perfected this playful set, consider these cute variations:
- Glitter Accents: Add a touch of shimmer to your star nails for added sparkle.
- Matte Finish: Swap your glossy top coat for matte for a modern twist.
- Mix and Match: Combine different patterns on each nail for a truly unique look.
Nails for Different Occasions
These adorable press-on nails are perfect for various occasions, including:
- Summer Parties: Their cheerful design complements warm-weather gatherings.
- Picnics: Add a touch of fun to your relaxed outdoor plans.
- Vacations: Brighten up beach days with contrasting swimwear and these cute nails.
- Festivals and Concerts: Stand out with eye-catching nails amidst the crowd.
Seasonal Ideas
While this nail set shines best in summer, don’t limit yourself! With a few tweaks, you can wear them all year round:
- Fall Transition: Pair them with muted colors like brown or burgundy for autumn vibes.
- Spring Forward: Introduce floral designs or lighter pastel shades for spring.
- Winter Wonder: Use icy blues and white for a frosty, winter manicure that still feels whimsical.
Beginner Tips
If you’re new to nail art or press-on nails, here are some handy tips to ensure a flawless application:
- Practice Makes Perfect: Before applying, practice placing the nails without adhesive to see which designs you like best.
- Go Slow: Take your time aligning each nail perfectly—this will enhance the overall look.
- Watch Tutorials: Online tutorials can provide helpful visuals, especially for beginners.
How to Make Your Manicure Last Longer
Maintaining the longevity of your press-on nails is key. Here are three essential tips:
- Avoid Water for a Few Hours: After application, wait several hours before soaking your nails in water to ensure the adhesive sets properly.
- Limit Excessive Heat: Avoid placing your hands in hot environments immediately after application.
- Gently Remove: When it’s time to take them off, soak your hands in warm water to loosen the adhesive before gently lifting each nail.
Frequently Asked Questions
Are press-on nails reusable?
Yes! With proper care, these nails can be reused multiple times.
How do I store my press-on nails?
Keep them in a cool, dry place. Use the original packaging or a separate container to prevent them from sticking together or getting damaged.
Can I customize the designs?
Absolutely! Feel free to add personal touches like your favorite colors or patterns.
Conclusion
There you have it—a delightful exploration of a handmade press-on nail set that is both fun and functional. With its playful design features and cheerful color palette, you’re sure to find inspiration in this summer-ready manicure. Whether you’re dressing for a summer party, a picnic, or simply want to brighten your day, these nails will have you standing out in every good way. Embrace the cheerfulness of soft blues, creamy whites, and sunny yellows, and don’t forget to showcase your unique personality with every cute accent you choose to add! Happy manicuring! 🌼💅✨