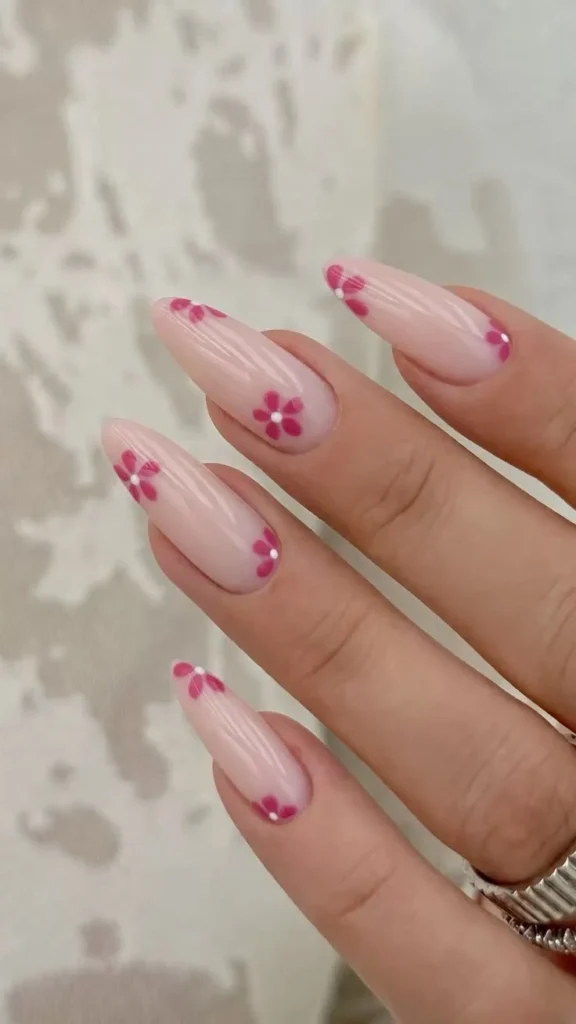

Basic yet Beautiful Floral Nails
When it comes to nail art, nothing says elegance and femininity quite like floral designs. They are timeless, versatile, and perfect for any occasion, from casual days to formal events. If you’re looking for beautiful, wearable, and creative nail inspiration, look no further than the enchanting floral nails offered by Nail Fairy X Shweta. Not only do these designs enhance your style, but they also bring a refreshing touch of nature right to your fingertips.
Why You Will Love These Nails
Floral nails are appealing for several reasons. For one, they offer endless possibilities in terms of color, shape, and style, making them suitable for everyone. Whether you prefer something bold and bright or soft and subtle, floral nails can cater to all tastes. Additionally, floral designs can be easily adapted for any season or event, giving you the freedom to express your mood and personality.
What You Need
To achieve these stunning floral nails, here are some essential products and tools you might need:
- Base coat and top coat: These will help extend the life of your manicure.
- Nail polish: Choose a color palette that reflects your personal style. Light pastels like lavender, baby pink, and mint green work beautifully for spring and summer, while deeper hues like burgundy and navy are perfect for fall and winter.
- Nail art brushes or dotting tools: For detailed floral designs, these tools will help you create fine lines and beautiful details.
- Nail extensions: Depending on your preferred length and shape, consider acrylic or gel nails for added durability and style.
How to Recreate the Look
Creating floral nails at home is simpler than you might think! Follow these easy steps:
Prep Your Nails: Start with clean, dry nails. Push back your cuticles and file your nails into your desired shape.
Apply Base Coat: A base coat protects your nails and helps the polish adhere better.
Choose Your Background Color: Paint your nails with a solid base color. A soft pastel or neutral shade makes for a lovely backdrop for floral designs.
Create Floral Designs: Use your nail art brushes to paint flowers. Start with a small dot in the center for the flower, then add petals around it. Experiment with different shapes and sizes.
Add Accents: Consider leaving one nail plain or using a glitter accent nail for extra flair.
Seal the Design: Finish with a top coat to protect your artwork and add shine.
Allow to Dry: Let your nails cure completely for lasting results.
Best Nail Shapes for This Design
Floral designs can be beautifully showcased on various nail shapes. Here are some options to consider:
- Almond nails: The tapered shape provides a delicate canvas for intricate designs.
- Square nails: This shape works well for bold floral prints and more angular designs.
- Coffin or ballerina nails: These provide enough length for detailed floral art without compromising on elegance.
Best Nail Length
The length of your nails can enhance or detract from your floral designs. Here’s how different lengths can affect the look:
- Short nails: Ideal for simple floral patterns or minimalistic designs. They are perfect for those looking for easy-to-maintain manicures.
- Medium nails: Offer a balance, allowing for more complex designs while still being manageable.
- Long nails: Perfect for showcasing intricate floral art. Just be mindful of your daily activities to avoid breakage.
Color Combinations
Choosing the right color palette is key to achieving the perfect floral nails. Here are some stunning combinations to consider:
- Pastel hues: Soft pinks, lilacs, and mint greens for a dreamy spring look.
- Bright shades: Bold reds, yellows, and turquoise for a summery vibe.
- Earth tones: Deep burgundies, olives, and mustard yellows can create beautiful autumnal themes.
- Monochrome: Different shades of one color can produce a sophisticated and modern look.
Cute Variations to Try
Not every floral design has to be the same. Here are some cute variations to spark your creativity:
- Negative space flowers: Leave parts of your nail unpainted to create a trendy and unique look.
- Holographic backgrounds: Use a shiny, holographic base to give your flowers an eye-catching twist.
- Floral tips: Try a French manicure with floral tips instead of a traditional white finish.
Nails for Different Occasions
Floral nails can be customized for any occasion, whether it’s a wedding, a casual outing, or a festive celebration:
- Casual outings: Opt for muted pastel colors and simple flower designs.
- Weddings: Choose elegant whites or blush tones with lace-like floral designs for a romantic touch.
- Festive celebrations: Go bold with vibrant colors and intricate detailing that will certainly catch the eye.
Seasonal Ideas
Floral nails can reflect the essence of each season:
- Spring: Embrace colors like lavender, soft pink, and baby blue with light flower designs.
- Summer: Bright colors like sunflower yellow and coral, along with tropical flower patterns, are perfect.
- Autumn: Deep oranges, purples, and rust with flowers resembling chrysanthemums or dahlias.
- Winter: Try using dark hues paired with metallics or white flowers with a snowy effect.
Beginner Tips
If you’re new to nail art, here are some simple tips to help you get started:
- Practice with dotting tools: They can be used to create perfect little flowers and dots.
- Start small: Begin with simple designs before tackling more intricate designs.
- Watch tutorials: There are countless online resources and videos that can guide you step by step.
- Have fun: Nail art should be enjoyable, so don’t stress if it doesn’t turn out perfect the first time!
How to Make Your Manicure Last Longer
To ensure your beautiful floral nails last, try these tips:
- Use a good base and top coat: They help to adhere the polish and provide protection.
- Avoid water exposure: Try to keep your hands out of water for the first hour after your manicure.
- Limit exposure to harsh chemicals: Wear gloves when cleaning or using products that may damage your nails.
Frequently Asked Questions
How long do floral nails last?
With proper care and maintenance, floral nails can last from one to three weeks, depending on the product used and nail growth.
Can I do floral nail art on short nails?
Absolutely! Floral nail art can look stunning on short nails. Focus on simple designs to keep the look clean and elegant.
Are floral nails suitable for all seasons?
Yes! Floral designs can be adapted for any season using various color palettes and techniques.
Conclusion
Basic yet beautiful floral nails are a fantastic way to express style and creativity. With the expertise of Nail Fairy X Shweta, you can explore endless designs that are perfect for any occasion. Using the tips and ideas in this article, you can create stunning floral nail art that is not only easy to wear but is also a delightful reflection of your personality. Whether you decide to book a session or tackle the design yourself, we hope you feel inspired to try out these lovely floral nails for your next manicure!