
Luxurious Homemade Rose Soap: Pamper Your Skin
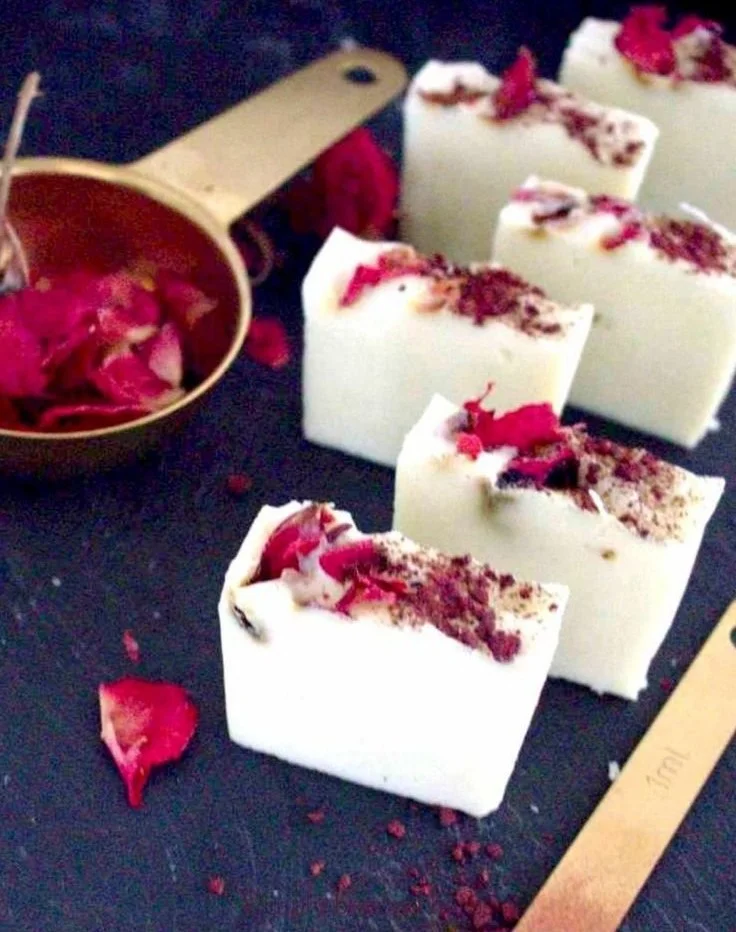
Indulging in the delicate aroma of roses while creating your own luxurious homemade soap can be a rewarding experience. Enriched with rose oils and rose petals, this DIY soap recipe promises to pamper your skin, leaving it smooth, relaxed, and moisturized. If you’re looking to craft a unique and delightful soap from the comfort of your own home, you’ve found the perfect guide!
Why You Will Love This Recipe
This homemade rose soap is more than just a cleansing bar; it’s a sensory escape. The luxurious rose scent can transform your daily shower into a comforting spa-like experience, while the natural ingredients work together to hydrate and rejuvenate your skin. The combination of oils and rose petals not only contributes to the soap’s fragrant allure but also provides natural benefits for your skin. Plus, making soap at home means you can control the ingredients, ensuring a product that is pure, gentle, and perfect for your skin type.
Ingredients
Before getting started, gather the following ingredients:
Base Ingredients:
- 1 lb (450 g) of melt-and-pour soap base (goat’s milk or shea butter work well)
Add-ins:
- 2 tablespoons of rose oil (use essential or fragrance oil)
- 2 tablespoons dried rose petals (make sure they’re organic and unscented)
Optional:
- 1 teaspoon of natural colorant (like beet powder for a rosy hue)
Equipment
Gather the necessary equipment to ensure a smooth soap-making process:
- Heatproof glass bowl or measuring cup
- Microwave or double boiler
- Silicone mold (rose-shaped molds add a lovely touch!)
- Stirring spoon or stick blender
- Kitchen scale (if measuring oils and colors)
- Safety gloves and goggles (optional but recommended)
- Rubbing alcohol in a spray bottle (to eliminate bubbles)
Step-by-Step Instructions
Step 1: Prepare Your Workspace
Start by setting up your workspace. Make sure your area is clean, and cover any surfaces to catch spills. You may wish to wear gloves to keep your hands safe and clean.
Step 2: Melt the Soap Base
- Cut the Soap Base: Chop your melt-and-pour soap base into small, even cubes for easier melting.
- Melt: In a heatproof bowl, microwave the soap base in 30-second bursts, stirring between each interval until fully melted. Alternatively, use a double boiler.
- Cool Slightly: Let the melted base cool for a few minutes to avoid burning the essential oils.
Step 3: Incorporate Oils and Color
- Add Rose Oil: Once it’s slightly cooled, stir in the rose oil. This adds both fragrance and skin-loving properties to your soap.
- Mix in Color and Petals: If you are using colorant, add that now (the optional beet powder works wonders for a natural rosy tint). Stir in the dried rose petals gently to distribute them evenly.
Step 4: Pour into Molds
- Pour: Carefully pour the soap mixture into your silicone molds. Leave a bit of space at the top.
- Spray: Lightly spray the surface with rubbing alcohol to eliminate any bubbles that may have formed.
Step 5: Allow to Set
- Cool at Room Temperature: Let the soap set at room temperature for 1-2 hours or until it’s solid.
- Unmold: Once set, gently remove the soap from the molds.
Step 6: Cure
- Although melt-and-pour soaps don’t require curing like cold process soaps, letting them sit for an additional 24 hours can help the scent mingle and strengthen.
Tips for Success
- Avoid Overheating: Be cautious not to overheat the soap base, as this can cause it to scorch and lose fragrance.
- Customize Scents: Feel free to blend in other essential oils like lavender or citrus for unique combinations.
- Store Properly: Place your soap in a cool, dry place, and avoid direct sunlight to preserve quality.
Common Mistakes to Avoid
- Not Cleaning Equipment: Ensure all tools and molds are clean and dry before starting to avoid contamination.
- Skipping the Alcohol Spray: Neglecting to spray the surface of the soap before it sets can lead to unsightly bubbles.
- Rushing the Cooling Process: Allow the soap to cool completely in molds before removing to prevent breakage.
Variations and Customization Ideas
This base recipe is wonderfully customizable! Here are a few options to consider:
- Add Exfoliants: Incorporate additive ingredients like oatmeal or poppy seeds for gentle exfoliation.
- Essential Oil Blends: Mix in other essential oils such as geranium or jasmine to tailor the fragrance.
- Other Flavors: Replace the rose oil with other floral or fruity scents.
Storage and Shelf Life
Store your finished rose soap in a cool, dry place, away from direct sunlight. If kept properly, it can last up to 6 months or longer. To prolong shelf life, keep them wrapped in wax paper or in an airtight container.
Safety Tips
- Protect Yourself: Always use gloves and goggles if desired. Soap-making can be safe, but it’s always best to take precautions.
- Ventilation: Work in a well-ventilated area, especially if you’re using synthetic fragrance oils.
Frequently Asked Questions
Q1: Can I use fresh rose petals instead of dried ones?
A: While fresh rose petals can be beautiful, they may introduce moisture into your soap, which can lead to spoiling. If you want a more fresh scent, consider using a higher concentration of essential oil instead.
Q2: How can I make my soap lather better?
A: Mixing in a small amount of castor oil (up to 5% of the total weight) can help create a richer lather.
Q3: Is this soap safe for sensitive skin?
A: Yes! This soap is made from natural ingredients, making it gentle on the skin. However, always do a patch test first if you’re trying a new ingredient.
Q4: Can I double the recipe?
A: Absolutely! Just be sure to adjust your melting times and mold sizes accordingly.
Q5: Why is my soap sweating?
A: This usually happens if the soap was stored in a high-humidity environment. If this happens, simply pat it dry with a paper towel.
Q6: Can I add coloring for a more visually appealing soap?
A: Of course! Just ensure that you’re using a skin-safe, soap-specific colorant.
Conclusion
Creating your own luxurious homemade rose soap is not only a fantastic DIY project but also a meaningful way to spoil yourself or give a heartfelt gift. With this guide, you’re equipped to tackle the soap-making process with ease. Enjoy the soothing aroma of roses as you care for your skin with this delightful handmade soap. So gather your ingredients, and let your creativity bloom! Happy soap-making!