
How to Make Your Own Beeswax Candle: A Step-by-Step Guide
Creating your own beeswax candles is a rewarding DIY project that brings warmth and a lovely ambiance to your home. Unlike commercial candles, which can release toxins into the air, beeswax candles are non-toxic, slow-burning, and even purify the air. If you’re looking to fill your space with a natural glow while enjoying a fun, practical craft, this guide will walk you through the process of making beeswax candles from scratch.
Why You Will Love This Recipe
Making your own beeswax candles has numerous benefits:
- Natural and Non-Toxic: Beeswax is a naturally occurring wax that emits negative ions when burned, helping to purify the air by neutralizing pollutants.
- Slow Burning: Beeswax candles burn longer than traditional paraffin candles, saving you money while providing more hours of light.
- Customizable: You can add scents with essential oils, choose colors, and create various shapes and sizes.
- Sustainable: Beeswax is a renewable resource, making it an eco-friendly choice.
Ingredients
To make your own beeswax candles, you will need the following:
- Beeswax: 1 pound (about 450 grams)
- Wicks: Pre-waxed cotton or wood wicks (appropriate size for your containers)
- Essential oils (optional): 1-2 teaspoons for fragrance
- Dyes (optional): Natural candle dyes or crayons (for coloring)
Equipment
Gather the following equipment before you start:
- Double boiler: For melting the beeswax safely.
- Thermometer: To monitor the wax temperature.
- Pouring pitcher: A heat-resistant pitcher for an easy transfer of melted wax.
- Candle containers: Glass jars, metal tins, or silicone molds.
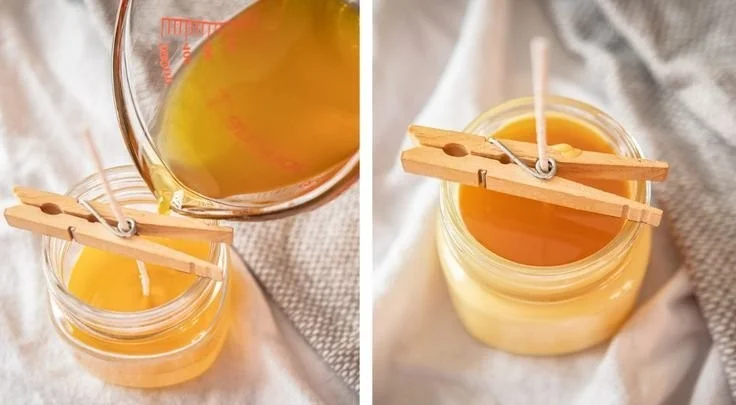
- Wick holder: To keep the wick centered while the wax cools.
- Stirring utensil: A wooden stick or spoon for mixing.
Step-by-Step Instructions
Preparation Time: 10 minutes
Making Time: 30-45 minutes (excluding cooling time)
Approximate Yield: About 3-4 candles (depending on the size of containers)
Set Up Your Workspace
Clear a clean, flat surface and lay down newspapers or paper towels to catch any spills. Gather all your materials and equipment.Melt the Beeswax
- Fill the bottom pot of the double boiler with water and bring it to a gentle simmer.
- Place the beeswax in the top pot and allow it to melt slowly. Stir occasionally until fully melted.
Monitor the Temperature
Keep an eye on the temperature as beeswax should not exceed 185°F (85°C). Use the thermometer to ensure it stays within this range.Add Fragrance and Dyes (Optional)
If you’d like to scent your candles, slowly stir in your chosen essential oils once the wax is melted. If using dyes, add them now as well, mixing thoroughly.Prepare Your Wick
- While the wax is melting, secure the wick at the bottom center of the container using a bit of melted wax or a wick sticker.
- Use a wick holder to keep the wick centered and upright.
Pour the Wax
Carefully pour the melted beeswax into your prepared containers, leaving about ½ inch of space at the top. Make sure the wick stays centered.Cool and Set
Allow the candles to cool completely, which may take a few hours. Avoid moving them during this time to prevent uneven surfaces.Trim the Wick
Once the candles are set, trim the wick to about 1/4 inch above the wax surface.
Tips for Success
- Choose the Right Wick Size: The wick should be appropriate for the diameter of your container. A wick that’s too small will result in a weak flame, while a wick that’s too large can cause smoking.
- Avoid Overheating: Melting at a low temperature preserves the natural properties of the beeswax.
- Cool Slowly: For the best results, let your candles cool at room temperature away from drafts.
Common Mistakes to Avoid
- Not Securing the Wick: If the wick isn’t properly secured, it may shift when pouring in the wax, resulting in an uneven burn.
- Overfilling Containers: Leave space at the top to prevent spillage and to allow for potential shrinkage as the wax cools.
- Skipping Wick Testing: Always test a wick with a small batch first to ensure proper burning.
Variations and Customization Ideas
- Layered Candles: Pour different layers of colored wax to create stripes.
- Scent Combinations: Experiment with various essential oil blends for unique fragrances.
- Decorative Embedded Items: Add dried flowers or herbs to the wax to enhance the visual appeal.
Storage and Shelf Life
Store your finished beeswax candles in a cool, dry place, away from direct sunlight. If kept properly, they can last for several years without losing their quality.
Safety Tips
- Always work in a well-ventilated area to avoid inhaling fumes from the melted wax and essential oils.
- Avoid direct contact with boiling water and melted wax to prevent burns.
- Keep candles away from flammable materials and never leave burning candles unattended.
Frequently Asked Questions
1. Can I use other types of wax?
While this guide focuses on beeswax, you can also use soy or paraffin wax using similar methods, though they have different properties and burn qualities.
2. What should I do if my candle has rough or uneven surfaces?
This could be due to cooling too quickly. If this happens, you can reheat the top and smooth it out with a spatula.
3. How do I prevent my candles from tunneling?
Make sure the wick is the right size and trim it regularly. Allow the candle to burn long enough to melt all the way to the edges during its initial burn.
4. Can I use fragrance oils instead of essential oils?
Yes, but ensure that they are specifically designed for candle making to avoid any adverse reactions.
5. What should I do if my wick keeps slipping?
Make sure to secure the wick adequately before pouring the wax. If it slips, you can press it back into place while the wax is still soft.
Conclusion
Making beeswax candles is not only a delightful project but also a way to fill your home with natural light and pleasant fragrance. With just a few simple materials and steps, you can create beautiful, eco-friendly candles that enhance your living space. Whether for personal use or as handmade gifts for loved ones, homemade candles are a wonderful addition to any home. So gather your materials and get started on this enjoyable DIY adventure!