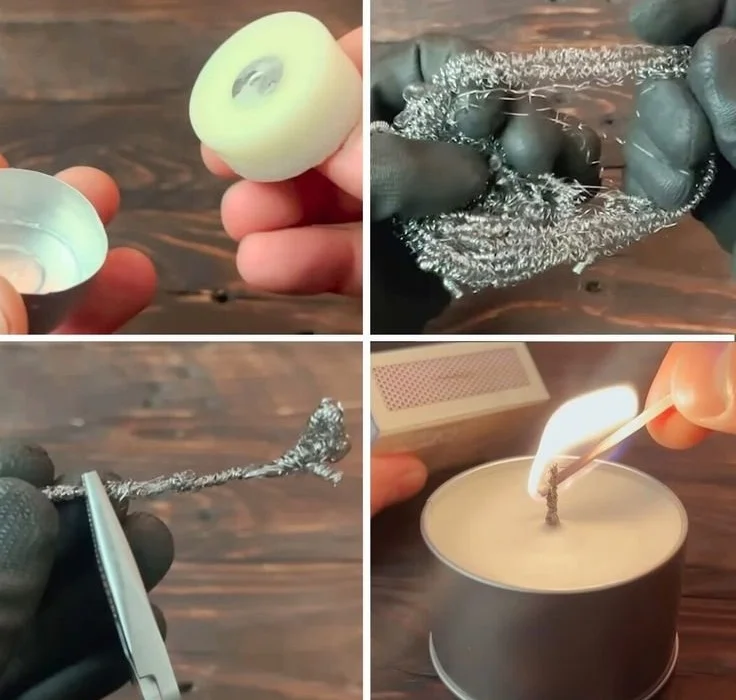

Discover How to Make a DIY "Infinite" Candle Wick That Never Burns Away
Are you looking for a unique and practical DIY project? Imagine a candle wick that never burns away, providing light whenever you need it. This ingenious method uses a steel scrubber and wax to create an "infinite" candle wick perfect for power outages, prepping, or simply enjoying candlelight while off the grid. In this article, I’ll show you step-by-step how to make this amazing survival hack, ensuring it’s straightforward enough for even the most novice of DIY makers.
Why You Will Love This Recipe
This DIY infinite candle wick is a fantastic project for anyone interested in homemade candles or prepping for the unexpected. Whether you’re looking to save on energy costs, create a cozy atmosphere, or prepare for emergencies, having a candle that can provide light for hours is invaluable. Plus, this project requires minimal supplies and can be completed swiftly.
Ingredients
To make your DIY infinite candle wick, you will need:
- Steel scrubber (1 per wick)
- Wax (approximately 1 cup; can use paraffin wax, beeswax, or a wax blend)
- Optional: Essential oils or fragrance oils (if you want to scent your wax)
Equipment
Gather the following equipment before getting started:
- Double boiler or microwave-safe container
- Heat-resistant surface (for pouring wax)
- Stirring stick (e.g., wooden stick or spoon)
- Baking sheet or tray lined with parchment paper
- Appropriate containers for your wax (like glass jars or candle molds)
Step-by-Step Instructions
Preparation Time
- Preparation Time: 5 minutes
- Making Time: 30 minutes
- Yield: Depends on how many wicks you make (approximately 5-10)
Making the Infinite Candle Wick
Prepare Your Work Area:
- Ensure your work surface is heat-resistant and lined with parchment paper. Gather all your equipment and ingredients to streamline the process.
Melt the Wax:
- Using a double boiler, melt approximately 1 cup of wax. If using a microwave, place the wax in a microwave-safe container and heat it in 30-second intervals, stirring in between until fully melted.
Create the Wick Base:
- While the wax melts, unpack the steel scrubber. Carefully separate the strands into a thicker strand that you can use as a wick.
Dip the Wick in Wax:
- Once the wax is melted, dip the steel scrubber into the wax until fully coated. Make sure it saturates adequately for an efficient burn.
Cool and Harden:
- Place the coated wick on the parchment paper to cool and harden. For best results, repeat the dipping process 2-3 times, allowing it to cool between dips.
Insert into Container:
- Once you have finished hardening the wick, trim it to fit your chosen container. You can now place it in a glass jar or mold filled with melted wax to complete the candle.
Secure the Wick:
- If necessary, secure the base of the wick with a small amount of melted wax or by sticking it to the bottom of your container before pouring the rest of the melted wax around it. Allow the entire candle to cool completely.
Tips for Success
- Ensure that the steel scrubber is clean and free of any harmful chemicals or soap residue.
- Experiment with different types of wax to find your favorite combination. Each wax type burns differently and can affect the scent throw and appearance of your candle.
- If adding fragrance oils, do so when the wax is melted but not too hot (around 185°F or 85°C) to avoid burning off the fragrance.
Common Mistakes to Avoid
- Using the wrong type of scrubber: Make sure it is purely steel; avoid those with any synthetic materials.
- Not allowing the wick to cool enough: If you try using the wick before it’s fully hardened, it may not burn correctly.
- Overheating the wax: Always monitor the melting process to prevent the wax from reaching its flashpoint.
Variations and Customization Ideas
- Scented Wax: Add essential oils or fragrance oils to your melted wax for a lovely aroma.
- Coloring: Use candle dye to color your wax, making it visually appealing.
- Container Choices: Get creative with containers—use decorative jars, tins, or other heat-safe items to hold your candle.
Storage and Shelf Life
Store your finished candles in a cool, dry place away from direct sunlight. The wax will maintain its quality for a long time if kept properly. Ensure that nothing heavy is resting on them to avoid denting the candle structure.
Safety Tips
- Handle hot materials with care: Use oven mitts or gloves when touching hot containers or wax.
- Never leave burning candles unattended: Always monitor while a candle is lit to prevent fire hazards.
- Ventilation: Ensure your space is well-ventilated when melting wax, especially when adding fragrances.
Frequently Asked Questions
Can I use any type of scrubber?
It’s best to use a natural steel scrubber without synthetic materials to ensure a safe and efficient burn.
How long will the infinite wax wick last?
The duration will depend on the wax amount and how well the wick is saturated. It’s designed to be longer-lasting than traditional candle wicks.
Can I use this wick in any container?
Yes, as long as the container is heat-resistant and can accommodate the size of the wick.
What if my wick doesn’t stay lit?
This could be due to several factors, such as insufficient wax saturation or incorrect wick size. Ensure it is adequately dipped and secure in the melted wax.
Can I add colors to my candle?
Absolutely! Use candle dye when melting the wax if you want to customize the appearance.
Conclusion
Creating a DIY infinite candle wick is not only a fun project, but it also equips you with a practical tool for various situations, from power outages to creating a cozy ambiance at home. With just a few simple materials and steps, you can make a candle that gives you endless light. Get creative, experiment, and enjoy the newfound warmth and comfort of your homemade candles. Happy crafting, and may your projects shine bright!