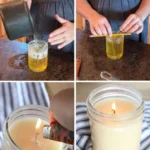

Make an Eco-Friendly DIY Oil Lamp with Supplies You Already Have at Home!
If you’re looking for a delightful way to create ambiance while being eco-conscious, making your own oil lamp can be both a fun project and a beautiful addition to your home. It’s not just easy; you probably have most of the supplies already! This guide will walk you through making an oil lamp using vegetable oil, cotton string, some wire, and a tin can. Let’s light up your space with an eco-friendly glow!
Why You Will Love This Recipe
Creating your own oil lamp is not only a creative activity; it’s also a sustainable alternative to commercial lighting options. You’ll learn valuable skills, engage your creativity, and end up with a charming lamp that fills your space with soft, inviting light. Plus, this project is budget-friendly, perfect for those who appreciate homemade gifts or decor!
Ingredients
- Vegetable oil: Any cooking oil will do, but olive oil or canola oil is ideal for a cleaner burn.
- Cotton string: This will act as the wick; ensure it’s 100% cotton for optimal burning.
- Wire: About 18 to 22 gauge is good for crafting, just enough to support your wick.
- Tin can: Any size works; you can use a soup can, coffee can, or any similar container.
Equipment
- Can opener: For removing the top of the tin can smoothly.
- Scissors: To cut the cotton string and wire.
- Drilling tool or awl: For making holes, if necessary.
- Measuring cup: To measure the oil accurately.
- Lighter or matches: To ignite your lamp once it’s assembled.
Step-by-Step Instructions
Prepare the Tin Can:
- Use a can opener to remove the top of the tin can. Clean it thoroughly and remove any sharp edges to avoid cuts.
Create the Wick:
- Cut a piece of cotton string about 10–12 inches long. The length can be adjusted depending on how tall you want your wick to stick out of the oil.
Make a Wick Holder:
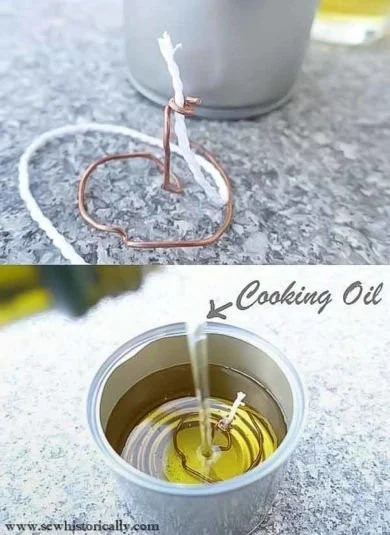
- Take a piece of wire and create a simple loop. Insert one end of the cotton string through the loop, pulling it down to secure it. This will hold the wick in place when you fill the can with oil.
Drill a Hole (if necessary):
- If your tin has a lid you want to use, drill a small hole in the center (just large enough for the wick to pass through). If not, just place the wick holder inside the can.
Fill with Oil:
- Pour vegetable oil into the can until it’s about two-thirds full. This should provide enough fuel for several hours of burning.
Insert the Wick:
- Place the wick holder (with the wick attached) into the can of oil. The bottom of the wick should sit in the oil, while a portion remains above the edge for lighting.
Let it Soak:
- Allow the wick to soak in the oil for about 15-30 minutes before lighting. This will ensure a cleaner and more effective burn.
Light Your Lamp:
- Carefully light the exposed portion of the wick with a lighter or match. Adjust the height of the wick if needed to control the flame size.
Tips for Success
- Oil Choice: Experiment with different vegetable oils to see which one burns the best and consider using oils with higher flash points for safety.
- Wick Length: Longer wicks will burn more oil, while shorter ones will create a smaller flame. Find a balance that works for you.
- Testing: Make a few lamps with different sized wicks and oil levels to test what suits your needs best.
Common Mistakes to Avoid
- Using Flammable Materials: Ensure you do not use synthetic string or any flammable materials for the wick, as this could lead to dangerous situations.
- Overfilling: Avoid filling the can too full with oil. Leave room for the wick and prevent overflow during burning.
- Ignoring Safety: Always keep the lamp on a stable, flat surface away from flammable items, and never leave it unattended while lit.
Variations and Customization Ideas
- Scented Oils: You can infuse your oil with herbs or essential oils for a pleasant scent when the lamp is burning.
- Decorative Touches: Paint or decorate your tin can to match your decor. Add stones, shells, or other elements around the base for an attractive presentation.
- Multiple Wicks: If using a larger can, consider adding more than one wick to increase light and atmosphere.
Storage and Shelf Life
When not in use, store your oil lamp in a cool, dry place. If you have leftover oil, seal it in a clean, airtight container. Vegetable oil should be kept away from light to prevent rancidity, and if you discover any unusual odors, it’s time to replace the oil.
Safety Tips
- Burn in a Safe Area: Always burn your oil lamp in an area free from flammable materials, and keep it away from drafts to ensure even burning.
- Supervision: Never leave a burning lamp unattended, especially in the presence of children or pets.
- Extinguishing Flames: If you need to extinguish the flame, do so by snuffing it out; do not blow it out as that can send sparks flying.
Frequently Asked Questions
1. How long will my DIY oil lamp burn?
The burn time will vary based on the amount of oil you fill the can with and the size of the wick. Typically, a well-prepared lamp can burn for 4-6 hours.
2. Can I use other oils besides vegetable oil?
Yes! While vegetable oil is ideal, you can also use olive oil, candle-making oils, and others. Just be mindful of their burning characteristics.
3. What should I do if the flame is too high?
If the flame is too large, lower the wick into the oil further. If that doesn’t help, use scissors to trim the wick to reduce the flame size.
4. Is it safe to leave the lamp outside?
Only leave the lamp outside if you can ensure it is stable and away from any flammable materials. Always bring it inside when finished burning.
5. Can I make this lamp with children?
While the project can be a fun activity with kids, ensure adult supervision during the handling of sharp objects and the lighting process.
Conclusion
Creating your own eco-friendly oil lamp is a fulfilling and engaging project that can add a charming touch to your home. With just a few simple materials, you can create a lovely light source that’s both functional and decorative. So, gather your supplies and get started on this easy DIY project! Enjoy the warm, inviting glow it brings into your life, knowing you made it all by yourself!