
Learn How to Make Lip Balm at Home: A Vanilla Lavender Recipe
Creating your own lip balm at home is one of the most satisfying DIY projects you can embark on, especially if you’re a fan of natural skincare. This simple yet luxurious vanilla lavender lip balm recipe will not only leave your lips feeling soft and nourished but also fill your workspace with delightful aromas. Let’s dive into this rewarding crafting experience that perfectly blends the benefits of natural ingredients with a touch of self-care.
Why You Will Love This Recipe
This vanilla lavender lip balm is not only easy to make but also a fantastic way to customize your skincare routine. Here are a few reasons you’ll love it:
- Natural Ingredients: You’ll know exactly what goes into your lip balm, steering clear of chemicals often found in store-bought products.
- Customizable: The recipe allows you to experiment with different flavors, scents, and even colors.
- Thoughtful Gifts: Homemade lip balm makes for lovely gifts for friends and family, perfect for any occasion.
- Self-Care: The soothing properties of lavender will help you unwind, while vanilla offers a warm, comforting scent.
Ingredients
For this vanilla lavender lip balm, you’ll need the following ingredients:
- 2 tablespoons of Beeswax Pellets (or Candelilla wax for a vegan option)
- 2 tablespoons of Coconut Oil
- 2 tablespoons of Sweet Almond Oil (or any carrier oil like jojoba or olive oil)
- 1 teaspoon of Vanilla Extract (or more, depending on taste)
- 10-15 drops of Lavender Essential Oil (adjust based on scent preference)
- Optional: A few drops of Natural Coloring (if you want to add color)
Equipment
Make sure you have the following equipment handy before you begin:
- Double boiler (or a heat-safe bowl over a pot of simmering water)
- Measuring cups and spoons
- Stirring utensil (a wooden stick or a spoon)
- Lip balm containers (small tins or tubes)
- Pipette or dropper (optional, for precision)
- Labels (optional, for gifting)
Step-by-Step Instructions
Now, let’s get down to crafting your very own vanilla lavender lip balm!
Setup Your Double Boiler: Fill a pot with water and bring it to a simmer. Place the heat-safe bowl on top, ensuring it doesn’t touch the water.
Melt the Beeswax: Add the beeswax pellets to the bowl. Stir occasionally as the wax starts to melt completely.
Combine Oils: Once the beeswax is melted, add the coconut oil and sweet almond oil. Stir well until everything is melted and combined.
Incorporate Flavors: Remove the bowl from heat. Quickly mix in the vanilla extract and lavender essential oil. If using natural coloring, add it at this stage.
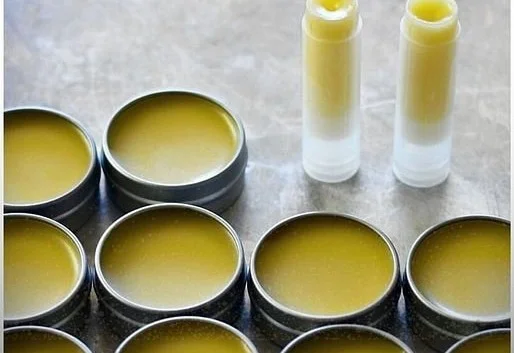
Pour into Containers: Using a pipette or simply pouring from the bowl, fill your lip balm containers while the mixture is still warm and liquid.
Cool and Set: Allow the lip balm to cool at room temperature for about 30-60 minutes until fully hardened.
Label and Store: Once cooled, label your containers if desired. Your vanilla lavender lip balm is now ready to use or gift!
Tips for Success
- Temperature Control: Be cautious not to overheat the oils; this can degrade their beneficial properties. Medium heat is sufficient.
- Mix Well: Ensure all ingredients are mixed thoroughly to achieve a uniform texture and consistent fragrance.
- Clean Tools: Use rubbing alcohol to clean your utensils and containers for a professional finish.
Common Mistakes to Avoid
- Not Measuring Accurately: Ensure accurate measurements for the right consistency. Too much wax makes it hard; too little makes it too soft.
- Forgetting to Stir: Stirring is essential after adding each ingredient to ensure everything blends smoothly.
- Ignoring Cooling Time: Patience is key! Allow the balm to cool completely before closing the containers.
Variations and Customization Ideas
- Different Essential Oils: Experiment with peppermint, chamomile, or citrus oils for a fresh twist.
- Flavor Enhancements: Add a dash of honey or a flavored oil for extra sweetness.
- Color Play: Incorporate natural colorants like beetroot powder for a hint of color.
Storage and Shelf Life
Store your vanilla lavender lip balm in a cool, dry place to extend its shelf life. When properly stored, your homemade lip balm can last for up to 1 year. If you notice any changes in color or smell, it’s best to discard it.
Safety Tips
- Always do a patch test before using new essential oils on your skin to avoid allergies or irritation.
- Use clean tools throughout the process to prevent contamination.
- Ensure proper ventilation when working with essential oils if you have sensitivities to scents.
Frequently Asked Questions
1. Can I use a different wax?
Absolutely! Candelilla wax or soy wax can be used as a vegan substitute for beeswax. Adjust the quantities accordingly, as different waxes melt at different rates.
2. Can I use other oils instead of coconut oil?
Yes! Jojoba oil, avocado oil, or olive oil are great alternatives, each bringing unique properties to the final product.
3. What if my balm is too hard/soft?
If your balm is too hard, re-melt it and add more carrier oil. If it’s too soft, melt it again and add more beeswax.
4. How should I label my lip balm?
Include the date made and scent. If you’re giving it as a gift, a little note about the ingredients can be a nice touch!
5. Can I make this lip balm without essential oils?
Yes, you can simply omit the essential oils, and you can increase the vanilla extract for flavoring.
6. Where can I find the ingredients?
Most ingredients are readily available at health food stores, online, or in the personal care aisle of major supermarkets.
Conclusion
Making your own vanilla lavender lip balm is a delightful DIY project that results in a nourishing product made with love. Whether you’re treating yourself or gifting friends, this homemade lip balm is sure to impress. Embrace the joy of crafting natural beauty products, and indulge your senses with every application.
Explore more exciting herbal remedies and natural recipes at growforagecookferment.com. Try this easy recipe, customize it to your liking, and enjoy the soft, hydrated lips that follow! Happy crafting!