
Making Tallow Candles: A DIY Guide to Clean and Cost-Effective Lighting
Tallow candles are an age-old tradition making a modern comeback, and it’s easy to see why. They provide a clean, cost-effective alternative to store-bought candles, allowing for an enjoyable DIY experience. Made from rendered animal fat and beeswax, tallow candles burn cleanly, last longer, and can be customized to your liking. In this guide, I’ll take you step-by-step through the process of making your own tallow candles using just two simple ingredients: tallow and beeswax.
Why You Will Love This Recipe
- Natural Ingredients: Tallow and beeswax are natural materials that provide a healthier burning option compared to synthetic waxes.
- Cost-Effective: Making your own candles saves money compared to purchasing high-quality candles from the store.
- Customization: You can personalize your candles with scents, colors, or container choices.
- Eco-Friendly: By using animal fat and beeswax, you reduce waste and support sustainable practices.
Ingredients
- Tallow: 1 cup (rendered beef or lamb fat)
- Beeswax: ½ cup (pure beeswax, preferably local)
Equipment
- Double boiler (or a makeshift version using two pots)
- Heat-resistant container for the candles (glass jars or metal tins work well)
- Candle wick (choose an appropriate size for your container)
- Wick holder (can be a chopstick or any suitable stick to keep the wick centered)
- Thermometer (optional, but useful for monitoring temperature)
- Wooden spoon or stirring stick
Step-by-Step Instructions
Preparation Time
10 minutes
Making Time
1 hour (including cooling time)
Yield
One medium-sized candle (approximately 8 oz)
Instructions
Prepare Your Workspace: Lay down newspaper or an old cloth to protect the surface you’ll be working on. Gather all your materials and tools.
Melt the Tallow:
- Fill the bottom pot of your double boiler with water and place it on the stove.
- Add the tallow to the top pot and heat on medium-low until fully melted, stirring occasionally. This can take about 15-20 minutes.
Melt the Beeswax:
- Once the tallow is melted, add the beeswax to the mixture.
- Continue to stir and heat gently until the beeswax is completely melted and combined with the tallow. You can monitor the temperature, but avoid overheating—keep it below 200°F (93°C).
Prepare the Wick:
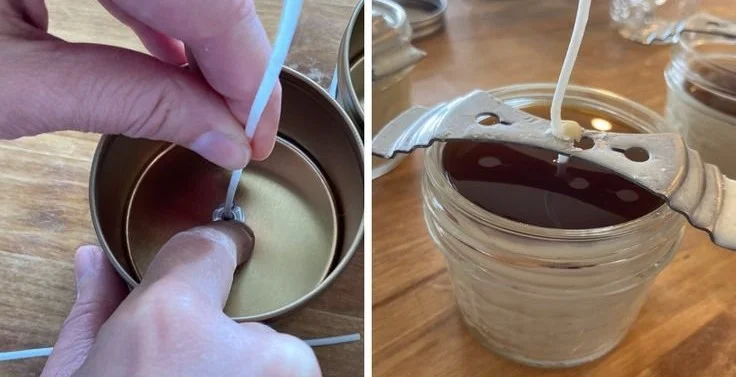
- While the tallow and beeswax are melting, prepare the wick. Secure one end to the bottom of your container using a small amount of melted wax or wick sticker.
- Use a wick holder to keep the wick centered.
Pour the Mixture:
- Once everything is liquid, remove the pot from heat and allow it to cool slightly (about 10-15 minutes). This helps prevent the wick from sinking.
- Carefully pour the melted tallow and beeswax mixture into your prepared container, leaving a small space at the top.
Set the Wick:
- Adjust the wick if necessary to ensure it’s centered.
Let it Cool:
- Allow the candle to cool completely at room temperature. This may take 30-60 minutes.
Trim the Wick:
- Once fully cooled, trim the wick to about ¼ inch above the wax surface.
Tips for Success
- Make sure your tallow is well-rendered to avoid impurities that can cause smoking.
- Experiment with different wick sizes to find what works best for your container and mixture.
Common Mistakes to Avoid
- Overheating the Mixture: High temperatures can compromise the quality of the wax. Heat slowly and stir frequently.
- Not Securing the Wick: If the wick isn’t secure, it may lean or float as the candle cools.
- Rushing Cooling Times: A proper cooling period is crucial for a good burn quality and cosmetic finish.
Variations and Customization Ideas
- Scenting Your Candles: Add essential oils to the melted mixture for a lovely fragrance. Start with about 30-50 drops per cup of wax, adjusting as needed.
- Coloring: Use natural colorants like mica powders or crayons for a splash of color. Mix in small amounts until you achieve your desired shade.
- Container Choices: Customize the look of your candles by using various containers like ceramic mugs, decorative tins, or even glass jars.
Storage and Shelf Life
Store your tallow candles in a cool, dry place away from direct sunlight. They can last for a year or more if properly stored. If the candle develops any surface imperfections, simply re-melt it and pour it back into the container.
Safety Tips
- Always work in a well-ventilated area when melting wax.
- Use gloves if handling very warm materials.
- Never leave melting wax unattended and keep it away from children and pets.
Frequently Asked Questions
1. Can I use any type of tallow?
Yes, you can use beef or lamb tallow. Ensure it’s rendered properly to remove impurities.
2. How do I know what wick size to use?
Wick size is usually determined by the diameter of your container. Many wick manufacturers provide guidelines on wick sizing for different container widths.
3. Can I use other types of wax in addition to tallow?
Sure! You can experiment by combining tallow with soy wax for a different burn quality and scent throw.
4. Why is my candle not burning evenly?
This could be due to a wick that is either too small, too large, or not centered. A wick that is too small won’t create a proper melt pool, while a wick that is too large may produce excessive soot.
5. Is it safe to burn tallow candles indoors?
Yes, as long as they are made cleanly and the wick is the right size, tallow candles can be safely burned indoors.
6. Can I reuse leftover wax from previous candles?
Absolutely! If you have leftover tallow or beeswax from other projects, simply melt it down and use it in your candle-making.
Conclusion
Making your own tallow candles is not only a cost-effective solution for your lighting needs but also a fun and rewarding DIY project. With just two ingredients, you can create a beautiful and functional product that enhances any space while promoting sustainable practices. I encourage you to gather your materials and try your hand at making these clean-burning, customizable candles. Happy crafting!