
Learn How to Make DIY Ice Cream Candles
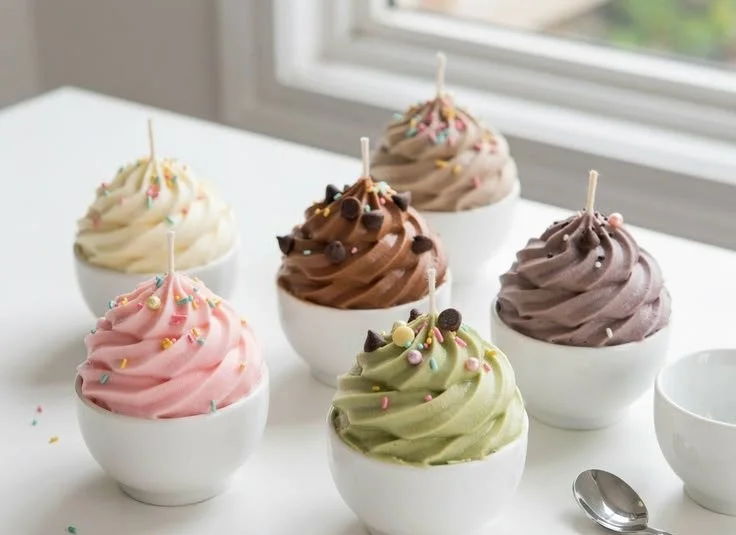
Are you ready to dive into a fun and delightful craft? Making DIY ice cream candles is not only a perfect way to express your creativity, but they also make adorable gifts and charming decor for your space. If you’re looking for a beginner-friendly tutorial that will lead you through the process step-by-step, you’re in the right place! Let’s get started on creating these sweet-smelling, realistic dessert candles.
Why You Will Love This Recipe
Ice cream candles are whimsical and sure to bring a smile to anyone who sees them. They offer a delightful way to brighten up any room or give a cute, handmade gift. Here’s why you’ll love this project:
- Easy to Make: This tutorial breaks down the process into simple steps, making it accessible even for beginners.
- Customizable: You can choose your favorite ice cream colors and toppings to personalize your creations.
- Cute Decor: They can be used as part of your room decor, perfect for parties or gatherings.
- Great Gifts: Handmade candles are a thoughtful gift option for friends and family.
Ingredients
To make your DIY ice cream candles, you will need the following ingredients:
Wax
- 1 pound of paraffin wax or soy wax (for a more eco-friendly option)
Dyes
- Candle dye chips or liquid dye in your preferred colors
Fragrance
- 1 ounce of candle fragrance oil (choose your favorite scent!)
Wick
- Pre-tabbed cotton wick (recommended size: 50mm for each scoop)
Additives
- Candle wax topping sprinkles or wax for realistic toppings
Equipment
Before you begin, make sure you have the following equipment:
- Double boiler or a wax melter
- Heat-resistant measuring cup or pouring pitcher
- Thermometer (optional but recommended)
- Stirring utensil (silicone spatula or spoon)
- Candle molds (scoop or other fun shapes)
- Craft knife (for trimming wicks, if necessary)
- Scale (to measure wax accurately)
Step-by-Step Instructions
Preparation Time
- Prep Time: 15 minutes
- Making Time: 1 hour
- Yield: Approximately 4-6 candles, depending on mold size
Instructions
Set Up Your Work Area: Prepare a flat, clean surface to work on and cover it with newspaper or a drop cloth to catch any wax spills.
Melt the Wax:
- In your double boiler, melt 1 pound of wax over medium heat until completely liquid.
- Use your thermometer to ensure the wax reaches around 170°F to 180°F.
Add Color and Scent:
- Once melted, stir in your chosen dye until you achieve the desired color.
- Next, add the fragrance oil and mix well for a consistent scent.
Pour the Base:
- Carefully pour the melted wax into your molds to create the “scoops.”
- Allow the wax to cool slightly before pouring in layers if adding colors for different scoops.
Add Wicks and Create Toppings:
- Before fully setting, insert the wicks into the center of each scoop.
- Once they are solid but still soft, you can create toppings by melting additional wax in different colors and pouring it over the top to simulate ice cream toppings.
Cool and Set:
- Let the candles cool completely for at least an hour at room temperature.
Trim Wicks:
- After the candles have set, trim the wicks to about ¼ inch above the wax surface.
Final Touches:
- Optionally, you can add more wax “sprinkles” or decorative elements to finish off your candles if desired.
Tips for Success
- Thermometer Use: If you’re unsure about melting temperatures, using a thermometer can help ensure your wax doesn’t get too hot, which can alter the fragrance retention.
- Layering Colors: If you want to create multi-colored candles, let each layer cool slightly before adding the next layer of color.
Common Mistakes to Avoid
- Overheating Wax: Be careful not to overheat the wax; it can cause discoloration and affect the scent.
- Not Securing the Wick: Ensure the wick is centrally located and straight to avoid uneven burning.
Variations and Customization Ideas
- Different Scents: Experiment with different fragrance oils for unique combinations, like vanilla with a sprinkle of nutmeg.
- Color Themes: Choose a color palette that fits a special occasion, holiday, or personal style.
- Incorporate Elements: Add small decorative elements like tiny wax fruits or sprinkles for added fun.
Storage and Shelf Life
Store your finished candles in a cool, dark place away from direct sunlight. Properly stored candles can last up to a year, but for the best scent retention and appearance, use them within a few months.
Safety Tips
- Work in a Well-Ventilated Area: Make sure your workspace has good airflow to deal with any fumes from the wax or fragrance oils.
- Avoid Skin Contact: Always wear gloves when handling melted wax to prevent burns.
Frequently Asked Questions
Can I use different types of wax?
- Yes, you can use either paraffin wax or soy wax, depending on your preference and availability.
What do I do if my candles don’t smell strong enough?
- Make sure you are following fragrance oil usage guidelines, typically 1 ounce of fragrance for every pound of wax.
How can I fix uneven surfaces on my candles?
- If the surface isn’t smooth, carefully reheat the top layer with a heat gun and smooth it out.
Can I reuse old candles?
- Yes! Melt down the wax and pour it into new molds for a fun reuse project.
Why did my candles develop cracks?
- This could be due to rapid cooling or too much cooling space while setting. Monitor temperature closely during the cooling phase.
Conclusion
Creating DIY ice cream candles is a delightful way to indulge your creative side while crafting charming decor or gifts. This easy-to-follow tutorial provides all the necessary guidelines and tips for success. So gather your supplies, and let your imagination run wild as you create sweet-smelling and whimsical candles. Don’t forget to share your creations with family and friends! Happy crafting!