
DIY Fall Oil Candle
Creating your own fall oil candle is a delightful way to bring warmth and coziness into your home during the crisp autumn months. These easy-to-make candles can fill your space with the sweet scents of the season, making them perfect for enhancing your living ambiance or giving as handmade gifts to friends and family.
Why You Will Love This Recipe
Making your own oil candle allows for customization in flavors and designs, aligning perfectly with the fall season’s themes. You can choose scents that resonate with the season, such as cinnamon, pumpkin spice, or apple cider. Additionally, crafting these candles at home eliminates the need for synthetic fragrances, providing a natural alternative that enhances the seasonal mood.
Ingredients
To make your DIY fall oil candle, you will need the following ingredients:
- Wax: 2 cups of soy wax (this is a great eco-friendly option that burns cleanly)
- Fragrance oil: 1 oz (you can use scents like cinnamon, nutmeg, or vanilla for a fall aroma)
- Dye (optional): Use candle dye chips or liquid dye (should match your chosen theme color, such as shades of orange, brown, or gold)
- Candle wick: Size and type will depend on your container (wooden wicks are great for a crackling effect)
Equipment
Gather the following equipment before you start:
- Double boiler: For melting the wax safely
- Candle containers: Mason jars, ceramic teacups, or any heat-safe container you prefer
- Thermometer: To monitor wax temperature
- Pouring pitcher: A heat-resistant container to pour the melted wax
- Stirring utensil: A wooden stick or a silicone spatula
- Wick holder: This can be a simple chopstick or a specially designed wick holder
Step-by-Step Instructions
Preparation Time: 15 minutes
Making Time: Approximately 1 hour (including cooling)
Yield: Approximately 2-3 candles, depending on the size of your containers.
Prepare Your Work Area: Lay out all your supplies and cover your work surface with newspaper or a drop cloth for easy cleanup.
Melt the Wax:
- Fill the bottom pot of your double boiler with water and bring it to a gentle simmer.
- Place the soy wax into the top pot and stir occasionally as it melts. Use a thermometer to monitor the temperature; aim for about 170°F (76°C) for optimal melting.
Add Fragrance and Color:
- Once the wax is fully melted, remove it from heat. Add the fragrance oil while stirring gently to combine.
- If you’re using dye, add it now until you achieve your desired color. Stir well to ensure even mixing.
Prepare the Wicks:
- Secure your wick to the bottom of your container using a small amount of melted wax or a glue dot.
- If using a wooden wick, place it in the center and use a wick holder to keep it upright.
Pour the Wax:
- Allow the wax to cool slightly to about 150°F (65°C) before pouring. This helps retain the fragrance.
- Carefully pour the melted wax into your prepared containers, leaving a small amount of space at the top.
Secure the Wick:
- Use a wick holder to keep the wick centered while the wax cools.
Let Them Cool:
- Allow your candles to cool completely at room temperature for at least 1-2 hours.
Trim the Wick:
- Once fully cooled, trim the wick to about 1/4 inch above the wax surface.
Tips for Success
- Temperature Monitoring: Always use a thermometer to ensure the wax is at the right temperature before adding fragrances and pouring.
- Testing Scents: Start with a small amount of fragrance oil and adjust based on your preference. Too much fragrance can cause issues with burning.
Common Mistakes to Avoid
Not Using a Double Boiler: Melting wax directly on the stovetop can cause it to overheat or catch fire. Always use a double boiler.
Skipping Wick Testing: Different containers may require different wick sizes. Test your wick before making multiple candles.
Ignoring Safety Precautions: Always work in a well-ventilated area and allow hot equipment to cool down before handling.
Variations and Customization Ideas
- Scent Combinations: Try blending different fragrance oils, such as vanilla with cinnamon or nutmeg with clove, to create a signature scent.
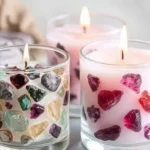
- Decorative Elements: Consider adding dried leaves, herbs, or spices in the wax for visual appeal.
Storage and Shelf Life
Store your candles in a cool, dark place away from direct sunlight. When properly stored, they can last up to 12 months without losing fragrance or color potency.
Safety Tips
- Handling Wax: Always be cautious with hot wax to prevent burns.
- Burning Candles: Keep your candles on a heat-resistant surface, away from flammable materials and never leave burning candles unattended. Trim wicks before lighting to minimize soot.
Frequently Asked Questions
Can I use essential oils instead of fragrance oils?
- Yes, essential oils can be used, but ensure they have a strong enough scent throw when burned.
What if my candles have a rough surface?
- This might occur due to temperature fluctuations. Try pouring at a consistent temperature and allowing appropriate cooling time.
Can I reuse candle containers?
- Absolutely! Just make sure to remove old wax completely and clean the container thoroughly before reusing.
What’s the difference between soy wax and paraffin wax?
- Soy wax is a natural alternative derived from soybeans and burns cleaner compared to paraffin wax, which is a petroleum byproduct.
How do I know which wick to use?
- Wicks should be chosen based on the size of the candle container and wax type to ensure proper burn and scent throw.
Conclusion
Making a DIY fall oil candle is a joyful and creative project perfect for both beginners and seasoned makers. With the right ingredients and a little patience, you can create lasting candles that fill your home with warmth and delicious autumn scents. Enjoy this fulfilling craft and share the joy of handmade gifts with your loved ones! Remember to try different variations and tweaks in your next batch—happy candle making!