
Candle Dipping: Hand-Dipped Beeswax Taper Candles
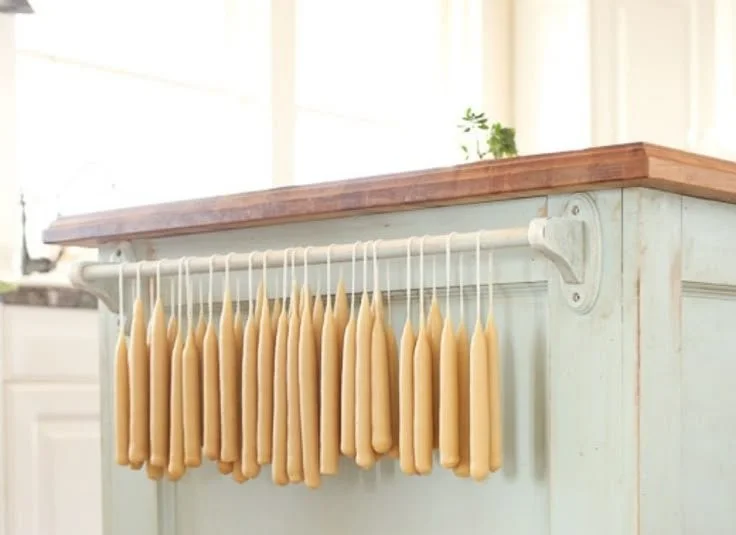
Candle dipping is a delightful, traditional craft that brings the beauty of handmade taper candles right into your home. There’s something special about the warm flicker of a candle, especially when it’s made by your own hands. In this guide, I will walk you through the engaging process of making hand-dipped beeswax taper candles, perfect for illuminating your evenings or giving as thoughtful, homemade gifts.
Why You Will Love This Recipe
Hand-dipped beeswax candles are not only beautiful but also natural and long-burning. Beeswax has a subtle, sweet honey scent without any added fragrances, making it perfect for those sensitive to strong scents. Plus, the act of dipping candles is meditative and can be a wonderful way to spend an afternoon.
Ingredients
- Beeswax: 1 pound (this amount will yield approximately 10-12 candles depending on thickness)
- Optional: Natural colorants (such as plant-based dyes) if you wish to color your candles.
Equipment
- Double boiler (or a heatproof bowl placed over a saucepan of simmering water)
- Candy thermometer (to check wax temperature)
- Dipping rod (or wooden skewer)
- Wick material (cotton or hemp, pre-waxed is best)
- Scissors
- Measuring cup
- Parchment paper (for setting finished candles)
- Fireproof container (for wax scraps)
Step-by-Step Instructions
Preparation Time: 15 minutes
Making Time: 1-2 hours (depending on the number of candles)
Approximate Yield: 10-12 taper candles
Set Up Your Workspace: Clear a space in your kitchen or crafting area. Lay down parchment paper to catch any drips from the candles as you dip.
Melt the Beeswax:
a. Chop or grate the beeswax into smaller pieces for quicker melting.
b. Fill the bottom part of your double boiler with water and bring it to a gentle simmer.
c. Place the beeswax in the top part of your double boiler, and allow it to melt. Use your candy thermometer to monitor the temperature. It should not exceed 170°F (77°C).Make Your Wick:
a. Cut your wick into lengths three inches longer than the desired height of your candles.
b. Attach one end of the wick to your dipping rod or skewer. Ensure it’s secure, as you’ll be dipping this into hot wax.Start Dipping:
a. Dip the wick into the melted wax, submerging it completely. Hold it for a few seconds until the wax coats the wick.
b. Remove the wick and allow excess wax to drip off, then gently swing it to prevent drips.
c. Repeat the dipping process. Aim for 8-10 dips for a standard thickness, allowing a few moments for cooling between dips.Setting Your Candles: After you’ve reached your desired thickness, place your finished candles onto the parchment paper to cool completely.
Trim the Wick: Once the candles are cool and set, trim the wick to about ¼ inch above the wax.
Tips for Success
- Work in a Cool Room: Higher temperatures may cause the wax to melt too quickly, leading to uneven candles.
- Keep a Steady Hand: The more consistent your dipping technique, the more uniform your candles will be.
- Be Patient: Let each layer of wax cool before dipping again to avoid drips and uneven surfaces.
Common Mistakes to Avoid
- Too Hot Wax: If the wax is too hot when dipped, it may cause the wick to burn while creating uneven layers.
- Not Enough Dips: Fewer dips may result in candles that are too thin and may melt down too quickly.
- Using Poor Quality Wick: Ensure you use suitable wick material. Wicks that are too thin may not hold the wick upright in the candle.
Variations and Customization Ideas
- Colorful Candles: Add natural colorants during the melting process for fun colors.
- Scented Candles: You can add essential oils to the melted wax, though beeswax has a natural scent already.
- Shaped Candles: Use various dipping techniques to create unique shapes or layer colors for striped taper candles.
Storage and Shelf Life
Store your finished beeswax candles in a cool, dry place. Avoid excessive heat and direct sunlight to maintain their shape and scent. Properly stored, beeswax candles can last for several years.
Safety Tips
- Avoid direct contact with the hot wax to prevent burns.
- Always keep your workspace organized to prevent spills and accidents.
- Ensure proper ventilation when working with essential oils to avoid strong scents affecting your comfort.
Frequently Asked Questions
Q: Can I use other types of wax for dipping candles?
A: Yes, while beeswax is preferred for its natural qualities, you can also use paraffin or soy wax. However, they will have different melting points and burning qualities.
Q: How can I make my candles burn longer?
A: Aim for a thicker candle by increasing the number of dips. Also, ensure your wick is the correct size for the diameter of your candles.
Q: What should I do if my candles are uneven?
A: If your candles are uneven, you can reheat the candles and re-dip them for a smoother finish.
Q: How do I know which wick size to use?
A: A general rule of thumb is to match the wick size with the diameter of your candle. Many resources online provide wick sizing charts for various wax types and candle diameters.
Q: Can I mix scents in my beeswax candles?
A: Absolutely! Mixing essential oils can create unique scents, but remember to keep within the recommended usage rates for safety.
Q: Do beeswax candles drip?
A: Properly made beeswax candles should have very minimal dripping. Ensure your wick is the correct height and that the candle burns evenly.
Conclusion
Making hand-dipped beeswax taper candles is not only rewarding but also offers a cozy addition to your home or a heartfelt gift for friends and family. By following these practical steps and keeping in mind the tips for success, you can create beautiful, functional art right in your kitchen. So grab your materials and get dipping—your homemade candles are waiting to light up your life!