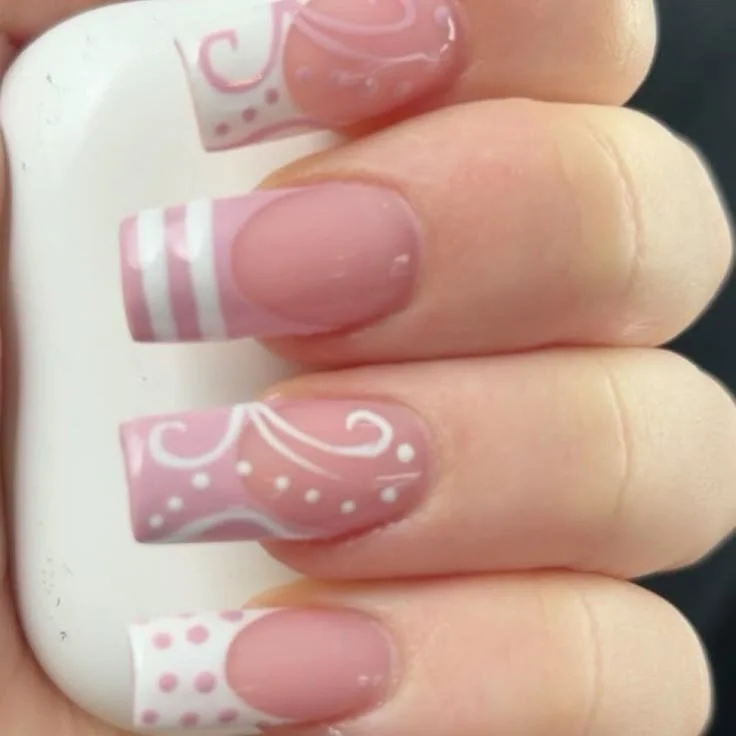

Embrace the Charm of Pink and White Nail Art with Swirls and Polka Dots
When it comes to nail art, the combination of pink and white is nothing short of a timeless classic. Pink and white nail art with swirls and polka dots creates a chic yet playful look that’s perfect for any occasion. Whether you’re headed to brunch with friends, a date night, or simply want to add a burst of personality to your everyday style, this nail design offers an adorable twist that will surely inspire you.
Why You Will Love These Nails
This pink and white nail art design is versatile, stylish, and undeniably cute. The swirls can give a sense of elegance, while the polka dots add a playful touch, making this nail art perfect for various styles and settings. The color palette is also incredibly flattering on different skin tones, ensuring that you’ll feel fabulous wearing it.
What You Need
To achieve this lovely nail art look, you’ll need the following supplies:
- Base coat: To protect your nails and enhance the longevity of your manicure.
- Pink nail polish: Choose a vibrant or pastel pink to suit your taste.
- White nail polish: A classic white for contrast.
- Top coat: For a glossy finish and protective layer.
- Nail art brush or dotting tool: Essential for creating detailed swirls and polka dots.
- Nail tape (optional): For cleaner lines if you opt for nail art with sharp edges.
How to Recreate the Look
Creating this cute nail art at home is easier than you might think! Follow these simple steps:
- Prepare Your Nails: Start with clean nails. Push back the cuticles and file your nails to your desired shape and length.
- Apply Base Coat: Use a clear base coat to protect your nails and create a smooth canvas.
- Base Color Application: Paint your nails with two coats of pink polish, allowing each layer to dry completely.
- Add White Swirls: With your nail art brush or dotting tool, carefully add swirls in white polish over the pink base. You can create light, delicate swirls or bold, sweeping curves depending on your style preference.
- Polka Dots: Once the swirls are dry, use the dotting tool to add polka dots, alternating sizes for a dynamic look.
- Top Coat: Seal your design with a clear top coat to protect your nail art and give it a beautiful shine.
- Clean Up: If you have any excess polish around your nails, gently clean it up with a small brush dipped in acetone.
Best Nail Shapes for This Design
This pink and white nail art design can be beautifully executed on various nail shapes. Here are a few suggestions:
- Almond Nails: The elegant curves of almond nails complement swirls beautifully.
- Square Nails: A more modern look that showcases intricate designs well.
- Coffin Nails: Offers a dramatic flair that can heighten the visual appeal of the polka dots and swirls.
Best Nail Length
This design is suitable for all nail lengths. If you have:
- Short Nails: The swirls and polka dots will still stand out beautifully and make your nails pop.
- Medium to Long Nails: You’ll have more space to create intricate designs, allowing for more creativity.
Color Combinations
While pink and white are the star colors of this design, you can also experiment with different shades. Consider these color combinations:
- Pastel Pink and White: For a sweet, subtle look.
- Hot Pink and Bright White: For a bolder statement.
- Light Pink and Off-White: A softer, romantic appearance.
Cute Variations to Try
To keep your nail art fresh, consider these cute variations:
- Accent Nails: Paint one or two nails on each hand entirely in white with swirls or polka dots, while keeping the rest pink.
- Gradient Effect: Blend lighter pink at the cuticle fading to a darker shade at the tip while adding white designs for depth.
- Glittery Finish: Add a sprinkle of glitter to your polka dots or swirls for some extra sparkle on special occasions.
Nails for Different Occasions
The pink and white swirl and polka dot manicure can be perfect for various occasions:
- Casual Outings: Wear this design for brunch, coffee dates, or shopping.
- Weddings or Engagements: Pair it with romantic attire for a pretty and polished look.
- Birthday Parties: Add a festive twist by incorporating sparkles and brighter shades.
Seasonal Ideas
Adapt your pink and white nail art to suit the seasons:
- Spring: Use pastel shades and incorporate floral designs with your swirls.
- Summer: Go for bright pinks and pair with fruity colors for a fun, beach-ready look.
- Fall and Winter: Add deeper shades of pink and white with frost-like swirls for a cozy vibe.
Beginner Tips
If you’re new to nail art, start with these simple tips:
- Practice: Get comfortable using your nail art brush on a piece of paper first.
- Take Your Time: Don’t rush while painting. Let each layer dry to avoid smudging.
- Watch Tutorials: Check out online videos for a visual guide that can help you through the process.
How to Make Your Manicure Last Longer
To ensure your nail art looks fabulous for as long as possible, consider the following tips:
- Use a Quality Base Coat and Top Coat: Invest in long-lasting formulas to prevent chipping.
- Avoid Hot Water: For the first 24 hours after your manicure, avoid soaking your hands in hot water.
- Moisturize: Keep your cuticles hydrated with cuticle oil to prevent peeling or breaking.
Frequently Asked Questions
How long will this design last?
With proper care and application, pink and white nail art with swirls and polka dots can last up to two weeks.
Can I use gel polish for this design?
Absolutely! Gel polish can provide additional durability and a glossy finish that enhances your nail art.
What should I do if I make a mistake while painting?
No worries! Use a small brush with acetone to touch up any mistakes before your top coat is applied.
Conclusion
The beauty of pink and white nail art with swirls and polka dots lies in its versatility and charm. It’s an ideal choice whether you’re feeling playful or want a sophisticated look. With just a few supplies and a bit of creativity, you can recreate this beautiful design and shine brightly in every setting. So why not take these ideas and put your unique spin on them? Happy painting!